
On this tutorial, I’ll information you thru establishing the DJI O4 Lite Air Unit in any FPV drone. This consists of wiring it to the flight controller, configuring Betaflight OSD, and sharing helpful ideas together with the finest transmission and digicam settings to realize optimum efficiency in your particular wants.

Nonetheless debating whether or not to get the DJI O4 Lite? Take a look at my assessment: https://oscarliang.com/dji-o4-air-unit-lite/
The place to Purchase?
You should buy the DJI O4 Lite Air Unit from the next retailers:
At present, elements are usually not bought individually, that means in the event you break the digicam or transmission module, you’d have to switch the complete air unit. Hopefully, spare elements will turn into accessible sooner or later to make repairs extra inexpensive. Nevertheless, the antenna is well detachable and replaceable.

Mounting
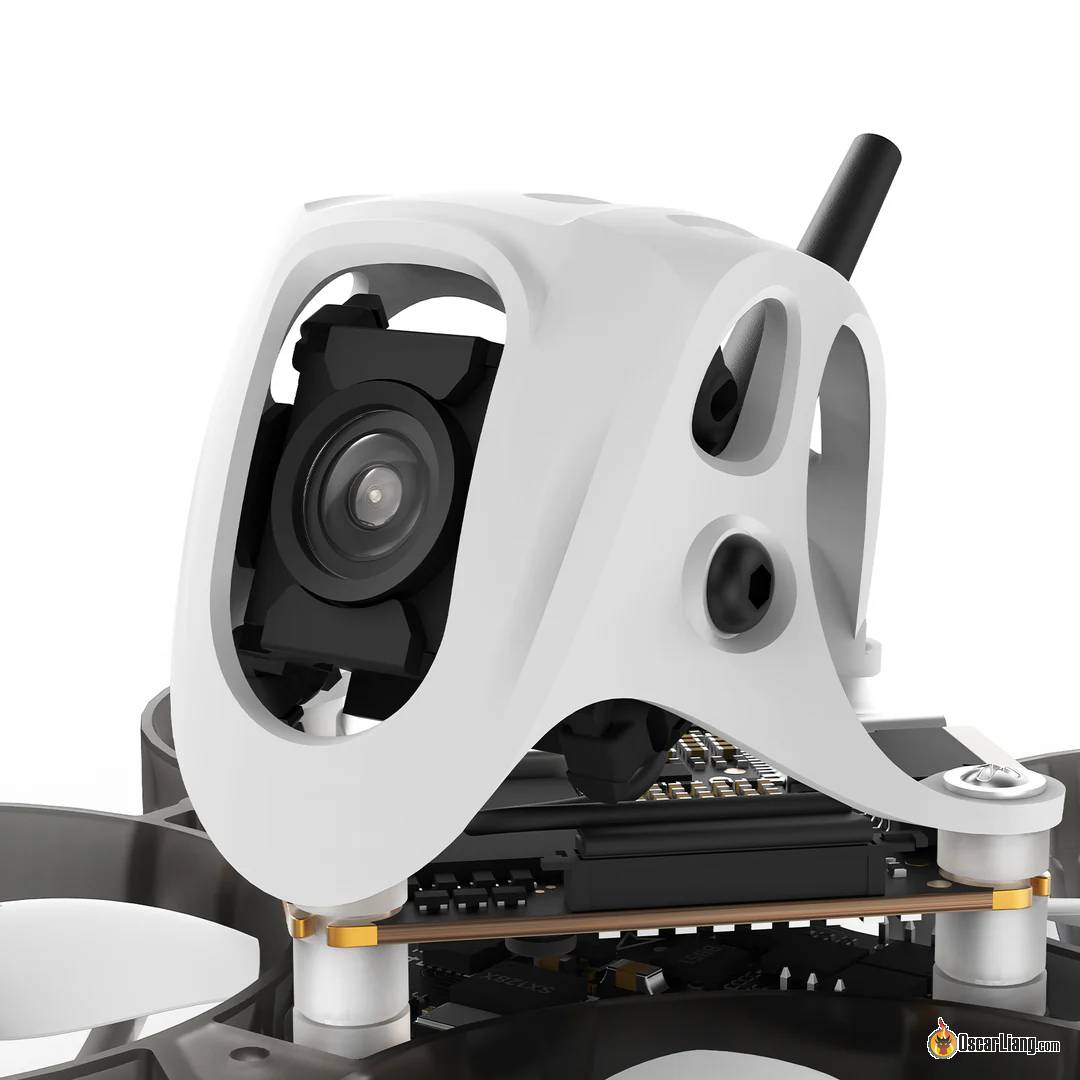
The O4 Lite Air Unit is designed for micro-sized FPV drones, corresponding to tinywhoop and ultralight quads. Since these small drones usually use a flight controller with a 25.5×25.5mm mounting sample, it’s potential to mount the O4 AU straight on high as a part of a single stack.
Many trendy frames have devoted areas within the rear for mounting the VTX, however this may increasingly not at all times work for the O4 Lite because of its brief digicam cable (solely 5cm lengthy).
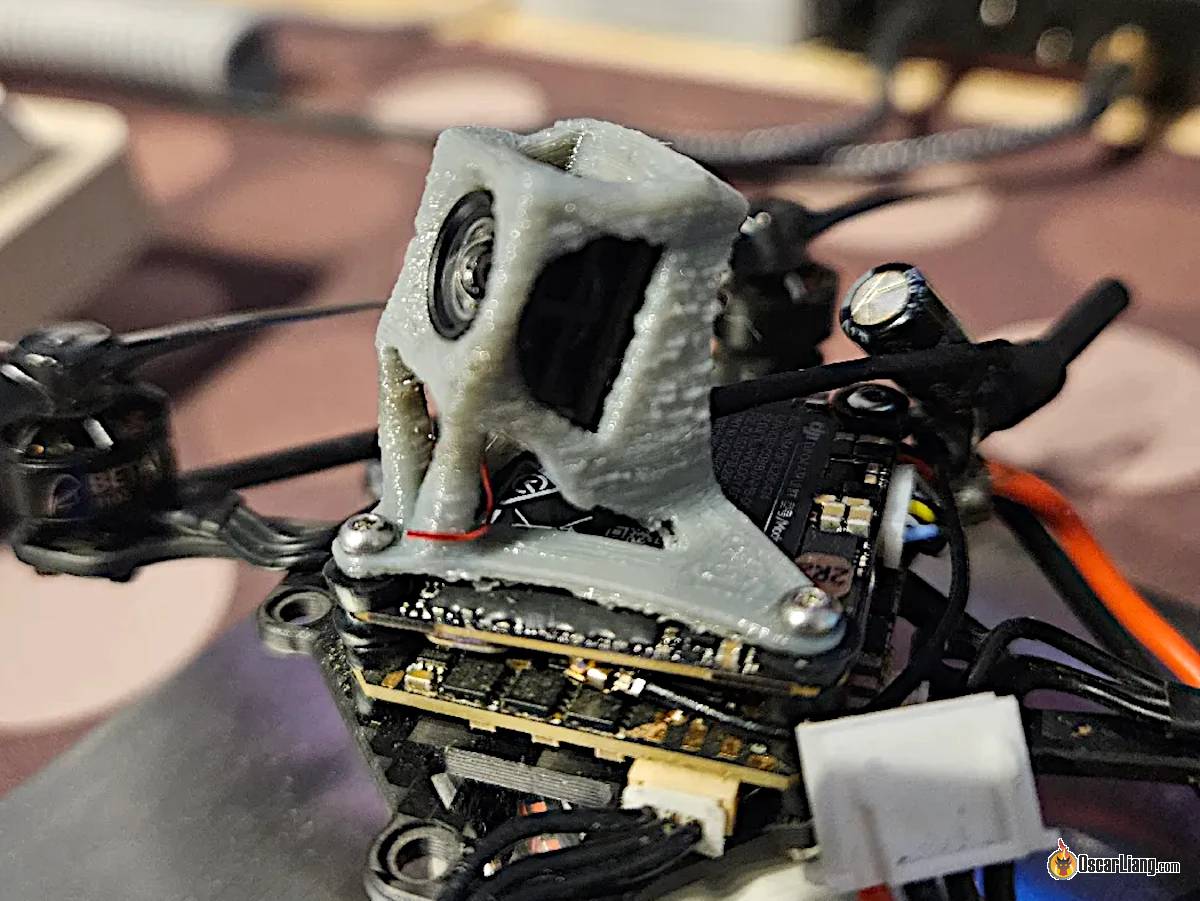
Picture Credit score: Calpulz
The actual problem is mounting the digicam because of its unconventional mounting system. You probably have entry to a 3D printer, you may design a customized mount in your current body. In any other case, you would possibly must buy a brand new body designed particularly for the DJI O4 Lite. Simply to call a few these new frames:
Moreover, ensure the antenna is securely strapped to one thing like the cover. The antenna is barely friction-fitted, that means the U.FL connector may pop off in a crash.
Disconnecting Digicam and Antenna
It’s potential to disconnect the digicam from the transmission module, however the coaxial cable/connectors are glued in place. Until you possibly can reapply the glue after reconnection, I don’t suggest disconnecting them. Eradicating or changing the antenna is simple although.
Powering the O4 Lite
The O4 Air Unit (Lite) could be powered straight from a 1S, 2S, or 3S LiPo battery (3.7–13.2V). Nevertheless, the Air Unit might turn into unreliable and even shut down when the voltage drops under 3.7V. Subsequently, it’s not really useful to energy the O4 Air Unit straight from a 1S LiPo. As an alternative, energy it from a secure 5V or 9V BEC on the flight controller, which additionally supplies further safety towards voltage spikes.
Energy necessities:
- Max energy consumption: ~6W
- Present draw at 700mW: 5V 1.2A or 9V 0.67A
- Advisable BEC: Minimal 5V 2A BEC or 9V 1A BEC (You probably have different power-hungry units, think about using a higher-rated BEC)
Flight Controller Connection
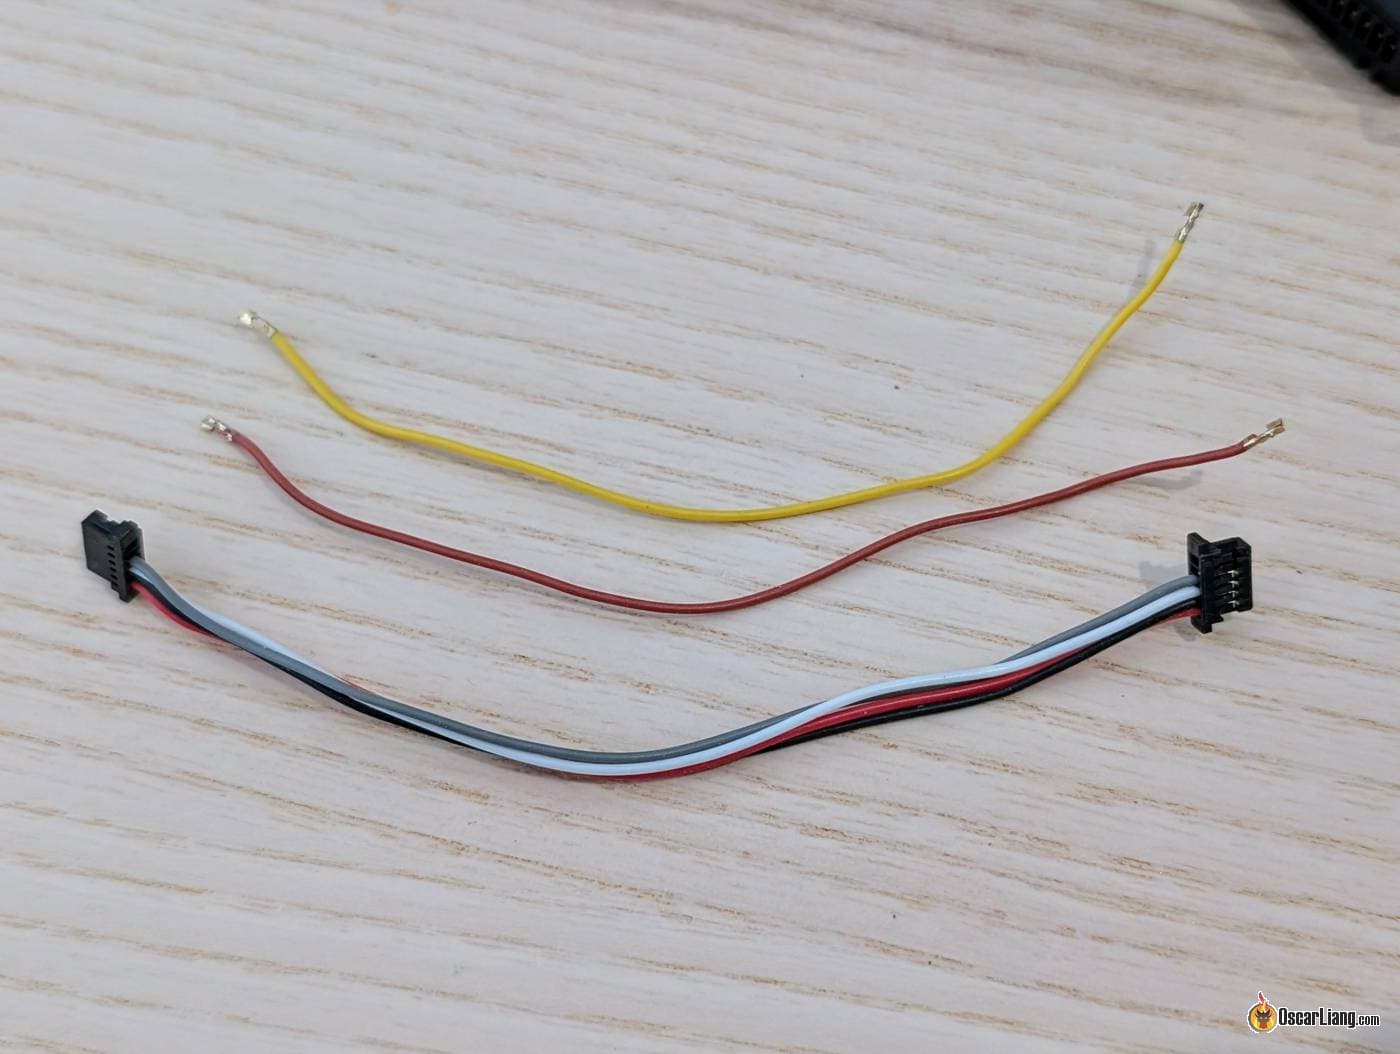
The DJI O4 Lite Air Unit makes use of the identical 6-pin connector and pinout because the O3 and O4 Professional, making it plug-and-play with any flight controller designed for current DJI Air Models. Nevertheless, you need to at all times double-check the wiring upon connection to keep away from any surprises.
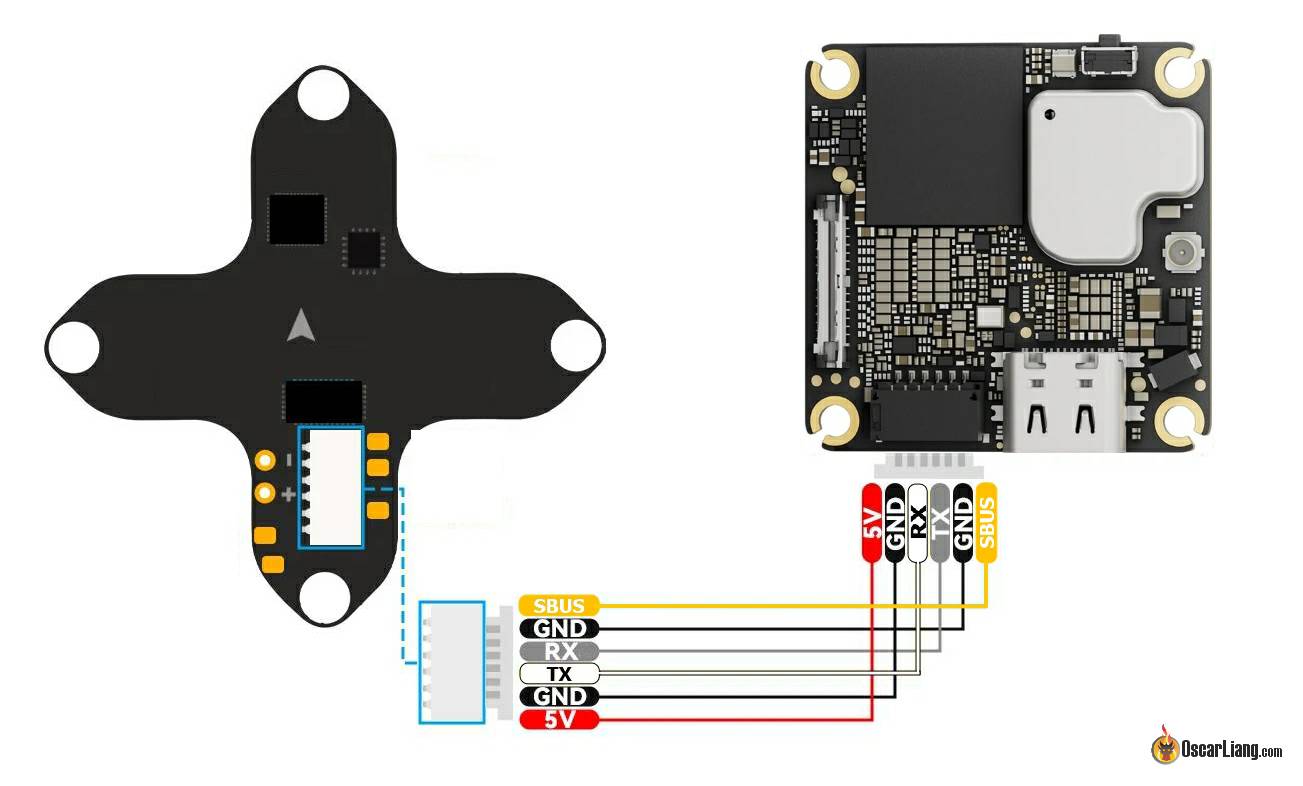
Pinout of the 6-pin connector:
- VCC: Energy provide
- GND: Floor
- RX/TX: Required for OSD and telemetry (e.g., displaying battery voltage and arming detection)
- GND and SBUS: For DJI Distant Controller (optionally available)
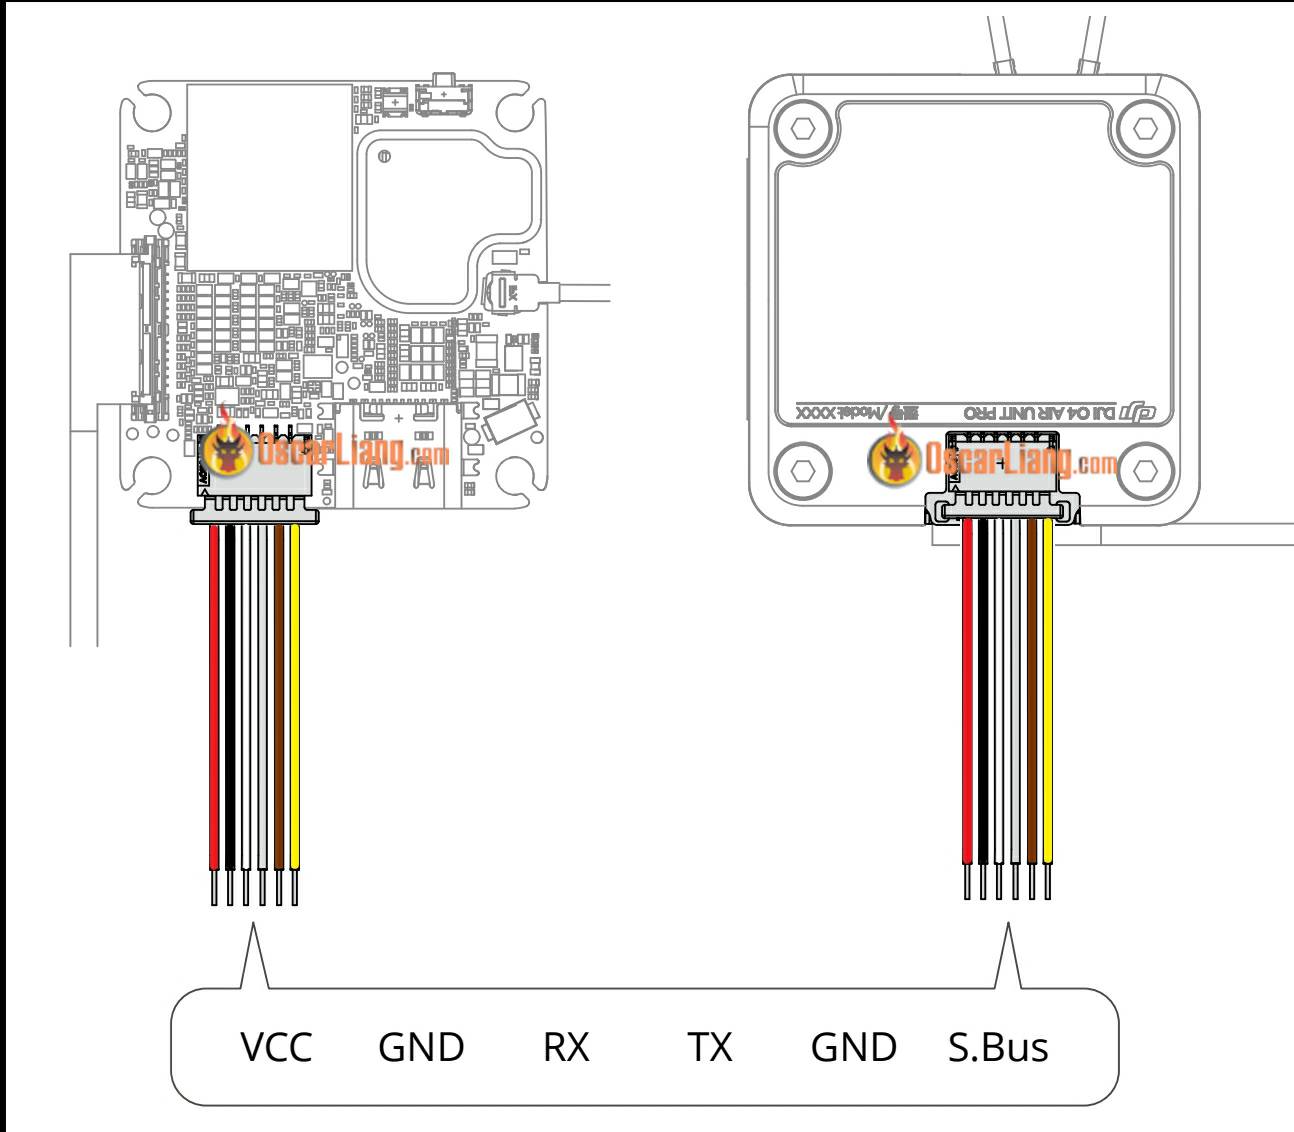
Not like the O4 Professional, the O4 Lite doesn’t have solder pads. If you wish to solder it on to the flight controller, you’ll need to lower off the connector from the cable and strip the wires.
If you’re not utilizing a DJI Distant to manage the drone, and are as a substitute utilizing your individual radio receiver, it’s really useful to take away the SBUS wire (DJI HDL) from the connector. This could forestall potential conflicts. Use a pointy instrument, corresponding to a pin or needle, to barely raise the tab within the connector and pull the wire out. On this case you may additionally take away the extra floor wire (brown).
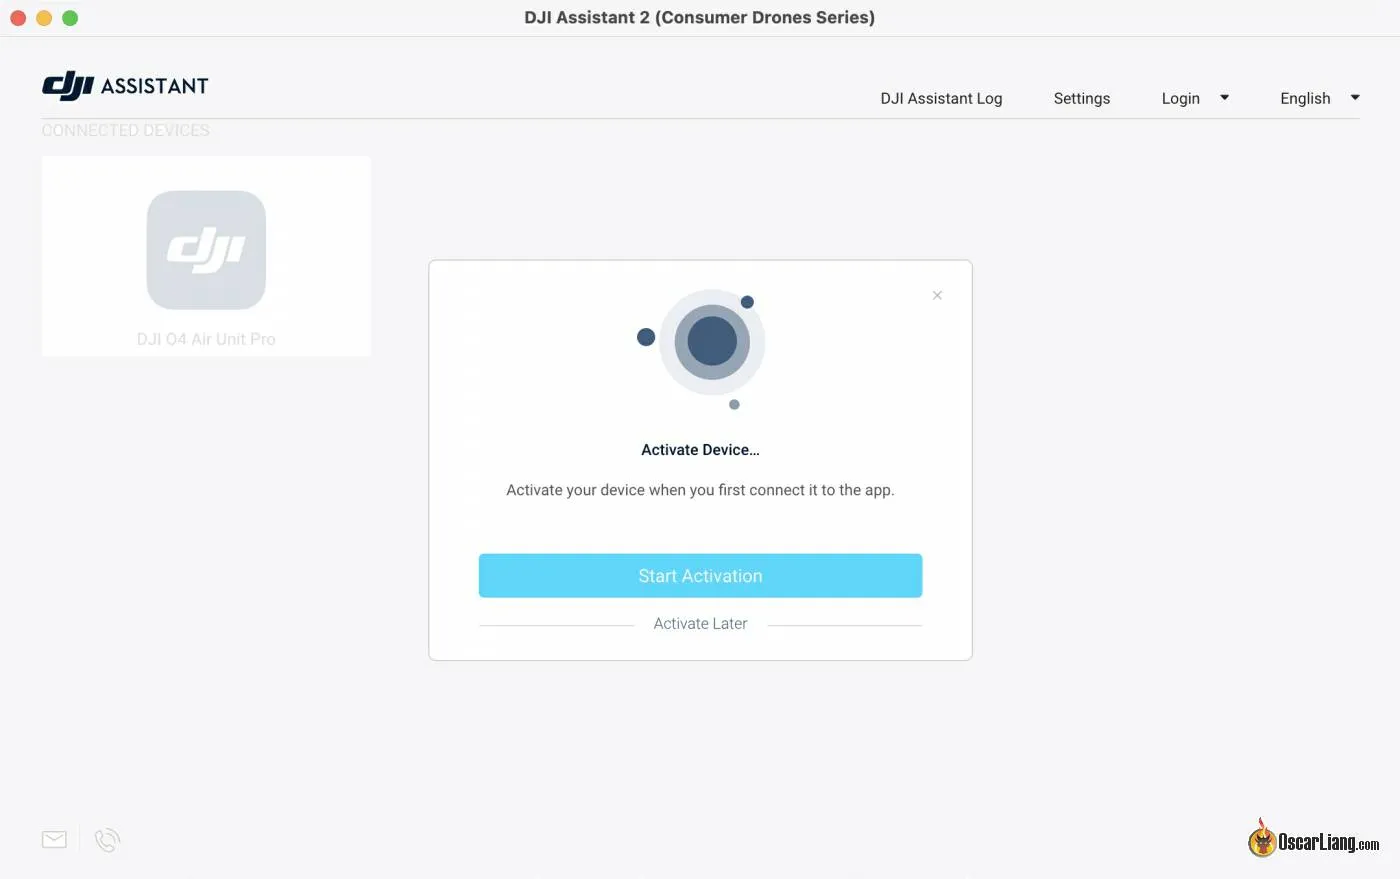
Activation
As soon as the O4 Lite is related to the flight controller (FC), it’s time to activate it. If the Air Unit was beforehand activated, this step just isn’t required.
Professional Tip: that the O4 Air Unit should be powered by a battery or a accurately rated energy provide throughout activation. Not like the O3, it can’t be activated utilizing simply the USB-C cable. Though the USB-C cable just isn’t included, any USB-C knowledge cable will work.
Obtain DJI Assistant 2 (Shopper Drone Collection): https://www.dji.com/nl/downloads/softwares/dji-assistant-2-consumer-drones-series.
You probably have put in it, it’s nonetheless a good suggestion to obtain and re-install the most recent model.
Professional Tip: activation CANNOT be completed within the DJI Fly App.
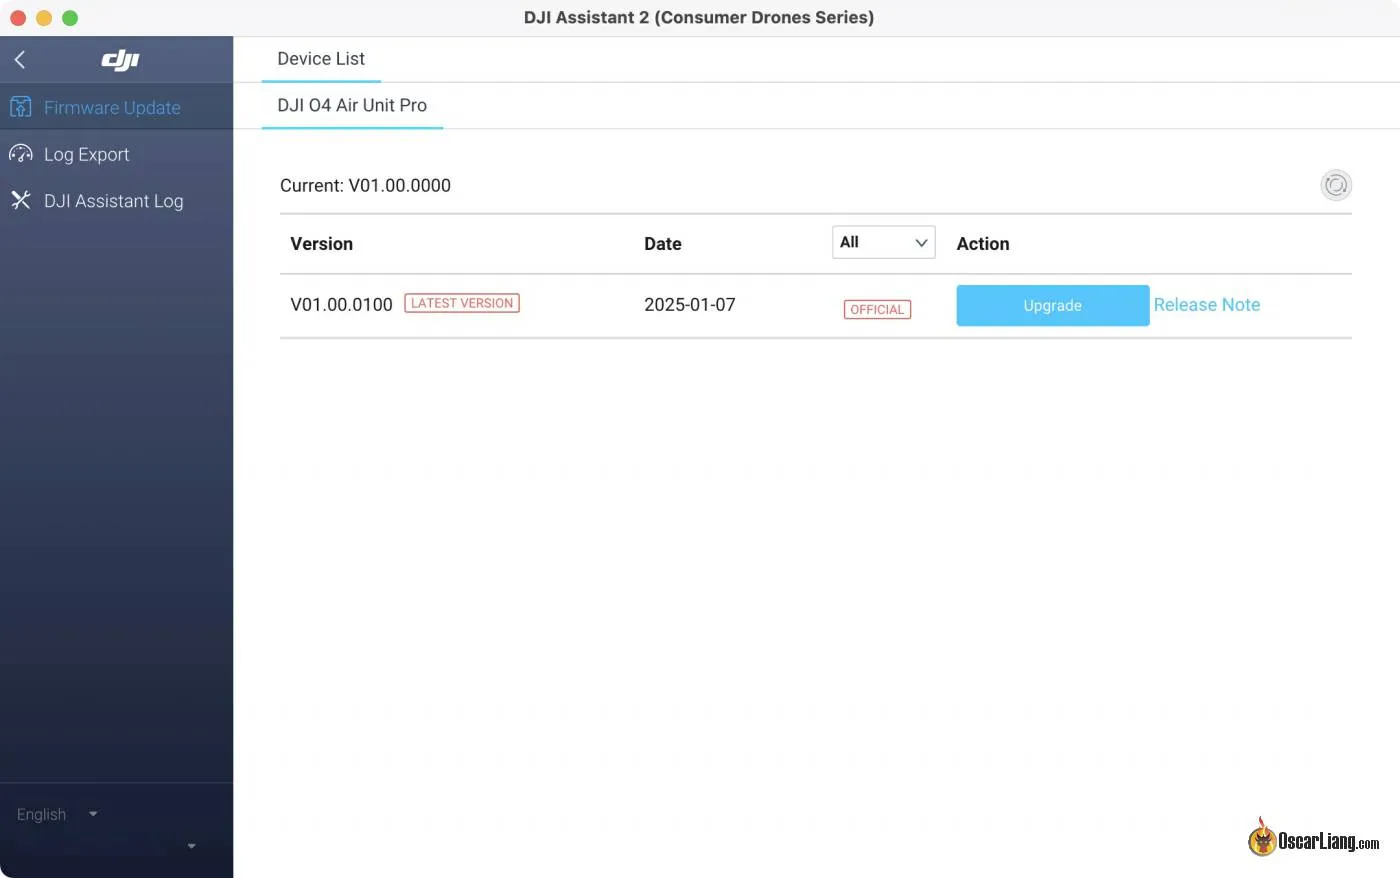
Firmware Replace
Whereas related to DJI Assistant 2, test if new firmware is accessible in your O4.
Professional Tip: For firmware updates, you possibly can safely unplug the battery through the course of to keep away from heating.
Pairing DJI Goggles 3 with O4 Lite
Earlier than pairing, guarantee your Goggles 3 firmware is up to date to the most recent model. With out this replace, you gained’t get the O4 Professional and O4 choices within the menu. Observe these steps:
Replace Firmware
- Activate the Goggles 3 and join them to your pc utilizing a USB-C knowledge cable.
- Replace the firmware through DJI Assistant 2.
Professional Tip: If the Goggles 3 doesn’t seem in DJI Assistant 2, navigate to the goggles menu:
Settings → About → OTG Wired Connection and allow it.
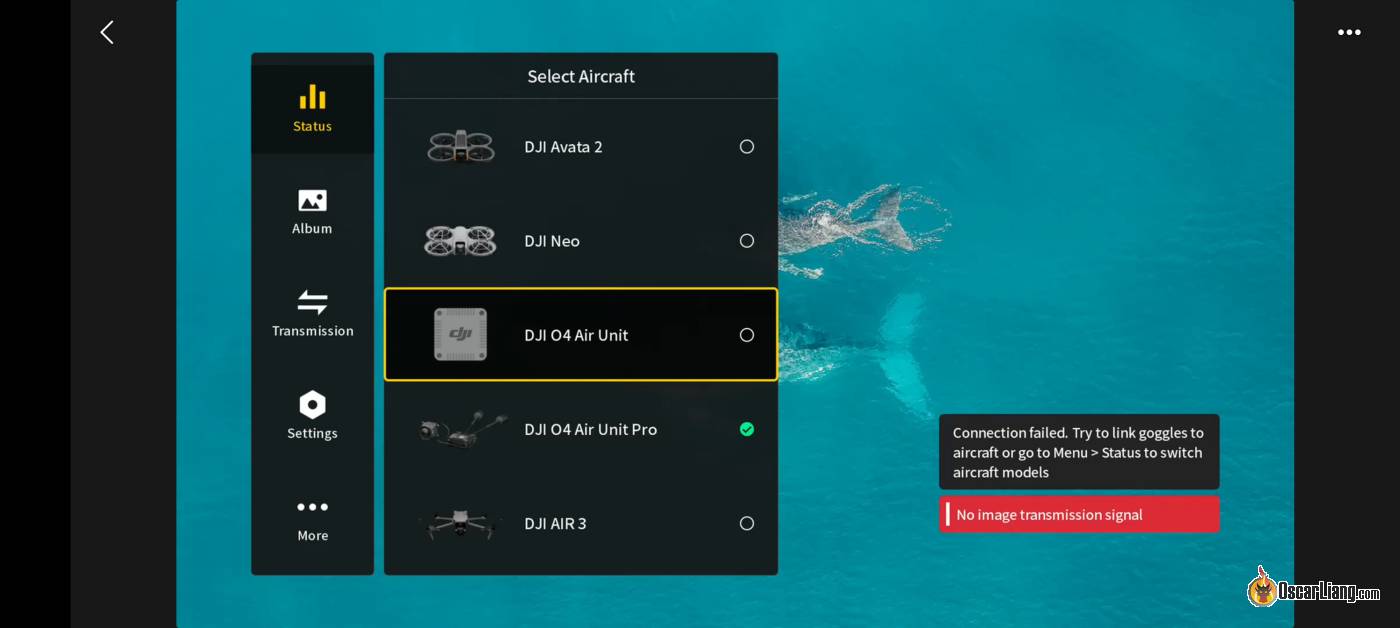
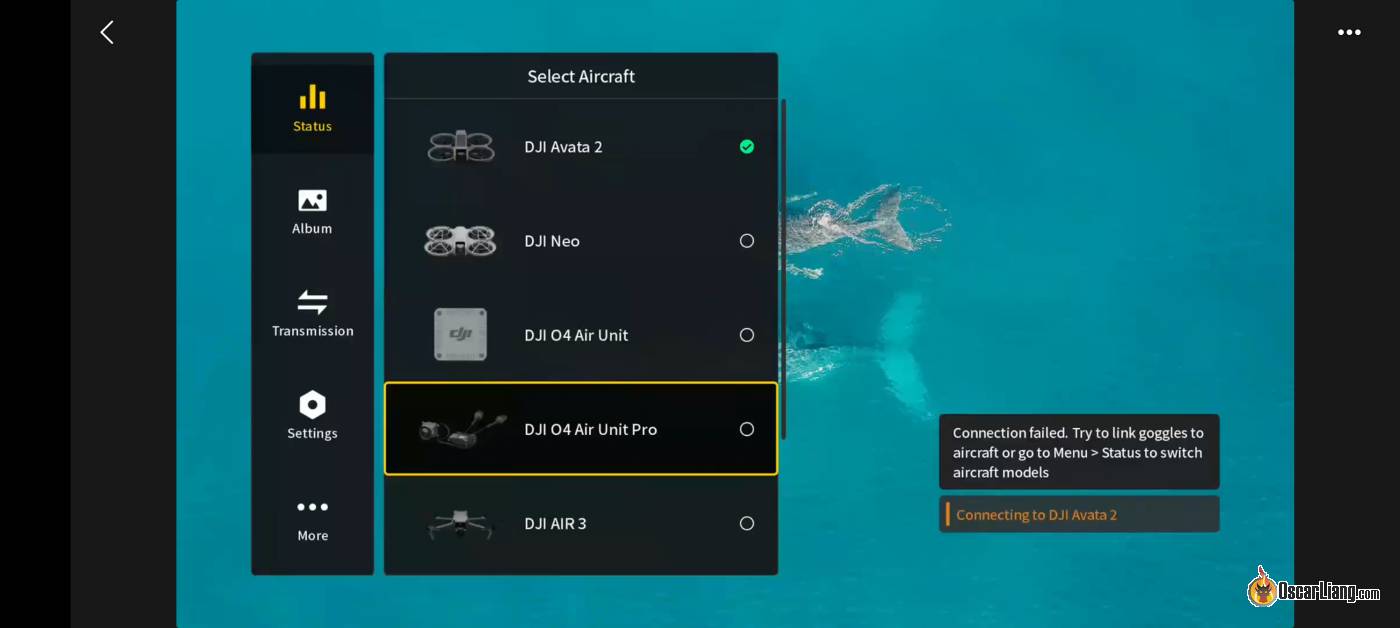
Choose O4 Air Unit Professional within the Goggles Menu
- Go to the goggles menu, navigate to Standing → Swap, and choose “DJI O4 Air Unit.”
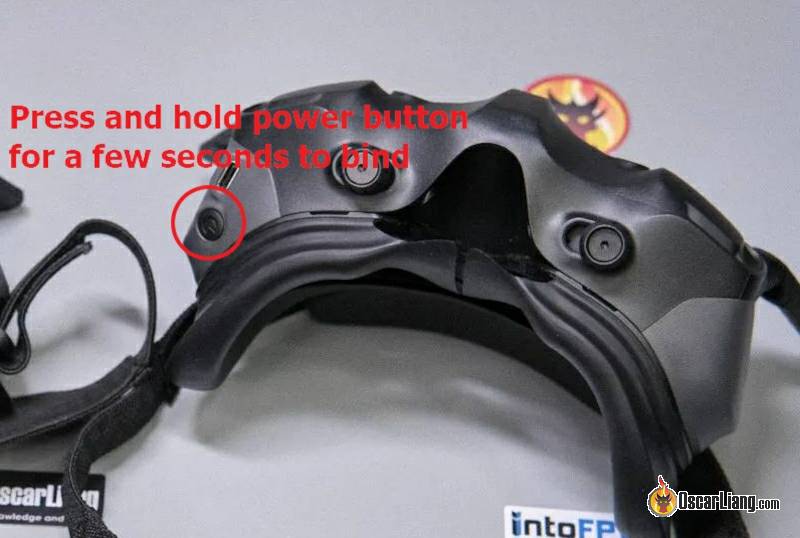
Enter Bind Mode
- Press and maintain the facility button on the goggles till they begin beeping, indicating they’re in bind mode.
Energy on the O4 Air Unit
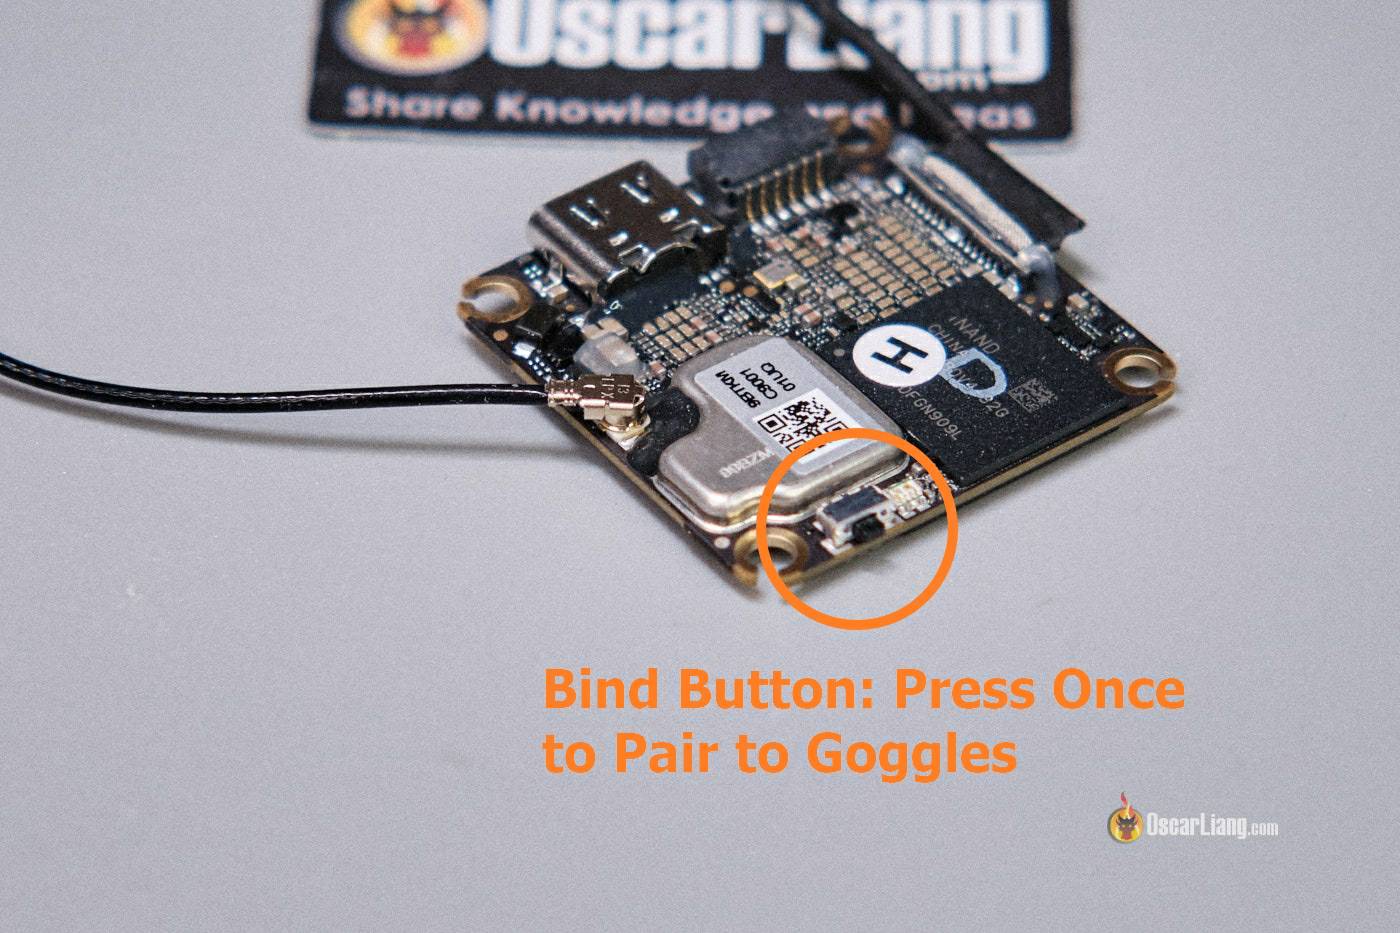
- Look ahead to the LED on the Air Unit to show crimson.
- Press the bind button on the Air Unit. The crimson LED will start flashing slowly, indicating it’s in bind mode.
Full Binding
- Binding is profitable when the LED on the Air Unit turns strong inexperienced, and the goggles show the digicam feed.
Pairing Goggles 2/Integra with O4 Lite
To make use of the O4 Air Unit with Goggles 2 (or Integra), you’ll must replace the firmware on each units. And don’t fear, you’ll nonetheless get compatibility with the O3 Air Unit, in addition to older DJI FPV Air Models and the Vista system.
Professional Tip: If you happen to’re utilizing a Mac and encounter connection points (e.g., Goggles 2 not showing in DJI Assistant 2), it is a identified drawback. Sadly, there isn’t a dependable repair. A workaround is to replace utilizing the DJI Fly App in your smartphone or swap to a Home windows PC for the firmware replace.
After the replace, go to the goggles menu and choose both O4 Air Unit or O3 Air Unit below the settings.
Press the hyperlink button between the lenses on the Goggles 2 to enter bind mode.

Energy on the O4 Air Unit and anticipate the LED to turn into crimson. Press the bind button on the Air Unit. The crimson LED will flash, indicating bind mode. Binding is profitable when the LED turns strong inexperienced, and the digicam feed seems in your goggles.
Switching Between Professional and Lite
If you happen to use each the O4 Professional and O4 Lite, keep in mind to change between them within the goggles menu earlier than flying. Every time you fly with a unique unit, you’ll must manually choose the corresponding Air Unit within the goggles settings.
Unlock FCC Mode
In case your Goggles 3 are shipped with CE mode (to adjust to European laws), they are going to be restricted by way of output energy (solely 25mW) and channels. There might be just one accessible channel within the 40MHz mode and three accessible channels within the 20MHz mode.
In FCC mode, you need to have the utmost 1200mW output energy choice, and there needs to be 7 accessible channels within the 20MHz mode, and three accessible channels within the 40MHz and 60MHz mode.
For goggles in CE mode, it’s potential to carry out the “FCC hack” to unlock greater output energy (extra vary and sign penetration) and extra channels (permits extra pilots within the air on the identical time), however solely do that if it’s authorized the place you fly.
To change to FCC mode, merely get the file “ham_cfg_support”, unzip it to the foundation listing of the SD card and put it within the goggles, energy on goggles, that’s it.
Obtain file right here: https://drive.google.com/file/d/1ug2U_i5kdrKQQ2I17NLJBXm2tKQeNj5Q/view?usp=share_link
To test if you’re in FCC mode, go to Settings => Transmission => Channel Mode, swap to Handbook, below 40MHz or 60MHz bandwidth, you need to see 3 channels accessible in FCC mode. If it should solely present 1 channel there, you’re in CE mode.
As soon as FCC mode is unlocked, you gained’t must do it once more. You possibly can return to CE mode by manufacturing facility reset the goggles (within the menu Settings => About).
Setup OSD in Betaflight
The DJI O4 Air Unit absolutely helps the Betaflight OSD, together with the Betaflight OSD menu and all accessible OSD parts.
Go to the Presets tab, and seek for “dji”, the “FPV.WTF MSP-OSD” preset ought to pop up. In choices, choose the UART you’ve related to the O4 Lite Air Unit.

To allow HD OSD, go to the settings menu within the goggles, Settings > Show > Canvas Mode, and choose HD OSD.
This lets you show the OSD with smaller fonts and drag OSD parts all the best way to the sides of the display. If you choose Regular Mode, the font will seem a lot bigger.
Lastly, go to the OSD tab in Betaflight Configurator. Below Video Format, guarantee HD is chosen.

Setup DJI Distant Controller
If you happen to’re utilizing a third-party radio hyperlink, you possibly can skip this part.
Utilizing DJI’s distant controller eliminates the necessity to wire a separate radio receiver to the flight controller, because the DJI O4 Air Unit additionally serves as an RC hyperlink. This simplifies the setup course of. Nevertheless, there are just a few downsides to think about:
- Fundamental performance: DJI’s distant controllers lack the superior options and management precision supplied by extra subtle techniques like ExpressLRS.
- Failsafe dependency: Because the video and radio alerts share the identical hyperlink, shedding the video sign additionally ends in a failsafe, which isn’t the case with superior RC hyperlinks like ExpressLRS that usually outperform video hyperlinks considerably.
Suitable DJI Distant Controllers:
- RC2: Works solely with the Goggles 2 and Integra.
- RC3: Works solely with the Goggles 3 and N3.
Pairing the DJI Distant Controller 3:
- Energy in your goggles 3 and RC3.
- Lengthy-press the energy button on each the goggles and distant controller to enter linking mode.
- As soon as the units are efficiently linked:
- The goggles will cease beeping and show the stay view.
- The distant controller will cease beeping.
Configuring Betaflight:
- Within the Ports tab, allow Serial RX for the UART related to the SBUS wire.
- Within the Receiver tab, set the protocol to SBUS (through UART).
Movies Recording
The O4 Air Unit has 23GB of onboard reminiscence for recording flight footage. Relying on the decision you choose, it might retailer roughly 30 to 45 minutes of recordings. Sadly, it doesn’t assist micro SD playing cards, so ensure to offload footage often; in any other case, the unit would possibly cease recording till you release reminiscence.
You possibly can begin recording through the use of the Report button within the goggles’ high menu. Alternatively, you possibly can configure the O4 Air Unit to start out recording robotically whenever you arm the quad within the system menu. Navigate to Settings → Digicam → Superior Digicam Settings to allow this selection, which many pilots discover extra handy.
Out there Resolutions & Body Charges:
- 4K 60fps
- 4K 50fps
- 4K 30fps
- 1080p 120fps
- 1080p 100fps
- 1080p 60fps
- 1080p 50fps
- 1080p 30fps
Obtain Video
To obtain movies, plug within the USB cable, an exterior drive will seem in your pc, containing all of the recorded footage. To obtain video off the Goggles, you need to energy them on first, in any other case connecting the USB cable does nothing.
Video Stabilization
Video stabilization helps clean out flight footage by lowering shakiness and vibrations. The O4 Air Unit helps two stabilization strategies: RockSteady and Gyroflow.
- RockSteady is built-in and could be enabled within the goggles’ menu. It stabilizes footage robotically throughout recording, providing respectable outcomes with minimal effort. To allow RockSteady, set Recording Stabilization to ON.
- Gyroflow is an open-source, software-based stabilization instrument that gives extra flexibility. It means that you can fine-tune stabilization settings in post-processing. With Gyroflow, the uncooked footage stays unstabilized, supplying you with full management over how a lot stabilization to use. To make use of Gyroflow, set Recording Stabilization to OFF.
For finest outcomes with Gyroflow, use the next settings:
- Facet Ratio: 4:3
- Digicam FOV: Broad
- Recording Stabilization: OFF
Gyroflow is straightforward to make use of, and I’ve created a tutorial explaining the way it works: https://oscarliang.com/gyroflow/
Find out how to Keep away from Jello and Vibration
Much like the O3, the O4 digicam is extremely delicate to vibrations, making it essential to isolate the digicam from vibration sources or get rid of vibrations altogether.
Keep away from utilizing 24kHz PWM frequency in your ESC settings, as decrease PWM frequencies can enhance vibrations and noise. As an alternative, use a greater frequency, corresponding to 48kHz, for optimum efficiency.
Mounting the O4 digicam straight on carbon fiber or CNC aluminum is not really useful, as vibrations can switch straight from the motors to the digicam, inflicting jello in your footage. As an alternative, use a mushy mounting materials that gives vibration dampening. Many new frames embody silicone or rubber inserts/spacers particularly designed for mounting the O4 FPV cameras, serving to to cut back vibrations considerably.
Greatest O4 Professional Settings
Not like the O4 Air Unit Professional, the usual O4 Air Unit solely helps one coloration mode: Regular. There’s no D-Log M mode, which is most popular by cinematographers. Whereas this may increasingly restrict superior coloration grading choices, it simplifies the decision-making when selecting the most effective settings.
Not like the O4 Air Unit Professional, the O4 Air Unit solely has one coloration mode: Regular. There isn’t any D-Log M mode which is most popular by cinetographers. However this limitation additionally makes our resolution simpler relating to what settings we should always run.
Advisable Digicam Settings for the Greatest FPV Expertise (For many who prioritize low latency and don’t care a lot about recording high quality):
- Facet Ratio 4:3
- Video High quality: 1080p 100fps (provides the bottom latency)
- Digicam FOV: Broad
- Auto ISO Restrict: 6400
- Auto Mode
Advisable Digicam Settings for the Greatest HD Recording (For these Utilizing ND filter, Gyroflow stabilization, and Shade grading):
- Facet Ratio 4:3
- Video High quality: 4K 60fps (30fps could be higher for low gentle, however it might enhance latency, making correct flying tougher.)
- Digicam FOV: Broad
- Recording Stabilization: OFF
- Sharpness: -2 (you possibly can enhance sharpness in post-editing if wanted)
- Noise Discount: 0 (or +1 in low-light conditions to cut back noise in darkish areas)
- Digicam Mode: Handbook
- Shutter Velocity: 1/120
- Auto ISO
- Auto ISO Restrict: 200 – (set this as little as potential to keep away from graininess; nevertheless, too low would possibly make the picture too darkish.)
- White Stability: Put White Stability on Auto first and see what the system select, then lock in with that worth, so WB is mounted throughout flight
Advisable Digicam Settings for Respectable HD Recording (For many who favor little to no modifying):
- Facet Ratio 4:3
- Video High quality: 4K 60fps
- Digicam FOV: Regular
- Auto ISO Restrict: Set as little as potential in your lighting situations. If not sure, go away it on the default (6400). Observe that greater ISO might result in grainier photos in darkish areas, however it ensures visibility.
- Recording Stabilization: ON
- Shade: Regular
- Digicam Mode: Auto
- White Stability: Auto
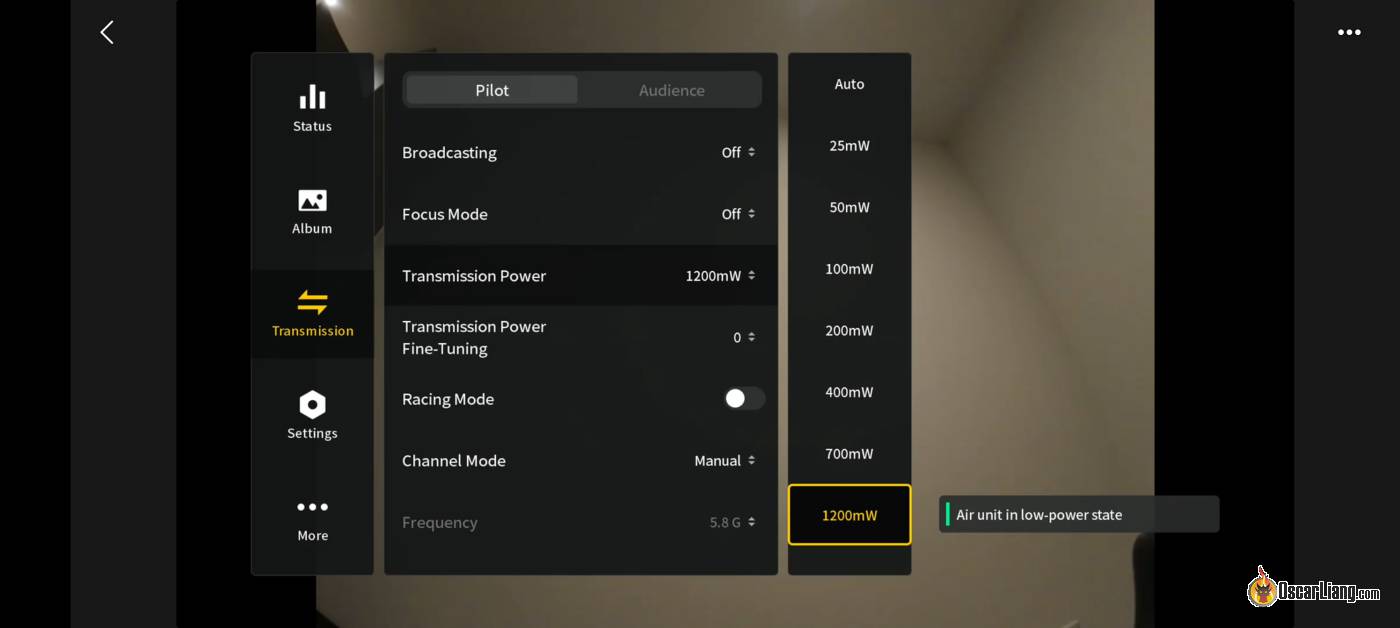
Advisable Transmission Settings for Solo Flying
- Race Mode: OFF
- Transmission Energy: Use the very best energy stage legally allowed, or simply set it to Auto.
- Channel Mode: Handbook
- Bandwidth: 60MHz (60mbps bitrate)
Advisable Transmission Settings When Flying with Different Pilots
- When flying with different DJI pilots: Contemplate lowering transmission energy and utilizing smaller bandwidth.
- When flying with pilots utilizing different FPV techniques (e.g., Analog, HDZero): Allow Race Mode to cut back interference.
Race Mode
Race Mode is a function designed particularly for FPV racing, accessible solely on the DJI Goggles 3 and N3, however not on the Goggles 2 and Integra because of {hardware} limitations. It optimizes the system for low-latency efficiency and minimizes interference in race environments by aligning its channel frequencies to Race band. Right here’s what Race Mode provides:
- Lowest Latency: Race Mode forces the system into 100fps with a 20MHz bandwidth, reaching latency as little as 20ms.
- Channel Alignment: Channels align with customary race band frequencies, making it extra suitable with different FPV techniques.
- Cleaner Sign: The telemetry hyperlink now operates on the identical static frequency because the video sign, lowering interference with different pilots. When the Air Unit is off, the goggles cease transmitting altogether, permitting pilots to stroll round with out affecting others.
- Commerce-offs: Narrower bandwidth and decrease energy output cut back vary and penetration, making it unsuitable for freestyle, cinematic, or long-range flying. Nevertheless, these limitations are acceptable for racing, which usually happens in open fields.
Warning: Keep away from powering in your Air Unit whereas others are within the air, because it momentarily sweeps throughout the band, probably inflicting interference for individuals who are nonetheless within the air. For all different forms of flying, regular mode provides higher RF efficiency.
Transmission Energy Tremendous Tune
This function means that you can fine-tune the output energy of your VTX by ±1mW to ±7mW to make sure compliance with racing occasion laws. For many customers, this setting isn’t crucial except you’re attending a regulated racing occasion the place exact energy ranges are required.
Spectator Mode
The Spectator Mode helps you to watch different pilots flying with the O4 Air Unit, however it comes with compatibility limitations:
- Goggles 3 and N3 customers can solely spectate different pilots utilizing G3 and N3.
- Goggles 2 and Integra can solely spectate different pilots utilizing G2 and Integra.
Spectator Mode doesn’t work throughout these two generations, so make sure you’re utilizing the identical era goggles because the pilot you need to spectate.
Conclusion
Establishing the DJI O4 Lite Air Unit in your FPV drone is simple, particularly in the event you observe the wiring, mounting, and configuration steps outlined on this information. Whereas the O4 Lite has some limitations in comparison with the O4 Professional, it stays a robust and light-weight choice for micro FPV drones. Be sure to often offload recorded footage, optimize mounting for the antenna and digicam, and select a dependable energy supply to make sure the most effective efficiency. Glad flying!

