")
On this tutorial, I’ll share how I take advantage of Blackbox logs to tune filters and PID on a Betaflight FPV Drone. I will probably be utilizing PIDToolBox as the first instrument for filter and PID tuning, with Blackbox Explorer as a secondary instrument for Feedforward and common troubleshooting.

Disclaimer: This information is supposed for informational functions solely. The creator holds no duty for damages ensuing from actions taken by the readers.
Blackbox isn’t a should for tuning as defined on this information, however it supplies full perception into what’s occurring with the drone and means that you can unleash its full potential. Issues like noise filtering and tiny overshoots are seen solely in Blackbox. If you happen to’re a perfectionist or simply somebody who likes to tinker, that is the tutorial for you.
If you’re new to Blackbox, be sure that to take a look at the Blackbox for newcomers tutorial..
I spent over 200 hours making this 8000-word tutorial! If you happen to discover my content material helpful, please think about supporting my work.
Getting Began
Tuning objectives
Utilizing Blackbox to tune our FPV drone, we purpose to attain two major objectives:
- Extra Efficient Use of Filters: Use minimal filtering to reduce delay however sufficient to maintain noise at a suitable stage.
- Optimized PID Positive factors and Associated Settings: Make sure the drone flies exactly and responsively.
Primary configurations
0. {Hardware} Guidelines
- Flight Controller (FC) Stack: Select an FC stack with rubber grommets (gummies) for sturdiness and noise efficiency.
- Steel Screws: Use steel screws for the FC stack; keep away from nylon/plastic screws/standoffs as they’re vulnerable to breakage and vibrations. If spacers are wanted, use comfortable silicone ones. Lighter titanium screws can save just a few grams.
- Locking Stack Screws: Safe the stack screws firmly with a steel nut earlier than mounting the 4in1 ESC. In case your body has pressed insert nuts, extra nuts will not be wanted. Tighten screws by hand first, then give a remaining squeeze with a wrench/screwdriver.
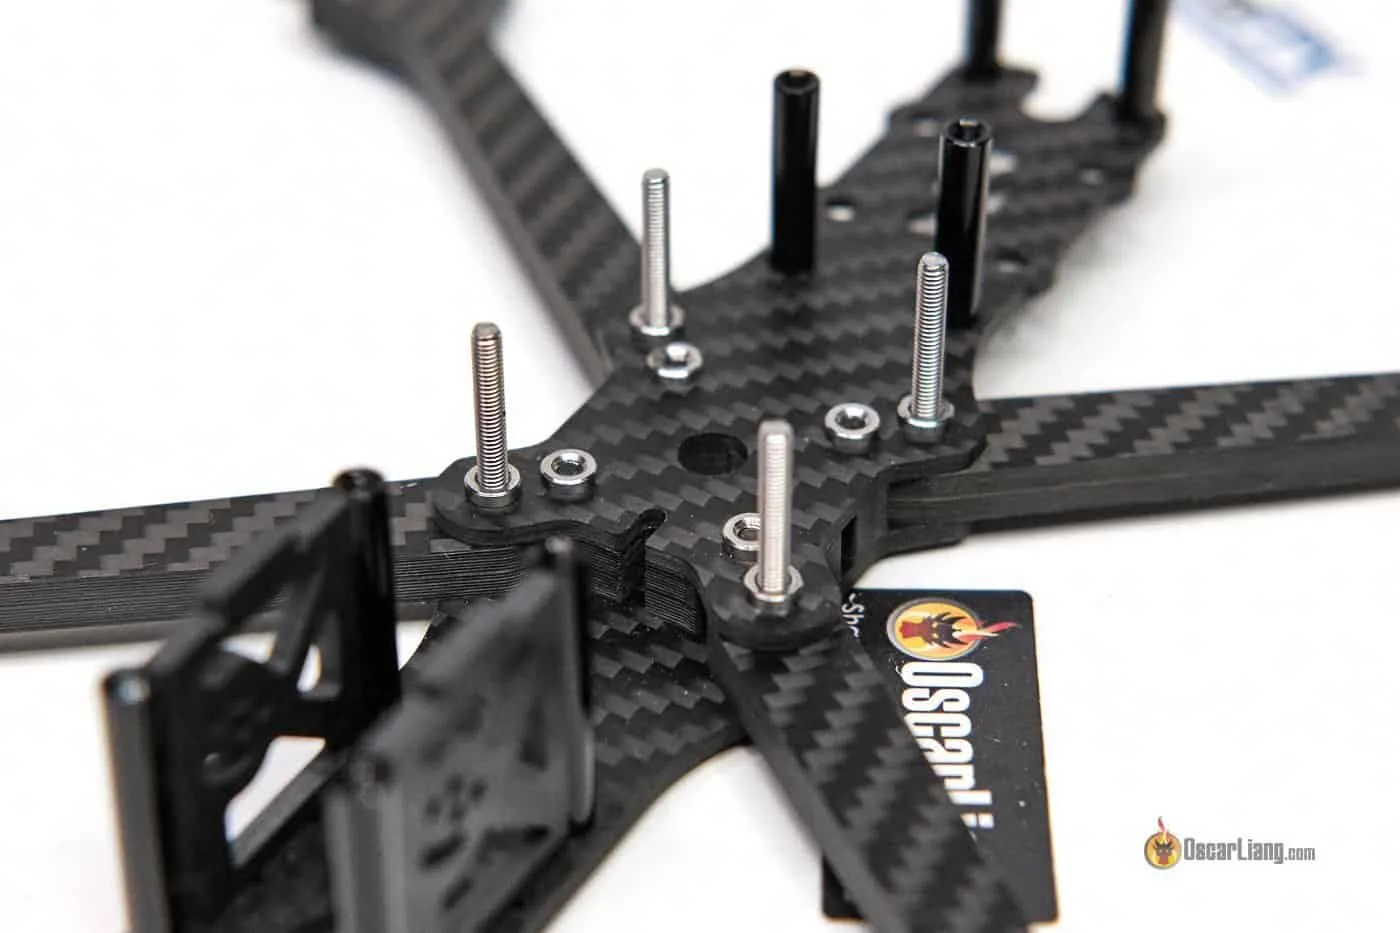
Use 4 plastic nuts to safe the FC stack. Tighten the nuts by hand solely to keep away from excessively crushing the gummies, permitting the comfortable mount to work successfully.

1. Blackbox Recording Settings
Choose the next settings within the Blackbox Configuration:
- Logging System: Onboard Flash or SD Card
- Logging Price: 2KHz (or 1.6KHz for BMI270 Gyro)
- Debug Mode: GYRO_SCALED (data unfiltered gyro sign)
- Knowledge Included: To avoid wasting area for longer recordings, deselect pointless information like Altitude, GPS, and Magnetometer, or depart at default.

2. Disable the ADC filter in your OpenTX/EdgeTX radio (System -> {Hardware}) to cut back latency.

3. ESC settings:
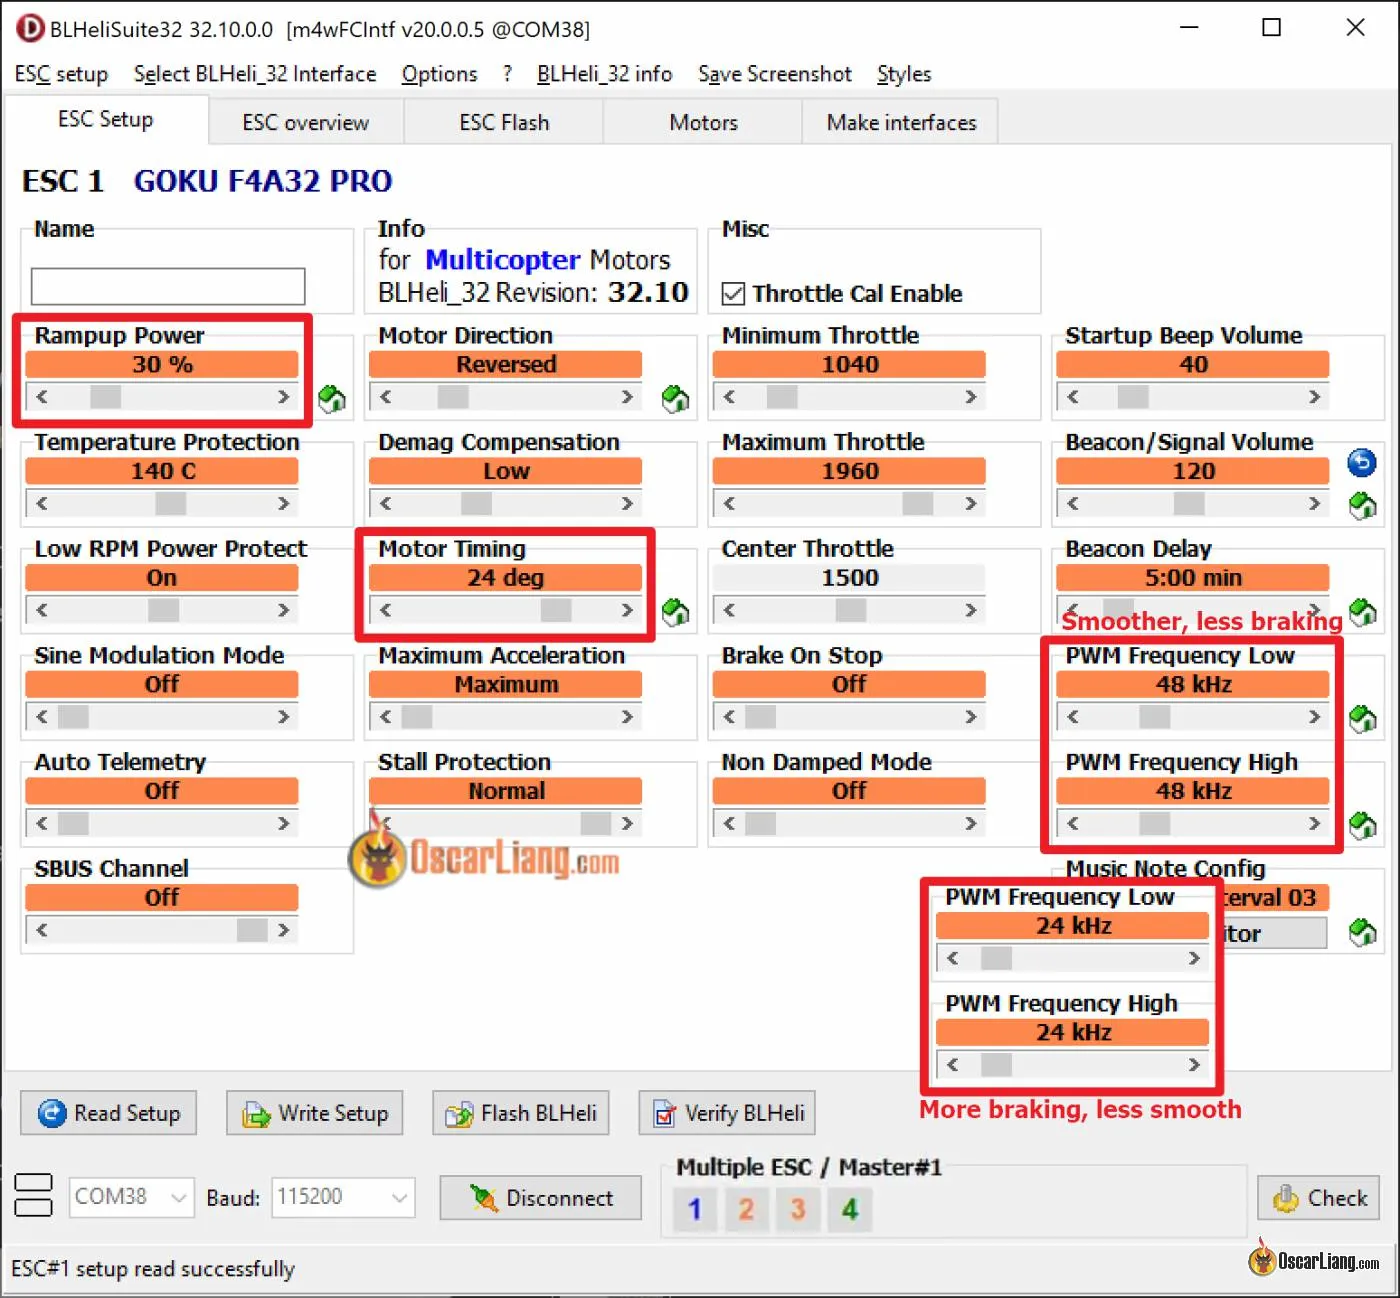
I’ve a submit explaining the greatest BLHeli32 settings. Right here’s the abstract (for five″ drones):
For BLHeli_32 ESC:
- Rampup Energy: 30%
- Motor Timing: 24
- PWM Frequency: Set LOW and HIGH to fastened 24KHz or 48KHz. 48KHz is usually safer for gyro noise, making your quad smoother and simpler to tune. 24KHz gives higher braking energy, which is useful for prop wash dealing with and responsiveness, however with the next threat of vibration. If you’re on the fence, simply go along with 48KHz.
For BLHeli_S ESC, flash Bluejay to allow bi-directional DShot, required for RPM filter and Dynamic Idle. I’ve a information on the way to flash it right here: https://oscarliang.com/bluejay-blheli-s/

3. Flash the newest model of Betaflight firmware to your flight controller and depart PID/filter settings at default. Allow Professional Mode in Betaflight Configurator to entry all sliders and choices on the PID Tuning web page.
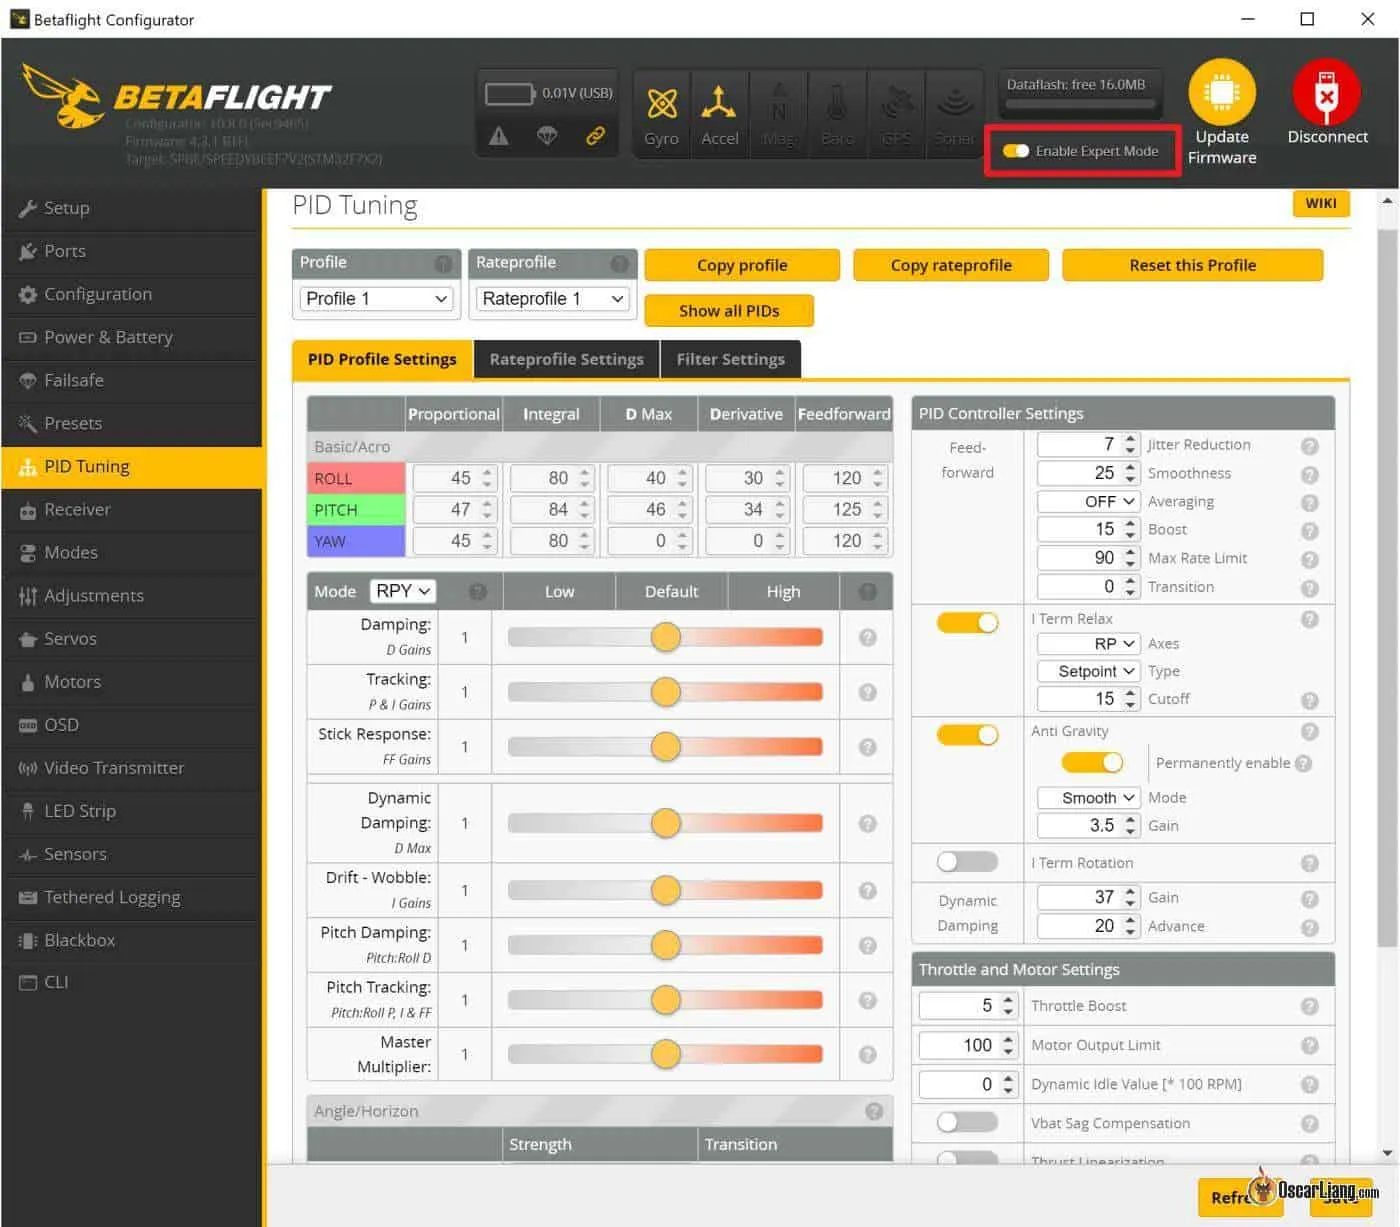
Within the Configuration tab, set your PID Loop Frequency, and within the Motor tab, set your ESC protocol:
- DShot300 for 4KHz or 3.2KHz Loop Frequency
- DShot600 for 8KHz Loop Frequency
4. Within the Motors tab, allow Bi-directional DShot.
Most fashionable ESCs assist Bi-directional DShot. I’ve a tutorial on the way to allow RPM filter. For BLHeli_32 ESC it really works out of the field, however if in case you have BLHeli_S ESC, you might want to flash Bluejay firmware (tutorial) first.
Examine if it’s working correctly by working the motors within the Motors tab (with out propellers) and making certain the error fee (E) stays at 0%. If not, strive a slower DShot protocol like DShot300 or DShot150. If errors persist, you would possibly simply have to surrender on Bi-directional DShot and RPM filter.
As soon as enabled, go to PID tuning tab, Filter Settings, the place you possibly can allow the Gyro RPM filter, top-of-the-line filters in Betaflight.

5. Load the suitable RC_Link preset.

Completely different RC hyperlinks require particular RC smoothing and feedforward configurations. Mistaken config may cause stuttering and vibrations. My favourite RC hyperlink is ExpressLRS, take a look at what radio gear I take advantage of right here.
Loading the appropriate RC_Link preset in Betaflight will apply the required configurations robotically. Keep in mind to decide on choices primarily based in your flying type, for most individuals it could be Freestyle.
For Crossfire, lock the packet fee to both 50Hz (longer vary, increased latency) or 150Hz (decrease latency, much less vary) utilizing the TBS Agent Lite LUA script.
6. Decrease TPA
Within the PID tuning tab, set the TPA breakpoint from 1350 to 1750 to keep away from TPA masking oscillation points at low/mid throttle throughout tuning. Advantageous-tune TPA on the finish if oscillation points happen at excessive throttle, however typically I might reduce using TPA each time doable.

How one can use PIDToolBox and Blackbox Explorer?
I will probably be utilizing each PIDToolBox (PTB) and Blackbox Explorer (BE) in my PID and filter tuning.
PIDToolBox will probably be our major instrument, it’s by far essentially the most highly effective Blackbox instrument accessible. It means that you can evaluate a number of logs aspect by aspect, making it simpler to see the results of your filter adjustments. The Step Response instrument is particularly helpful for tuning PID. The spectral analyzer in PTB makes use of decibels on the Y-axis, offering extra correct and goal comparisons. PTB additionally estimates filter delays, which may be very useful.
Nevertheless, PTB may be slower and fewer intuitive to make use of in comparison with Blackbox Explorer. For fast checks or troubleshooting a single log, BE is quicker and simpler. However for noise and filter tuning, PTB is the way in which to go.
Filters Tuning
You’ll find all of the filters in Betaflight within the PID Tuning tab. Don’t be intimidated by all of the settings, on this tutorial, we are going to principally solely give attention to the inexperienced sections (RPM filter and Dynamic Notch) and alter the orange sections (Gyro and D Time period Lowpass Filters) utilizing the sliders. No want to the touch the crimson sections.
Additional studying: Be taught concerning the several types of filter in Betaflight on this tutorial.

Good {hardware} can cut back the necessity for in depth filtering. Guarantee your body is well-designed with out resonance points, use well-balanced propellers, and high-quality motors with easy bearings.
Performing Flight for Noise Evaluation
- Take Off: Fly ahead with minimal throttle and stick inputs.
- Throttle Sweeps: Slowly ramp up throttle to 100% over 5-10 seconds. This check reveals vibrations throughout the throttle vary and body resonances.
- Repeat: Carry out 2-3 throttle sweeps, then land and disarm.
That is what a typical throttle sweep log would appear like (see the underside bar for throttle adjustments).

Gyro Noise Frequency Defined
Open the throttle sweeps log in Blackbox Explorer and click on on “Gyro_Scaled” on the fitting hand pane, that is the unfiltered gyro sign. Take away the takeoff and touchdown elements of the log by urgent “i” and “o”.
Right here’s a breakdown of the uncooked gyro sign frequency graph from a typical 5″ FPV Drone:
- Below 20Hz: Drone flight actions.
- 20Hz – 100Hz: Propwash and oscillations from suboptimal PID, problematic ESC config, dangerous RC hyperlink settings, and so on.
- 100Hz – 250Hz: Body resonance or free elements.
- Above 250Hz: Noise from motors and propellers, and harmonics.

Every little thing under 20Hz is “good” drone movement reacting to the sticks.
Between 20Hz and 100Hz is the place undesired vibrations, equivalent to oscillations and propwash, happen. As a common rule of thumb, you wish to see little exercise on this frequency vary. Having some is regular, however an excessive amount of means you have got an oscillation challenge that must be addressed. Usually, we attempt to keep away from filtering under 100Hz as a result of these are actual motions of the drone that we both wish to work with or towards. Filtering on this low-frequency vary can really make issues worse as a result of it introduces an amazing quantity of latency. Analyzing the spectra underneath 100Hz may give you perception into vibration or mid-throttle oscillation points and the way effectively the copter handles propwash.
We don’t care about something above 1000Hz as these have little impact on our drone. What we wish to give attention to filtering is the noise between 100Hz and 1000Hz.
Delay Brought on by Filtering
Maybe not intuitive, however over-filtering can really trigger oscillation to point out up as noise within the sub-100Hz spectra. That’s as a result of filtering creates delay. When the quad tries to right the error, the response may be too late because of the delay, which may be counterproductive. It might probably make the error worse and create a suggestions loop, inflicting the drone to oscillate.
That’s why, if we use much less filtering, noise points underneath 100Hz can typically really get higher as a result of latency is diminished and the quad can react quicker to right PID errors. Utilizing much less filtering additionally means that you can push PID features increased, which makes your quad monitor setpoint higher and helps fight propwash.
You’ll find out how a lot delay is added to the Gyro sign attributable to filtering by plotting Gyro and Gyro_Scaled and measuring the hole between them.

In PTB, it robotically estimates the delay brought on by gyro filtering and D-term filtering (see the highest proper nook of the primary graph within the second column).

Filter Technique
My common filter technique is to remove motor noise bands utilizing RPM filter, then crush out body resonances with dynamic notch filters, and eventually, cut back the ambient noise flooring with Gyro and D-term lowpass filters. I will probably be tuning filters on this order:
RPM Filter > Dynamic Notch Filter > Gyro Lowpass > D-term Lowpass
We wish to use as little filtering as doable to reduce latency, however on the identical time, we’d like sufficient filtering to keep away from burning our motors when flying residence with a bent prop. You’ll be able to actually play it secure and apply extra filtering than wanted, however over-filtering makes the drone really feel disconnected and sluggish to react because of the elevated delay. It might probably additionally worsen propwash. So, we have to try for a stability.
Other than checking Blackbox logs, motor temperature is one other helpful indicator in filter tuning. When motors get too sizzling, it normally signifies that the filtering is just too aggressive.
Professional Tip: Scorching Motors – How Scorching is Too Scorching?
As a common rule of thumb, if you happen to pinch the motor bell and might’t preserve your fingers on it for quite a lot of seconds, it’s too sizzling and you’re most likely pushing your settings too aggressively.
How Clear is Your Construct?
Earlier than we start tuning, it’s vital to examine if in case you have a clear construct. Begin by performing throttle sweeps as beforehand described.
Load the log in PIDToolBox, click on on the Spectral Analyzer, choose “Gyro prefilt” (the uncooked, unfiltered gyro sign; “Gyro” is the filtered sign), and hit Run.

The default filter settings in Betaflight are pretty conservative, and most builds ought to be capable of cut back filtering from there. In case your quad is already noisy with default filter settings, as an alternative of accelerating filtering, it’s best to search for doable mechanical or electrical points. Guarantee you have got a capacitor on the ESC enter energy, all screws are tightened, and also you’re utilizing contemporary new props, and so on.
On a clear 5″ quad, there must be little exercise between ~50Hz (the quad’s actions) and ~200Hz (motor vibration). In case you have a variety of noise on this area, it might be electrical noise (maybe the gyro enter energy is just too noisy, or it requires an additional capacitor on the ESC enter energy) or mechanical (e.g., a wire hitting the gyro). Attaining optimum filtering on this situation could be more difficult.
As recommended by the creator of PIDToolBox, it’s excellent to have the general noise flooring under -30dB above 50Hz. For D-term, it’s excellent to have the general noise flooring under -10dB. Analyzing the noise ranges in these areas may give you a great indication of how easy your quad flies. The noise stage is influenced by the construct high quality of the drone, the standard of the {hardware}, and typically you would possibly simply have a loud gyro.
In case your quad is noisier than this (e.g., there’s a peak within the center above 0dB), then you have to extra filtering. It’s not the tip of the world; it simply means the latency will probably be increased, and also you gained’t be capable of push PID features as excessive.
Tuning RPM filter
Motor noise is the first supply of noise for FPV drones, and the RPM filter is without doubt one of the simplest filters in Betaflight for tackling motor noise. On a clear construct, the RPM filter and Dynamic Notch filters will do a lot of the work, permitting us to disable many different filters to reduce latency.
Let’s have a look at some examples of motor noise:
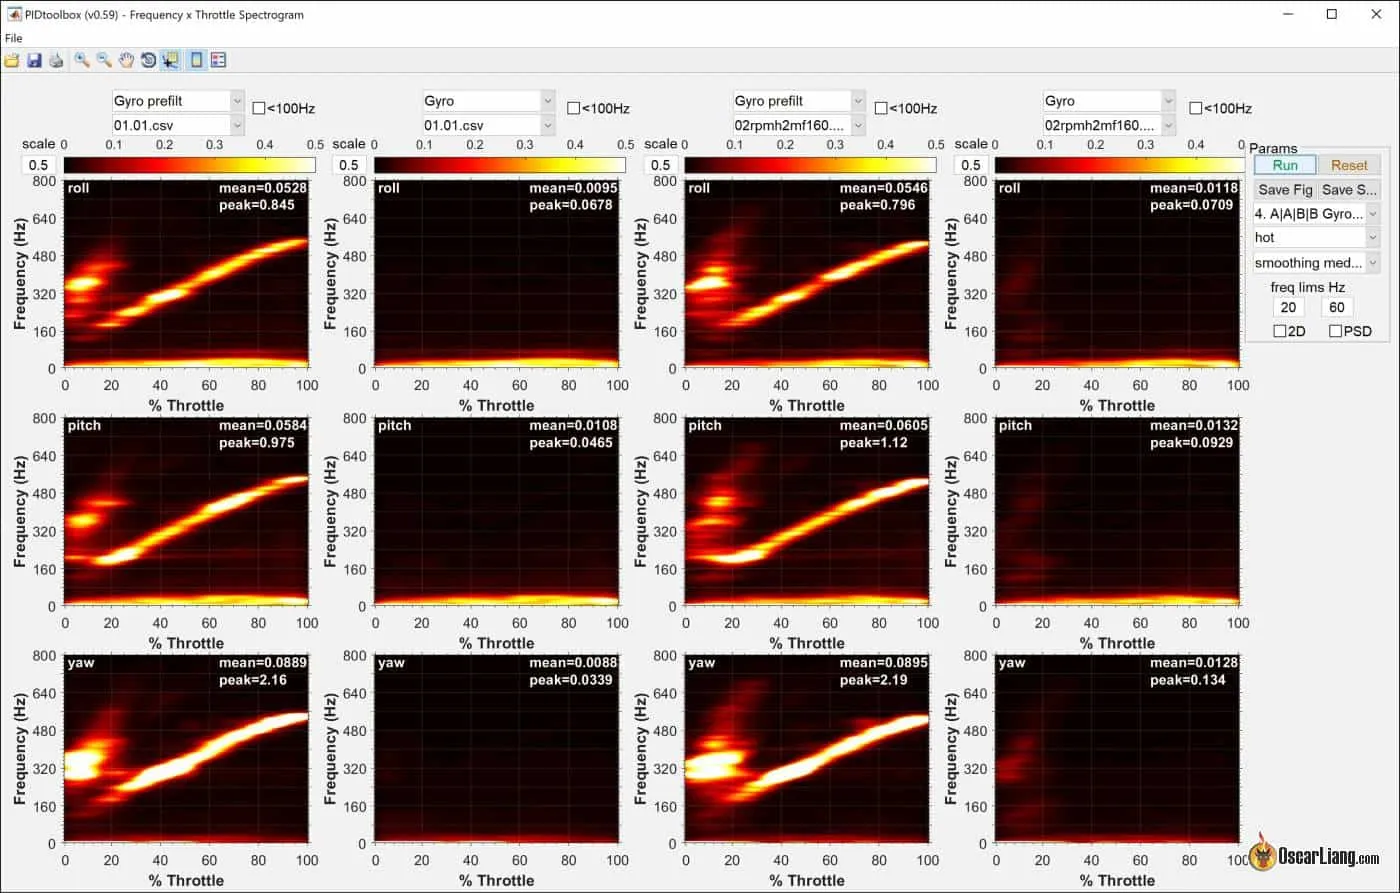
- Load the “Throttle Sweeps” log in PTB, click on Spectral Analyzer and click on “Freq x Throttle“.
- Below “Presets” choose “Gyro Prefilt, Gyro, Dterm Prefilt, Dterm” and hit Run. That is what I name “warmth maps”.

Right here’s a breakdown of what we’re taking a look at:
- Near 0Hz: The very brilliant horizontal line on the backside (1) represents the drone’s movement reacting to the sticks.
- Round 200Hz: This horizontal line (2) signifies body resonance. Its frequency doesn’t change with throttle place however is strongest the place it intersects with the motor band.
- Basic Motor Noise Band: This diagonal line (3) is normally the brightest. Motor noise usually will increase in frequency with throttle stage.
- Harmonics: These are multiples of the elemental motor noise band. In our instance, harmonics (typically dimmer and more durable to identify) present up as strains (4) and (5). Strive adjusting the dimensions in the event that they aren’t seen. Notice that 2-blade propellers have a tendency to point out extra and stronger harmonics than 3-blade props.

We are going to use RPM filter to deal with these motor noise bands.
The objective is to optimize the variety of RPM harmonics used and set the best doable “Min Frequency” primarily based on the beginning frequency of the motor band. Fewer RPM harmonics and the next min frequency end in much less filtering and decrease latency.
Use the Knowledge Cursor Software, click on on the place the motor band begins to seek out the precise frequency. Verify this within the roll/pitch/yaw graphs and take the bottom frequency.

Right here’s an instance from my new Supply One V5 construct:
- On the left, is the default RPM Filter, 3 harmonics with a min frequency of 100Hz.
- On the fitting, I modified it to 2 Harmonics with min frequency of 160Hz
By decreasing one harmonics and lift the cutoff frequency, you possibly can maybe see extra unfiltered noise from the third motor harmonics.
Though it’s fairly weak, it could possibly nonetheless get amplified when it will get into D time period. Let’s examine the Dterm warmth map under on the fitting, as you possibly can see, a tiny little bit of gyro noise has develop into fairly dangerous Dterm noise.

On this instance, it’s most likely higher to have 3 harmonics in RPM filter.
The opposite factor you may need observed is a few noise round 116Hz left unfiltered as a result of we raised the min freq to 160Hz. To deal with that, we’ve to decrease Min Freq, i.e. round 20Hz under the noise frequency could be excellent.

Right here’s a comparability of gyro sign after filtering utilizing 3 totally different settings:
- left: 2 harmonics 160Hz min freq
- mid: 3 harmonics 130Hz min freq
- proper: 3 harmonics 100Hz min freq

To crush out the motor bands, it appears we are able to’t actually cut back RPM filter. On this instance, the default settings (3 harmonics and 100Hz min frequency) labored greatest.
RPM Crossfading
This superior characteristic fades within the RPM filter power over a variety (kind of like TPA), the default is nice for many 5″ builds however it may be optimized particularly for bigger or smaller builds, because the motor noise would possibly begin increased or decrease in frequency, and also you would possibly want it to fade in additional rapidly or slowly is determined by the noise. This characteristic is simply accessible in CLI, for instance:
set rpm_filter_min_hz = 100 set rpm_filter_fade_range_hz = 50
This implies the RPM filter begins at 100Hz at minimal power and reaches full power at 150Hz.
Q Worth
Rising the Q worth of a notch filter makes it extra targeted on the focused frequency, decreasing latency. Alter this within the CLI:
set rpm_filter_q = 500
The default values of 500 normally work effectively, however you possibly can fine-tune by rising the Q worth till motor noise turns into seen within the filtered gyro diagram, then again off. Don’t exceed 1000.
RPM Filtering Dimming
This enables particular person management of every RPM filter to focus on harmonics. For instance, when utilizing 3-blade propellers, the second harmonics is normally not very robust, however the third harmonics is. On this case you should utilize extra filtering power on the third harmonics and fewer on the 2nd:
set rpm_filter_weights = 100, 0, 80
And when utilizing 2-blade propellers, the place 2nd harmonics is stronger than the third harmonics, you are able to do one thing like this:
set rpm_filter_weights = 100, 80, 0
You’ll be able to additional lower RPM filter weights so long as motor noise isn’t seen within the filtered gyro diagram.
Tuning Dynamic Notch Filter
The dynamic notch filter suppresses sign peaks within the gyro sign, that are principally vibrations from the body or different {hardware} elements, equivalent to body resonance, antennas, GoPro mounts, and bent propellers.
When the RPM filter is enabled, Betaflight will robotically cut back the quantity of Dynamic Notch filtering through the use of fewer notches and the next Q worth because the RPM filter will do a lot of the heavy lifting. You’ll be able to additional tune the Dynamic Notch filter primarily based in your setup.
Establish Body Resonances: Have a look at the warmth map and establish what number of body resonances there are to find out the variety of notches wanted. As much as 5 notches can be utilized, however normally, 1 or 2 are ample until your drone is poorly constructed or in a beat-up situation. With the RPM filter enabled, 1 notch is usually sufficient to deal with body resonance.
Decide Q Worth: The Q worth determines the width of the filter. A better Q worth means a narrower filter, which ends up in much less filtering and decrease latency.
- Default Q: Begin with the default Q of 500.
- Alter Q: If the default is working effectively, strive rising it to 600 and even 700. Keep away from exceeding 1000. If you happen to nonetheless see body resonance noise after filtering, decrease the Q worth.
- Examine D-term Heatmap: Analyze the D-term heatmap to see how adjustments within the Q worth have an effect on D-term noise.
Set Min/Max Frequency: These are the cutoff frequencies, defining the efficient vary of the Dynamic Notch filter. Add 20-30Hz to every aspect of the resonance for the vary.
Keep away from setting the Min Frequency too excessive for security causes, as bent props can create large resonance. In case of a crash, a broader frequency vary will help catch new resonances and forestall motor overheating or injury. We don’t know precisely the place that resonance goes to be, however having a wider frequency vary has the next probability of catching it. If the Dynamic Notch fails to catch these newly pop up resonances attributable to Min Frequency is about too excessive, your motors can get sizzling and even burn in these conditions.
With out RPM Filter: In case your quad can’t use RPM Filter, for instance on a tiny whoop, you possibly can attempt to allow Dynamic Notch Filter with 5 harmonics, Q issue 350 and Min Frequency at 100Hz as a place to begin, then tune it by working your approach up.
In an instance setup, there seems to be one body resonance round 210Hz.

I attempted rising Q to 700 and setting the min/max frequency to 160-230Hz, however Q was clearly too excessive. There’s extra unfiltered noise, and it will get into Dterm and get amplified.

Lastly, after I set Q to 450, the noise is satisfactorily managed. Within the under graphs, on the left is Q=700, the fitting is Q=450. You’ll be able to examine Dterm heatmap once more to substantiate that is working effectively.

Tuning Gyro Lowpass Filter
Most often, you can begin by turning off the Gyro Lowpass 1 filter as it’s typically pointless. Check fly aggressively for 30 seconds and examine the motor temperature to make sure they aren’t sizzling earlier than continuing.

Use the “Gyro Filter Multiplier” slider to cut back Gyro Lowpass 2 a few notches at a time. Transferring the slider to the fitting will increase the frequency, which reduces filtering, leading to much less delay, higher prop wash dealing with, and the potential for increased PID features.

Right here’s a comparability of the gyro frequency spectrum at totally different Gyro Lowpass filter slider values: 1.0 (brown), 1.5 (crimson), and a pair of.0 (orange).
The three strains virtually overlap, suggesting that the Gyro Lowpass filter isn’t considerably affecting the sign and may be diminished. Apparently, the noise within the sub-100Hz spectrum barely improves with much less filtering, which aligns with our earlier discussions.
Necessary Issues:
- By no means disable the Gyro Lowpass 2 filter for 2K/4K PID loop frequencies attributable to anti-aliasing causes.
- Minimal Frequency:
- For 2K loop time, depart Gyro Lowpass 2 at a minimal of 500Hz.
- For 4K, you possibly can set Gyro Lowpass 2 as much as 1000Hz.
- For 8K, you possibly can disable Gyro Lowpass 2 fully if noise isn’t a difficulty.

Tuning D Time period Lowpass
D time period is far noisier than Gyro attributable to its delicate nature and noise will get amplified as frequency will increase. Subsequently, be further cautious and conservative when coping with D Time period filtering.
Strive shifting the “D Time period Filter Multiplier” slider to the fitting a notch at a time and see how the drone responds in a 30-second check flight (do some acro strikes), additionally examine motor temperature after touchdown. In the event that they get sizzling it’s best to return a notch or two.
Keep away from being too aggressive with decreasing D Time period filtering. Depart some headroom for doable bent props throughout flight. Too little D Time period filtering mixed with a broken propeller can result in sizzling or burned motors.
Right here’s a comparability of D-term filtering slider positions: 1.0 (brown), 1.3 (crimson), and 1.6 (orange). As seen within the heatmap, much less filtering leads to extra noise for D-term, not like Gyro lowpass.

From left to proper, the heatmap reveals unfiltered D time period, D-term lowpass filter at 1.0, 1.3, and 1.6.
If you happen to hear the motors getting tough (thrilling oscillation) as you cut back D-term filtering, it’s because of the rising noise under 100Hz. You’ll be able to affirm this by checking the <100Hz graphs. On this instance, staying under 1.3, possibly 1.2 and even simply 1.1, could be safer.

After tuning PID features, revisit D Time period filtering to see if it may be additional optimized.
If the D Time period traces are very noisy, one or two clicks extra filtering on the slider could assist. If the D time period hint may be very clear, you possibly can maybe cut back filtering a bit extra (if motors will not be sizzling). See under graphs, the left has a loud D time period hint, the fitting is far cleaner.

Necessary: NEVER disable D-Time period lowpass filters fully, you’ll burn your motors.
Gyro/D Time period Notch Filters
There’s no have to allow Gyro Notch Filter and D Time period Notch Filter, these are static notch filters which have develop into legacy since RPM filter and dynamic notch filters are doing a lot of the work.
Nevertheless, if there’s a robust resonance at a particular frequency (equivalent to body resonance), a static notch filter may be useful. The dynamic notch filter normally covers it, so a static notch filter is commonly pointless. You’ll be able to strive including a static notch for identified body resonance and cut back the dynamic notch depend by one to see which technique works higher in your setup.
Yaw Lowpass Filter
The default yaw lowpass filter at 100Hz cutoff has minimal latency penalty and may be left untouched. This filter is particularly useful for whoops, because it helps to cut back yaw spin in collisions.
PID Tuning
To tune PID utilizing Blackbox, I observe the “Basement Tuning” methodology utilizing PIDToolBox. This methodology is beginner-friendly and may be carried out in a small area like a basement or bed room, therefore the identify. It entails performing a sequence of quick flights with barely totally different PID values, then evaluating the logs to seek out the optimum features.
In the course of the flights, transfer the quad round on the pitch and roll axes. You’ll be able to study extra concerning the basement methodology on this video by PIDToolbox.

Though the tactic known as “basement tuning,” I’m not snug doing this indoors. I’ve had a few “fly to the moon” incidents up to now, practically drilling a gap within the ceiling. Subsequently, I at all times carry out these assessments in a backyard or native park for security.
Price Profile and Angle Mode
Performing basement tuning flights requires good line-of-sight flying abilities to maintain the drone managed in a confined area. Listed below are some tricks to make it simpler. Do this fee profile:
- Heart Sensitivity 250
- Max Price 400
- Expo 0.00
This profile has a low max fee, making it much less prone to lose management if you happen to transfer the sticks an excessive amount of. The excessive and linear middle stick sensitivity ensures the stick inputs are important sufficient for correct logging.
Performing the check in Angle mode could make it even simpler than in Price mode. In response to the creator of PIDToolBox, Angle mode works simply in addition to Price mode, however you might want to do the next first:
- Go to the Setup tab and calibrate the accelerometer.
- Within the PID Profile Settings, set the Angle mode power to 100.
- Click on Save to make sure the adjustments are utilized.
Discovering P/D Stability
To start with, decrease these features so that they don’t intrude with our tuning:
- Set the “Stick Response” slider (Feed Ahead) to 0
- Set the “Dynamic Damping” (D Max) slider to 0
- Set the “Drift-Wobble” (I features) slider to 0.2, it’s low sufficient that it shouldn’t introduce overshoot but have just a bit I phrases to assist stabilize the quad higher, makes it simpler to regulate

Alter the “Damping” (D features) slider, begin with a minimal worth you wish to check. For a typical 5-inch FPV drone, 0.6 is an effective start line.

Here’s what you wish to carry out within the flight:
- Arm and hover
- Continuously shifting the roll and pitch stick for 20-30 seconds, the extra actions the extra correct it is going to be
- Do as large strikes as you possibly can with out hitting the partitions (ideally full stick deflections)
- You’ll be able to transfer each pitch and roll collectively so long as you possibly can preserve it underneath management
- Strive to not cease/hover for too lengthy throughout flight, and be as steady as you possibly can
Elevating the Damping slider by 0.2 every time and repeat the flight: e.g, 0.6, 0.8, 1.0, 1.2, 1.4, 1.6. Whenever you increase D acquire too excessive, your motors will sound tough, subsequently you possibly can’t at all times check the final one or two values, which is ok.
The quickest method to change slider worth is by going into Betaflight OSD menu, Profile, Simplified Tuning. However if you’re unable to do that then simply plug within the USB cable and use the Betaflight Configurator.
![]()
It’s a good suggestion to vary battery each 2-3 flights to make sure the consequence isn’t affected by voltage. Energy cycle the quad by unplugging the battery earlier than each flight so it creates a brand new log. Or just select “Save and Reboot” within the OSD menu so that you don’t have to unplug.
16MB reminiscence must be sufficient for six 30-second flights if you happen to time it effectively.
After you have got accomplished all of the flights, obtain them to your pc. To prepare the logs higher, I’ve a folder construction created for this course of, obtain right here: https://drive.google.com/file/d/1tx1AV2lOMgknAwIB3VFhqP1i6VpDLVjr/view?usp=share_link

And I rename the logs to one thing like “01 d06“, “02 d08” and so on (01 means first check flight, d06 means damping slider worth 0.6), and put them within the “02 PD Stability” folder.
Load all of the logs in PTB, undergo each and take away the take-off and touchdown elements for every log (to do that, allow “Trim” on the fitting hand panel).

Click on the “Step Resp Software“, choose all of the recordsdata and click on Run. if in case you have offset within the curves (gyro curve shifting away from setpoint in the direction of the tip), allow Y Correction.

It’s fairly straight-forward, merely decide the perfect trying line, that’s your optimum Damping slider worth. The best response ought to look one thing just like the inexperienced line within the following graph, little to no overshoot. Having a tiny little bit of overshoot is suitable.
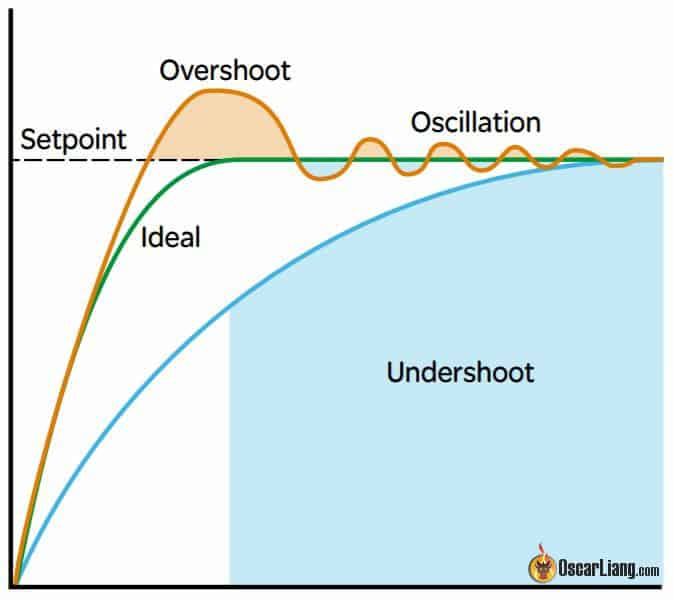
In case your traces don’t look easy however have a lot of ups and downs, that’s referred to as oscillation, and it’s an indicator that the sign is just too noisy or your actions aren’t sufficiently big.
The graphs on the fitting are additionally extraordinarily useful:
- Peak is highest amplitude of the overshoot (ideally the nearer to 1 the higher)
- Latency is the time it takes to succeed in setpoint (ideally the decrease the higher)

When D acquire is low, you’ll get overshoot and even oscillation. As D acquire will increase, there will probably be much less overshoot and Peak will lower, however Latency will go up in consequence. When D is just too excessive (undershoot), the preliminary peak won’t even attain the setpoint and this isn’t excellent. Discover a response that has minimal overshoot and but has comparatively low Latency.
You’ll be able to zoom in and see it extra clearly (or choose fewer logs, and hit Run once more). We solely want to have a look at Roll and Pitch axis.
In our instance, it’s fairly clear the perfect worth is orange (3) for each pitch and roll, so that might be 1.0.
It’s fairly frequent to have a distinct PD stability on pitch and roll because of the totally different weight distribution. If that’s the case for you, take the Damping slider to the place you need for pitch, write down the pitch D acquire, then take the Damping slider to the place you need for roll, and alter the Pitch Damping slider to match the pitch D acquire you simply wrote down.

Typically it’s higher to be just a little extra conservative and keep away from having D acquire too excessive. If you’re on the fence, at all times go along with much less D acquire (the next P/D ratio), so you possibly can increase your general PID features increased on the finish since D is normally the limiting issue.
What I’ve discovered is that the step response instrument tends to be fairly delicate and the P/D stability may be decrease than what I’d personally want. So I usually bump up P/D stability by 5-10% after discovering a really perfect worth. That’s simply my private choice, you may give {that a} strive if you would like.
Drone dimension additionally impacts PD ratio, bigger drones are inclined to have increased P:D ratio. For instance a 5″ would possibly use 0.8-1.1 Damping slider whereas a tiny whoop would possibly use 1.4-1.6.
Discovering Max D Achieve
Do the identical check for Grasp Multiplier slider, transfer the slider in 0.2 steps. For a 5″ drone, begin with values equivalent to 0.8, 1.0, 1.2, 1.4, 1.6, and 1.8.

Be cautious and don’t stand too near the quad throughout this check. When D acquire is just too excessive, the quad could shoot up unexpectedly. Pay shut consideration to motor noise, and cease instantly if you happen to hear thrilling oscillation.

You would possibly discover that the shapes of the step response don’t change a lot between totally different values and that the Peak values stay roughly the identical. It is because the response curve form is especially decided by the P/D ratio. Rising the features gained’t considerably have an effect on the response form, however bumping up P/D features can cut back latency.
You might have reached the perfect Grasp Multiplier acquire when one of many following happens:
- Thrilling Oscillation: If you happen to hear thrilling oscillation, you possibly can’t enhance D acquire any additional.
- Latency Plateau: If latency doesn’t lower anymore (or little or no), it means you have got reached the higher certain tuning window. The motors are working at their hardest, and you aren’t gaining any extra efficiency from them.
The utmost acquire achievable is influenced by the noise stage of your construct and the quantity of filtering used. Much less filtering permits for increased PID features. Typically, it’s safer to cut back the Grasp Multiplier slider by a notch or two as soon as you discover the utmost worth. Keep away from pushing D acquire to the restrict to account for potential points like bent props.
Drones utilizing increased cell depend batteries (increased voltage) are inclined to require decrease D features. For instance, on a 6S quad, D features may be within the 30s, whereas on a 4S they’re normally within the 40s.
In my instance, 1.6 appears to be the worth that offers the least quantity of latency, with little enchancment when rising to 1.8.
If you happen to can’t hear thrilling oscillations, use the Spectral Analyzer to plot D-term. As features enhance, motors could produce an exciting sound peaking round 40-80Hz, particularly when throttling up. If noise on this frequency vary will increase with increased features, it signifies the onset of PID-related oscillations.
On this instance, you possibly can clearly see peaks round 60Hz for 1.4 (olive), 1.6 (inexperienced), and 1.8 (cyan). Though 1.6 reveals latency enchancment, I might not threat it and would seemingly select 1.4 and even 1.3 to be secure.

There’s ongoing debate on whether or not it’s higher to have extra D-term filtering and better D acquire, or much less D-term filtering and decrease D acquire. Nevertheless, by no means run with much less D-term filtering and excessive D acquire as this could result in disastrous outcomes if you happen to hit an impediment or bend a prop. It’s no joke, talking from expertise right here:
After discovering the optimum D acquire, examine setpoint monitoring by plotting Gyro and Setpoint. The strains must be roughly parallel, indicating the quad is accelerating and decelerating on the identical fee because the setpoint. Nevertheless, there would possibly nonetheless be a major hole between them, indicating latency. Within the subsequent step, we are going to cut back this hole utilizing Feedforward.
![]()
Tuning Feed Ahead
Feed Ahead (FF) accelerates your quad if you transfer the sticks, making your quad extra responsive and nearer to the setpoint. Not like P time period, which reacts solely when there’s a PID error, Feed Ahead measures the speed of stick deflection. It will get the motors shifting as quickly because the stick strikes, making it a lot quicker than P time period.
Feed Ahead helps the quad reply promptly to stay inputs, offering a extra quick and managed flying expertise. It’s useful for all flying kinds, together with cinematic flying, because it reduces latency between stick enter and quad response.

When tuning Feed Ahead I want to do some snap rolls and flips and examine Gyro/Setpoint traces. Use your regular fee profile, or a default fee profile in Betaflight (simply change to an unused fee profile) to get an honest max fee at full stick. You’ll be able to examine my charges right here: https://oscarliang.com/charges/#My-Charges
As a substitute of utilizing the step response instrument in PTB, use BE to examine the setpoint/gyro traces. The gyro ought to monitor the setpoint extra intently with much less delay. Ideally, the gyro must be proper on high of the setpoint.
If Feed Ahead overshoots (gyro strikes earlier than the setpoint), the FF is just too excessive. Within the following demonstration, 0.5 is approach too low, 1.0 remains to be not excessive sufficient, however 1.5 is a tiny bit an excessive amount of and overshoots. I feel Feedforward at 1.3-1.4 ought to do it on this instance.
![]()
If the FF acquire is just too excessive, it could possibly trigger the P time period to react in the wrong way, making an attempt to counteract it.

Doesn’t matter what your flying type is, feedforward may be helpful and doesn’t apply solely to sure forms of flying. Even cinematic flying can profit from a great quantity of feedforward, if you’re shifting your stick easily and slowly, then feedforward gained’t kick in anyway. Whenever you want snappy response FF will cut back the latency between stick enter and quad response. If you would like easy flying, simply use expo, extra RC smoothing or decrease your fee.
There’s an elective setting, Feedforward enhance (FF Enhance). You wish to enhance it if gyro lagging behind setpoint at first of a transfer, however catching up in a while. However it’s best to cut back it if gyro will get forward of the setpoint at first of a transfer, however falls behind later.
Tuning I Achieve
The best I acquire is essentially primarily based on really feel. You don’t want a variety of I acquire when you have got optimum P and D features; you simply want sufficient to maintain the drone from drifting and wandering. If you’re cruising ahead with minimal stick inputs, the drone ought to maintain its place for some time. If there’s any drifting, you then want the next I acquire.
The I time period in Betaflight has a REALLY WIDE tuning window, particularly for highly effective 5″ quads. Usually, a variety of 0.5 to 1.5 on the I time period slider works positive for five″ quads. This vast window permits us to tune all the things else first and alter the I time period final. With a excessive I acquire, your quad will really feel extra exact, but when the I acquire is just too excessive, it’s possible you’ll expertise sluggish oscillations, which you wish to keep away from.
I discovered the step response instrument in PTB isn’t efficient for locating the I time period, because the step response for pitch and roll stays similar whatever the I acquire slider worth (e.g., 0.4 to 2.0). Nevertheless, you should utilize it for tuning Yaw I acquire, which I discover normally lands round 1 on the slider for 5-inch quads.

You’ll be able to tune the I acquire by trying via the goggles and listening to the motors. If you happen to purpose to push the I acquire as excessive as doable, strive shifting the I acquire slider up till you discover sluggish bouncebacks and oscillations throughout quick strikes, then cut back it a notch or two. Nevertheless, it’s actually onerous to get our quads to point out bouncebacks, due to options like “I-term loosen up” in Betaflight. These days, you should utilize extraordinarily excessive I acquire with out a lot adverse impression (equivalent to bouncebacks).
For five″ quads, I normally simply depart the I acquire slider at 1.
With I-term loosen up, you possibly can alter the cutoff primarily based on the drone’s responsiveness. For freestyle drones, you possibly can normally depart it on the default setting. For racing drones, enhance it to 30. For heavier drones like cinelifters and seven″ long-range drones carrying a GoPro, set the cutoff to 10.
Dynamic Damping
Dynamic Damping is a characteristic that reinforces D acquire to the utmost throughout sharp strikes however doesn’t enhance it throughout regular flight. This helps in decreasing motor warmth.
That is how I usually use Dynamic Damping:
- Notice down your present D Max worth. This worth must be the identical as By-product as a result of the Dynamic Damping slider is about to 0 in the intervening time.
- Start by rising the Dynamic Damping slider to 1.
- Then cut back the Damping slider till the D Max worth stays the identical as earlier than, this can decrease the baseline D acquire used throughout regular flights to maintain your motors cool.
Alternatively, to maintain issues easy, you may as well simply depart Dynamic Damping slider at 0 and depart the Damping slider unchanged, the quad will use the identical D acquire via the entire flight, it’s as much as you.
Different Settings
Anti Gravity Positive factors
Anti-Gravity (AG) features assist cut back wobbling and nostril dips if you punch out after which let go of the throttle. AG briefly boosts I acquire throughout throttle pumps to mitigate these undesirable dips. Nevertheless, if the AG acquire is about too excessive, your quad could expertise speedy oscillation (stutter) if you launch the throttle, as a result of AG boosts each P and I.
Default is 8, cut back it if you happen to see wobbles throughout quick throttle adjustments. For five″ freestyle drones, I discovered 8 to 12 a great vary.
You’ll be able to tune AG by trying within the goggles, or examine for nostril dip in Blackbox logs, and see the impact of anti-gravity.

Dynamic Idle
Dynamic Idle improves stability, enhances propwash dealing with, and reduces the prospect of ESC desync. It will increase motor velocity when the throttle is at zero, bettering management authority and responsiveness at low throttle inputs. Different advantages embody sharper flip and roll stops, extra responsive in low throttle and more practical braking.
When Dynamic Idle is about, Static Motor Idle (in %) within the Motors tab is disengaged.
To setup Dynamic Idle, you might want to
- Allow bi-directional DShot within the Motor Tab (if you have already got RPM filter enabled, you’re all set)
- Enter an acceptable Idle RPM worth within the PID Tuning web page (e.g., 20 to 40 for five″ drones).
The advisable Idle RPM worth is determined by propeller dimension and pitch. Smaller and decrease pitch propellers typically require increased values. Alter the worth increased in windy circumstances to counteract instability.
| Prop Sizes | Excessive Pitch Props | Low Pitch Props |
| 31mm/1.2″ | 84 | 167 |
| 40mm/1.6″ | 62 | 124 |
| 2″ | 50 | 100 |
| 2.5″ | 40 | 80 |
| 3″ | 33 | 66 |
| 3.5″ | 28 | 57 |
| 4″ | 25 | 50 |
| 5″ | 20 | 40 |
| 6″ | 16 | 33 |
| 7″ | 14 | 28 |
| 8″ | 12 | 25 |
| 10″ | 10 | 20 |
Issues for Dynamic Idle:
- Excessive Worth: Reduces hold time when the drone is the other way up (motors push more durable in the direction of the bottom). It might probably additionally make the quad hover barely at zero throttle, making throttle administration more durable.
- Low Worth: Dangers low throttle instability.
Setting the Preferrred Worth:
- Decide ESC Idle Worth: Default is normally 5.5%. Check your motor within the motor tab utilizing a smoke stopper or bench energy provide to restrict present.
- Examine RPM: Spin the motor on the ESC idle worth (e.g., 5.5%, slider at round 1055) and be aware the reported RPM (requires bi-directional DShot).
- Set Dynamic Idle: Use the RPM worth divided by 100 as the perfect Dynamic Idle worth.
Throttle Enhance
Throttle Enhance will increase your throttle worth if you quickly transfer the throttle stick up, supplying you with further energy. This could make throttle responses extra dynamic however may make them unpredictable.
- The Default Worth of 5 typically works effectively
- Adjustment Suggestions:
- If you happen to discover the throttle onerous to handle exactly, cut back the worth.
- Some racers even disable Throttle Enhance fully by setting it to 0 to have essentially the most predictable throttle response doable.
- Experiment with totally different values to see what works greatest in your flying type.
Voltage Sag Compensation
This characteristic reduces the utmost motor drive worth when the battery is full and will increase it because the battery voltage drops. It supplies extra constant flight efficiency all through the flight. However watch out it’d make you neglect when to land as a result of the quad would really feel comparable via the entire pack.
Thrust Linearization
- Advisable Setting: Allow Thrust Linearization at 20%.
- Advantages:
- Boosts PID to enhance responsiveness and management at low throttle.
- Lowers PID at excessive throttle to cut back oscillations (just like TPA).
- Helps with nostril dips and is particularly helpful for whoops and drones utilizing 48KHz PWM frequency on ESCs.
Notice: Because it boosts PID at low throttle, you would possibly have to decrease the grasp multiplier slider if motors get sizzling.
TPA
TPA stands for Throttle PID Attenuation.
To positive tune TPA, carry out a throttle sweep and examine the frequency vs. throttle heatmap. If you happen to get oscillations above a sure throttle stage, by which case TPA will help.
Within the newest Betaflight it solely attenuates D acquire above sure throttle stage (which is normally the reason for the oscillations). Within the older Betaflight it attenuates each P and D, if you would like you possibly can convey this again by typing in CLI: set tpa_mode = PD.
Usually I want to set throttle worth in TPA as excessive as doable, so D acquire is extra fixed throughout a wider throttle vary. Make certain to set the throttle worth just a little decrease than the place the place the D time period associated oscillations begin to present up. For instance, if oscillation begins round 1800 throttle, I might do one thing like this: TPA = 0.75, 1750.
I Time period Rotation and Absolute Management
These options are typically not wanted for FPV freestyle drones and are extra useful for line-of-sight pilots.
Tuning Yaw
Yaw typically doesn’t require a lot tuning because the default acquire works effectively. The tuning window for Yaw is sort of vast. Not like pitch and roll that are primarily based on thrust generated by propellers, yaw is predicated on the inertia generated by propeller rotation. Subsequently, yaw will inherently be too sluggish to overshoot setpoint, and there’s little have to tune yaw PID.
Yaw can be too sluggish for D phrases to have any significant impact and it’s typically not required. Nevertheless you possibly can allow it if you would like, however it would possibly introduce extra downside than it solves, like vibrations and so on. So we’re left with P and I phrases for Yaw.
You’ll be able to tune Yaw utilizing the step-response evaluation like we did with Pitch and Roll. Moreover, if sluggish oscillations happen within the again a part of the graph, then I-Time period is just too excessive. If quick oscillations happen, then P-Time period is just too excessive.
In case you have yaw shakes when doing throttle pump, you possibly can isolate yaw from the slider tuning, and set Yaw PID individually. To do that, go to the PID tuning tab, within the ‘Slider Mode’ dropdown listing, choose RP (Roll Pitch), as an alternative of RPY (Roll Pitch Yaw). This may exclude yaw values from the sliders, and means that you can enter PID numbers for yaw. For five″ freestyle and cinematic builds, strive 100 for each P and I might be a great start line. You may also strive increased values as yaw tends to be fairly sluggish reacting.
There isn’t a excellent tune
How good is nice sufficient? You’ll be able to at all times spend extra time taking part in with filters and PID numbers, and you might even see enhancements however it may be situational and the time you spend money on it won’t be proportional to the consequence. I usually simply cease when it seems to be “ok” and depart it there until there’s a particular downside to be solved
Troubleshooting Suggestions
Dangerous Gyro
A 5-inch FPV drone ought to fly easily on default Betaflight settings. In case your quad experiences vibrations, it might be attributable to mechanical or electrical points, or typically a foul gyro on the flight controller (FC). Right here’s the way to diagnose a foul gyro:
- Symptom: One axis is considerably noisier than the others, particularly within the decrease frequency spectrum under 200Hz.
- Prognosis: Rotate the FC by 90 levels. If the noisy axis follows the rotation, the gyro might be defective.
Within the instance under, the pitch axis is far noisier than roll and yaw, with bursts of D time period noise brought on by the noisy gyro. Potential Causes:
- Excessive energy wires close to the gyro.
- Noisy energy provide to the FC.
- Poor board design.

Options:
- Eradicating any excessive energy wires close to the gyro .
- You’ll be able to strive utilizing a 1000uF low ESR capacitor on the ESC energy.
- If already utilizing a capacitor, strive soldering a further smaller 220uF-470uF capacitor to the facility of the FC (VBAT/VCC pad).
- If not one of the above strategies works, you would possibly simply have to switch the FC.
RC Smoothing
RC smoothing is crucial in Betaflight to keep away from points with feedforward. Correct RC smoothing settings rely in your RC hyperlink. It’s greatest to load the suitable RC_Link preset to keep away from errors.
The Auto Issue is probably one of the crucial vital values, decrease is extra twitchy and responsive whereas the next worth is softer and smoother however extra sluggish. Right here’s a common rule I personally observe:
- 20-25: Racing
- 30: Default worth, nice for Freestyle
- 50: Cinematic
- 90: Extraordinarily easy cruising, delay may be noticeable to some
- 120: Highest smoothness doable with out entering into bother, however delay is noticeable
Dangerous gear/pilot require increased RC smoothing too, e.g. Low high quality radio management gear, worn out gimbals, pilots with shaky fingers, and so on. Mainly something that may contribute to jerkiness in RC instructions.
If doable, examine black field logs to substantiate you have got easy setpoints, if the setpoint isn’t easy (has steppings from RC instructions), merely enhance the smoothing barely.
In case you have noise in setpoint that peaks round 50Hz, 150Hz, 250Hz or 500Hz, then there’s most likely an issue with RC smoothing. These frequencies are frequent packet charges in RC hyperlink. On this instance, it’s Crossfire 150Hz.

If you’re not utilizing sufficient filtering for the RC instructions, you won’t have smoothed out the RC sign sufficient and it may create noise on the frequency of your radio hyperlink packet fee.
RC smoothing removes stepping and bumpiness in your set-point, it makes P time period hint much less jerky. Nevertheless it additionally provides delay to feedforward in addition to setpoint, so your quad would possibly really feel just a little bit much less responsive. RC Smoothing is beneficial, however an excessive amount of smoothing defeats the aim of getting quick RC packet charges like ExpressLRS gives.
The objective is to easy out the steppings however not including an excessive amount of delay. If you would like smoother RC enter, strive including some extra expo, it has comparable impact however it gained’t provide the latency penalty.
One of the simplest ways is to only load the suitable RC Hyperlink preset as I talked about right here. If you happen to did not load the right RC_Link preset in your specific RC hyperlink and packet fee, it may also trigger issues to Feedforward. On this instance, feedforward jitters because of the lack of stepping smoothing in RC instructions.

PID Sum too low?
If the PID_Sum hits the default 500 restrict (50%) as a result of PID settings are very excessive, you possibly can increase the restrict to 1000. To do that, enter the next command within the CLI: set pid_sum_limit=1000. However it doesn’t at all times make a distinction in flight behaviour as motors would possibly saturate at this fee anyway.

ADC Filter Jitters Inflicting Oscillations
If you happen to expertise random vibrations and wobbles attributable to feedforward jitters, even after making use of the right RC Hyperlink preset or rising RC smoothing, the difficulty might be because of the ADC filter.
Make sure the ADC filter is turned off in your radio’s system menu underneath the {hardware} web page.
Feedforward spikes seem within the Blackbox logs when the ADC filter is turned on, inflicting undesirable oscillations and vibrations.

Edit Historical past
- Nov 2022 – Information created
- Jun 2024 – Up to date to Betaflight 4.5

