
Do you wish to learn to load a xib file to create a customized view object? Properly, this UIKit tutorial is only for you written in Swift.
I have already got a complete information about initializing views and controllers, however that one lacks a really particular case: making a customized view utilizing interface builder. 🤷♂️
Loading xib information
Utilizing the contents of a xib file is a reasonably rattling straightforward job to do. You should use the next two strategies to load the contents (aka. the view hierarchy) of the file.
let view = UINib(
    nibName: "CustomView",
    bundle: .most important
).instantiate(
    withOwner: nil,
    choices: nil
).first as! UIView

// does the identical as above
// let view = Bundle.most important.loadNibNamed(
//    "CustomView",
//    proprietor: nil,
//    choices: nil
// )!.first as! UIView

view.body = self.view.bounds
self.view.addSubview(view)
The snippet above will merely instantiate a view object from the xib file. You possibly can have a number of root objects within the view hierarchy, however this time let’s simply decide the primary one and use that. I assume that in 99% of the circumstances that is what you’ll want with the intention to get your customized views. Additionally you’ll be able to lengthen the UIView object with any of the options above to create a generic view loader. Extra on that later… 😊
This technique is fairly easy and low cost, nonetheless there may be one little disadvantage. You possibly can’t get named pointers (shops) for the views, however just for the basis object. In case you are placing design components into your display, that’s effective, but when you might want to show dynamic knowledge, you may wish to attain out for the underlying views as effectively. 😃
Customized views with shops & actions
So the right method to load customized views from xib information goes one thing like this:
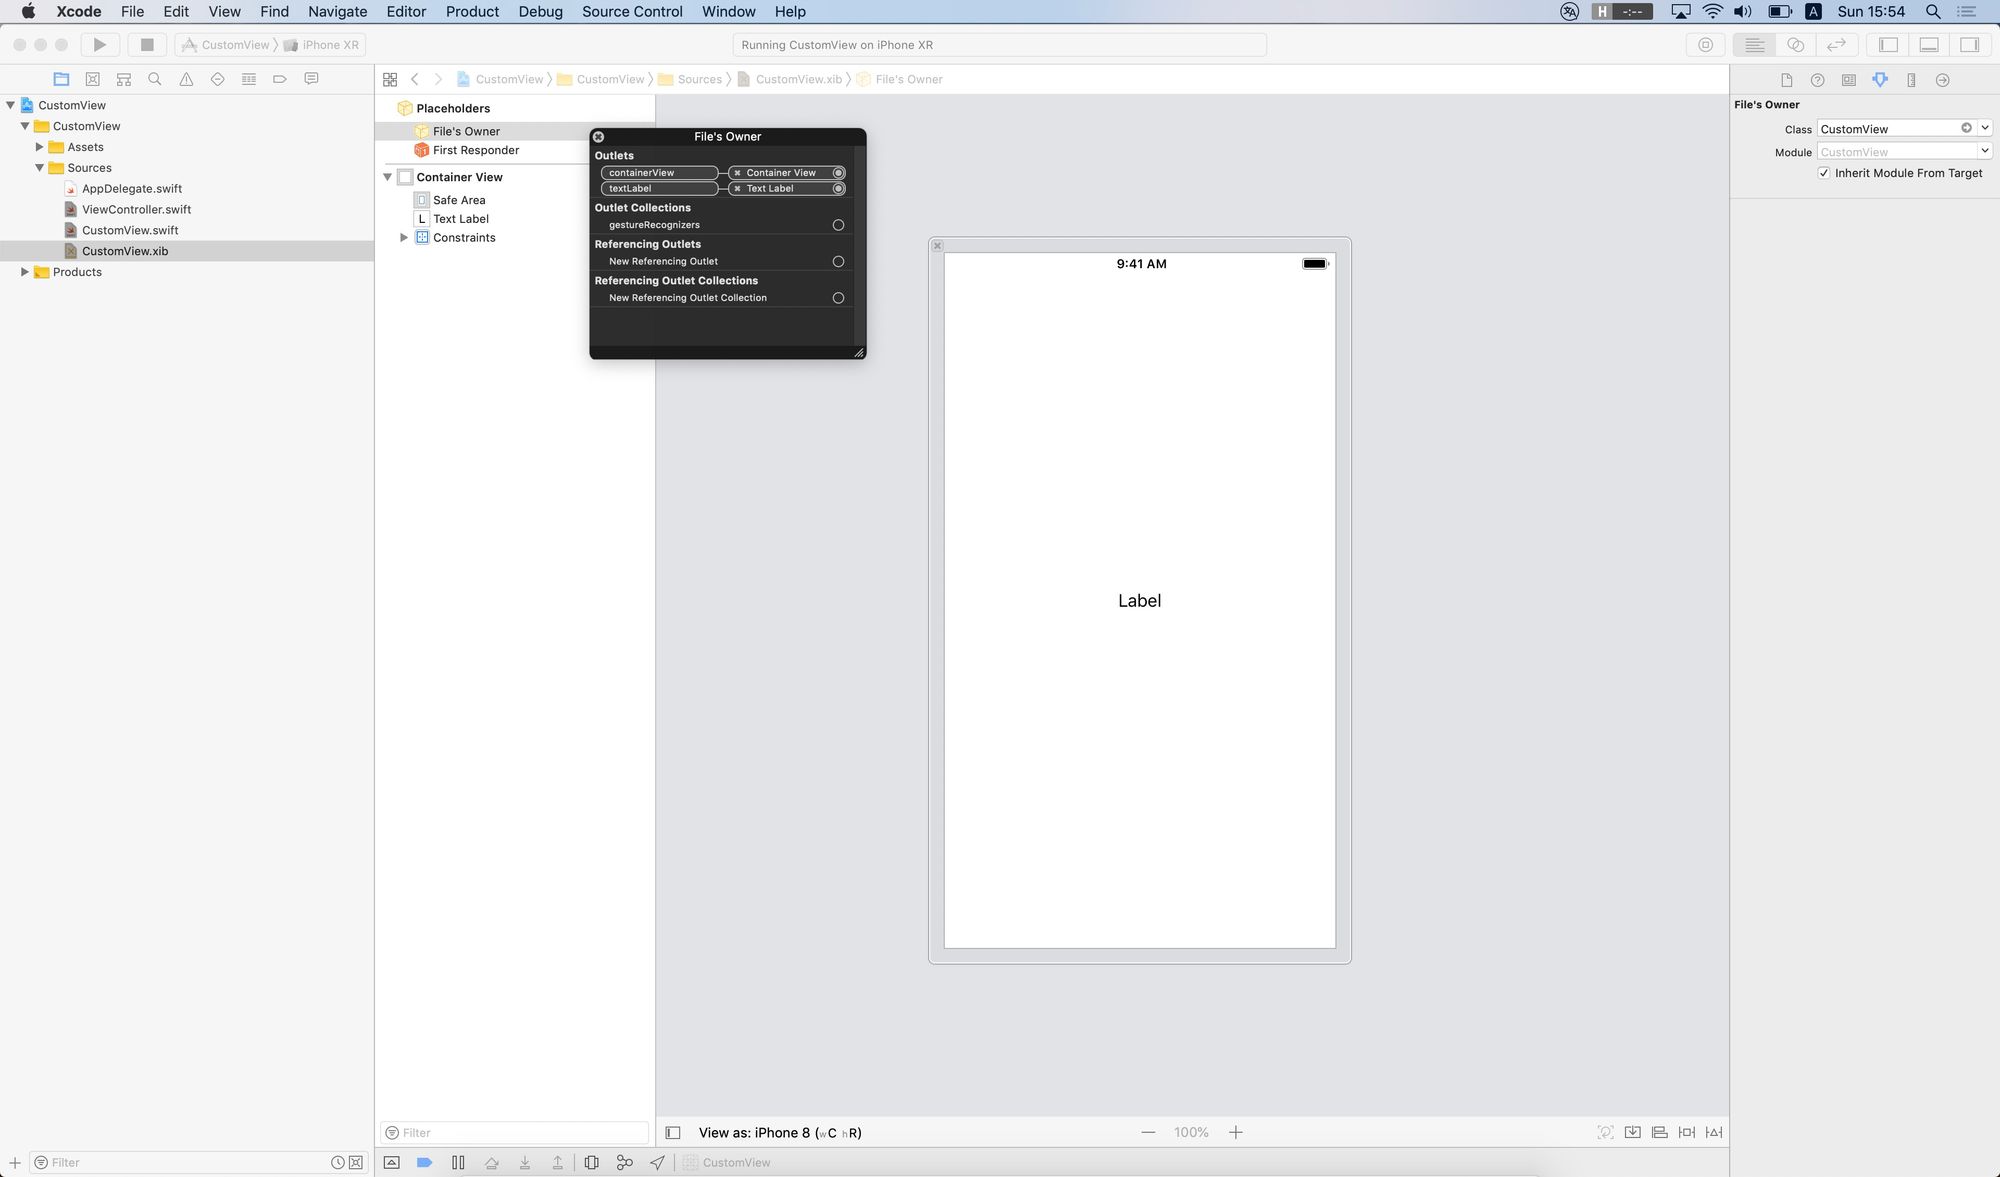
Inside your customized view object, you instantiate the xib file precisely the identical approach as I advised you proper up right here. 👆 The one distinction is that you simply don’t want to make use of the article array returned by the strategies, however you must join your view objects by means of the interface builder, utilizing the File’s Proprietor as a reference level, plus a customized container view outlet, that’ll comprise every little thing you want. 🤨
// notice: view object is from my earlier tutorial, with autoresizing masks disabled
class CustomView: View {

    // that is going to be our container object
    @IBOutlet weak var containerView: UIView!

    // different common shops
    @IBOutlet weak var textLabel: UILabel!

    override func initialize() {
        tremendous.initialize()

        // first: load the view hierarchy to get correct shops
        let title = String(describing: sort(of: self))
        let nib = UINib(nibName: title, bundle: .most important)
        nib.instantiate(withOwner: self, choices: nil)

        // subsequent: append the container to our view
        self.addSubview(self.containerView)
        self.containerView.translatesAutoresizingMaskIntoConstraints = false
        NSLayoutConstraint.activate([
            self.containerView.topAnchor.constraint(equalTo: self.topAnchor),
            self.containerView.bottomAnchor.constraint(equalTo: self.bottomAnchor),
            self.containerView.leadingAnchor.constraint(equalTo: self.leadingAnchor),
            self.containerView.trailingAnchor.constraint(equalTo: self.trailingAnchor),
        ])
    }
}
So the initialize technique right here is simply loading the nib file with the proprietor of self. After the loading course of completed, your outlet pointers are going to be full of correct values from the xib file. There may be one final thing that we have to do. Even the views from the xib file are “programmatically” related to our customized view object, however visually they aren’t. So we now have so as to add our container view into the view hierarchy. 🤐

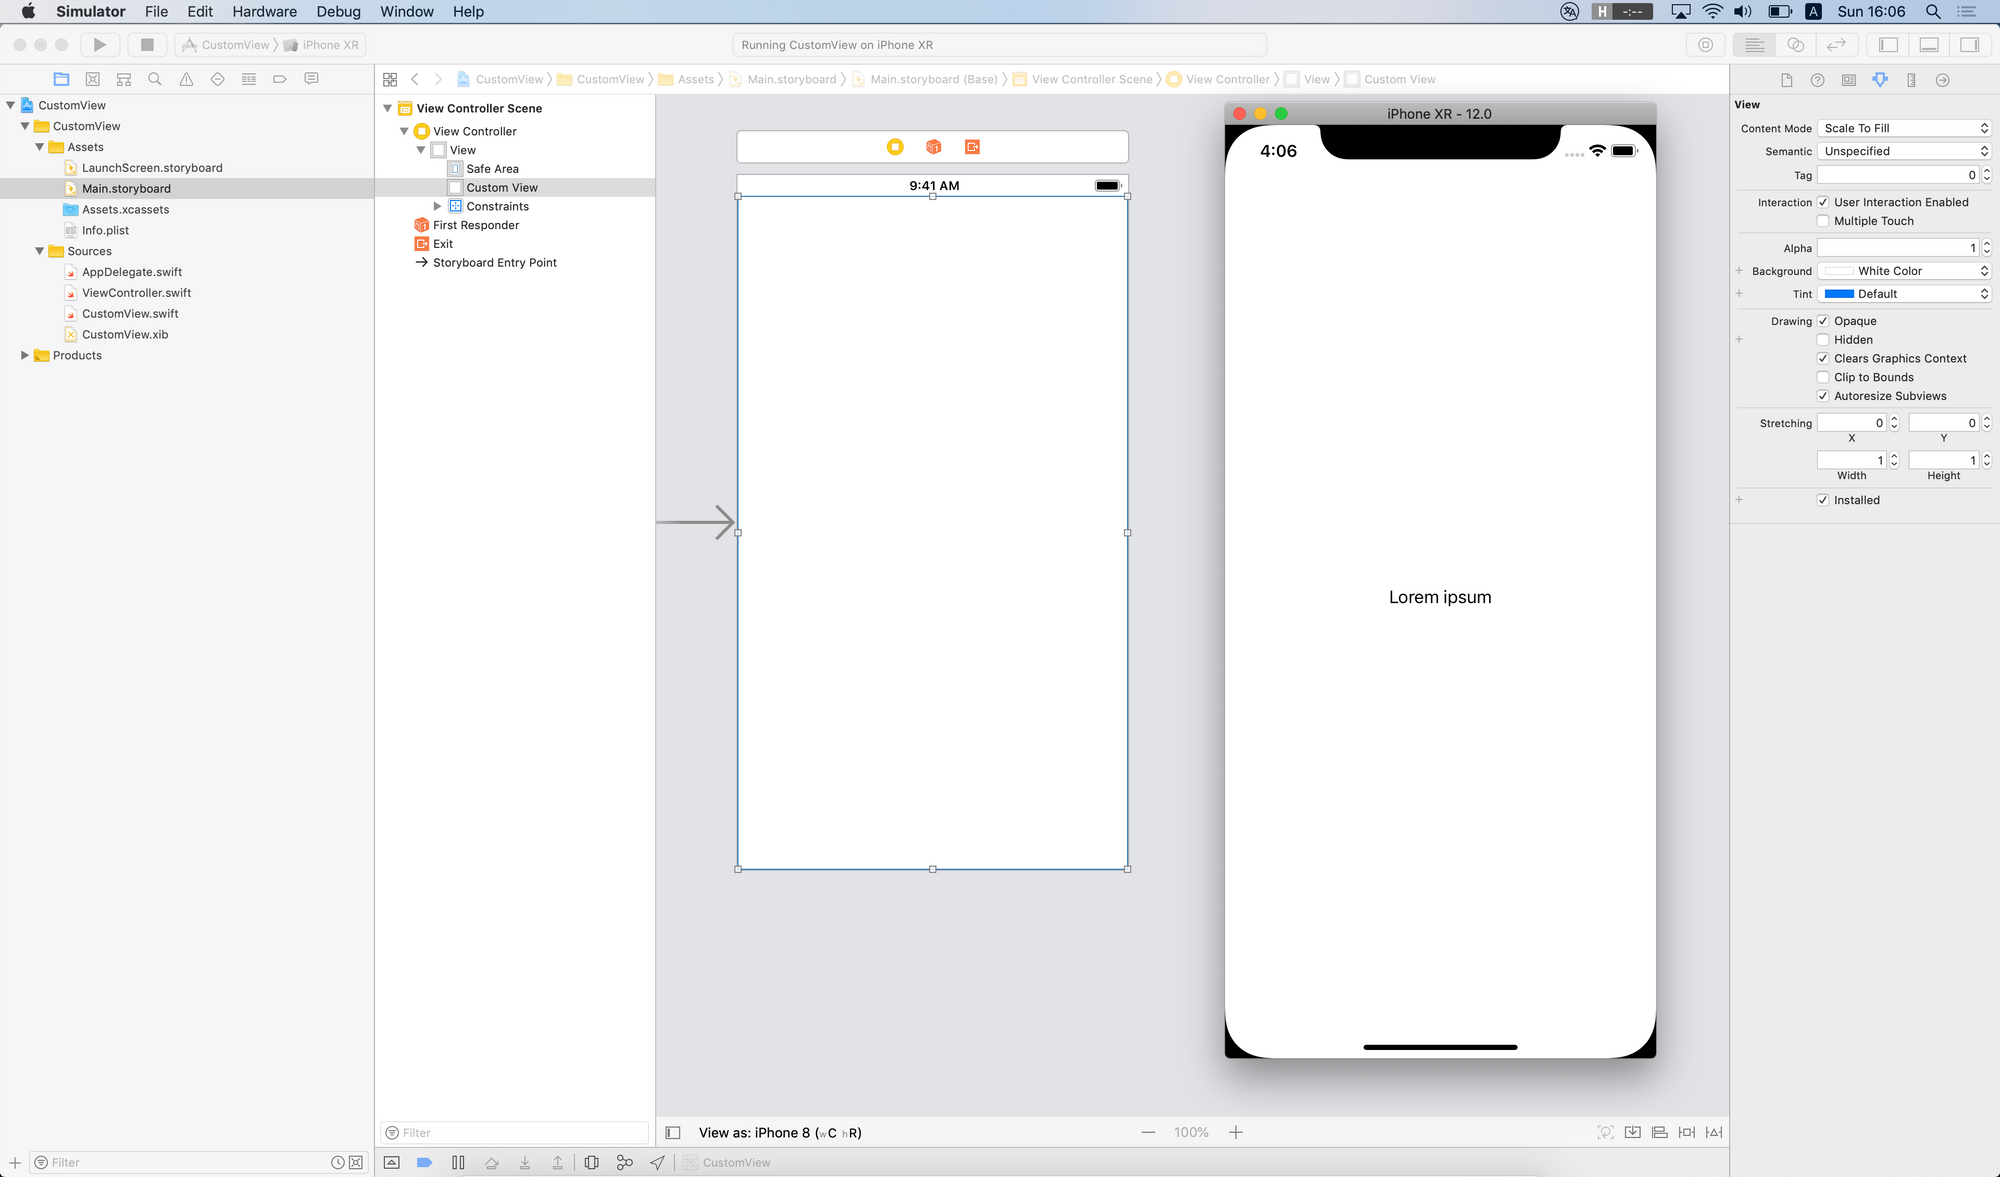
If you wish to use your customized view object, you simply should create a brand new occasion from it – inside a view controller – and at last be happy so as to add it as a subview!
One phrase about bounds, frames aka. springs and struts: fucking UGLY! That’s two phrases. They’re thought of as a foul observe, so please use auto format, I’ve a pleasant tutorial about anchors, they’re wonderful and studying them takes about quarter-hour. 😅
class ViewController: UIViewController {

    weak var customView: CustomView!

    override func loadView() {
        tremendous.loadView()

        let customView = CustomView()
        self.view.addSubview(customView)
        NSLayoutConstraint.activate([
            customView.topAnchor.constraint(equalTo: self.view.topAnchor),
            customView.bottomAnchor.constraint(equalTo: self.view.bottomAnchor),
            customView.leadingAnchor.constraint(equalTo: self.view.leadingAnchor),
            customView.trailingAnchor.constraint(equalTo: self.view.trailingAnchor),
        ])
        self.customView = customView
    }

    override func viewDidLoad() {
        tremendous.viewDidLoad()

        self.customView.textLabel.textual content = "Lorem ipsum"
    }
}
That’s it, now you’ve got a very working customized UIView object that masses a xib file with the intention to use it’s contents. Wasn’t so dangerous, proper? 🤪
Another additional factor. If you happen to don’t prefer to deal with views programmatically otherwise you merely don’t wish to fiddle with the loadView technique, simply take away it completely. Subsequent put the @IBOutlet key phrase proper earlier than your customized view class variable. Open your storyboard utilizing IB, then drag & drop a brand new UIView component to your controller and join the customized view outlet. It ought to work like magic. 💫
I promised shops and actions within the heading of this part, so let’s discuss a bit bit about IBActions. They work precisely the identical as you’d anticipate them with controllers. You possibly can merely hook-up a button to your customized view and delegate the motion to the customized view class. If you wish to ahead touches or particular actions to a controller, you need to use the delegate sample or go together with a easy block. 😎
Possession and container views
It’s attainable to depart out all of the xib loading mechanism from the view occasion. We will create a set of extensions with the intention to have a pleasant view loader with a customized view class from a xib file. This manner you don’t want a container view anymore, additionally the proprietor of the file might be overlooked from the sport, it’s roughly the identical technique as reusable cells for tables and collections created by Apple. 🍎
You need to know that going this manner you’ll be able to’t use your default UIView init strategies programmatically anymore, as a result of the xib file will maintain the init course of. Additionally in case you are making an attempt to make use of this type of customized views from a storyboard or xib file, you gained’t have the ability to use your shops, as a result of the correspondig xib of the view class gained’t be loaded. In any other case in case you are making an attempt to load it manyally you’ll run into an infinite loop and finally your app will crash like hell. 😈
import UIKit

extension UINib {
    func instantiate() -> Any? {
        return self.instantiate(withOwner: nil, choices: nil).first
    }
}

extension UIView {

    static var nib: UINib {
        return UINib(nibName: String(describing: self), bundle: nil)
    }

    static func instantiate(autolayout: Bool = true) -> Self {
        // generic helper operate
        func instantiateUsingNib(autolayout: Bool) -> T {
            let view = self.nib.instantiate() as! T
            view.translatesAutoresizingMaskIntoConstraints = !autolayout
            return view
        }
        return instantiateUsingNib(autolayout: autolayout)
    }
}

class CustomView: UIView {

    @IBOutlet weak var textLabel: UILabel!
}

// utilization (inside a view controller for instance)
// let view = CustomView.instantiate()
Similar to with desk or assortment view cells this time you must set your customized view class on the view object, as an alternative of the File’s Proprietor. You need to join your shops and principally you’re finished with every little thing. 🤞
To any extent further you need to ALWAYS use the instantiate technique in your customized view object. The excellent news is that the operate is generic, returns the right occasion sort and it’s extremely reusable. Oh, btw. I already talked about the dangerous information… 🤪
There may be additionally yet another approach by overriding awakeAfter, however I might not depend on that resolution anymore. In a lot of the circumstances you’ll be able to merely set the File’s Proprietor to your customized view, and go together with a container, that’s a secure guess. When you’ve got particular wants you may want the second method, however please watch out with that. 😉

