
In iOS 18, Apple has revamped the best way that tab bars look. They was positioned on the backside of the display with an icon and a textual content beneath. Beginning with iOS 18, tab bars will not be displayed in that method.
As an alternative, on iPad you’ll have your tab bar on the highest of the display with text-only objects whereas on iPhone your tab bar will retain its previous look.
Along with altering how a tab bar seems to be, Apple has additionally added new habits to the tab bar; it will possibly increase right into a sidebar that comprises a extra detailed hierarchy of navigation objects.
On this put up, I’d like to check out this function and particularly I’d wish to share some issues that I’ve realized about how Apple handles sidebars that include sectioned content material. Take into account this put up to be each an illustration of how one can have a TabBar that doubles as a sidebar in addition to some ideas and methods that may make it easier to craft an awesome expertise once you select to undertake a TabBar that may grow to be a sidebar with sections.
Understanding our purpose
Now, I may present you the SwiftUI views and look at modifiers you want as a way to construct a sidebar / tabview pair for iPad and I may present you that it really works and finish this put up there. Nonetheless, that may be a little bit bit too shortsighted and also you would possibly simply as properly watch Apple’s personal content material on this matter as a substitute.
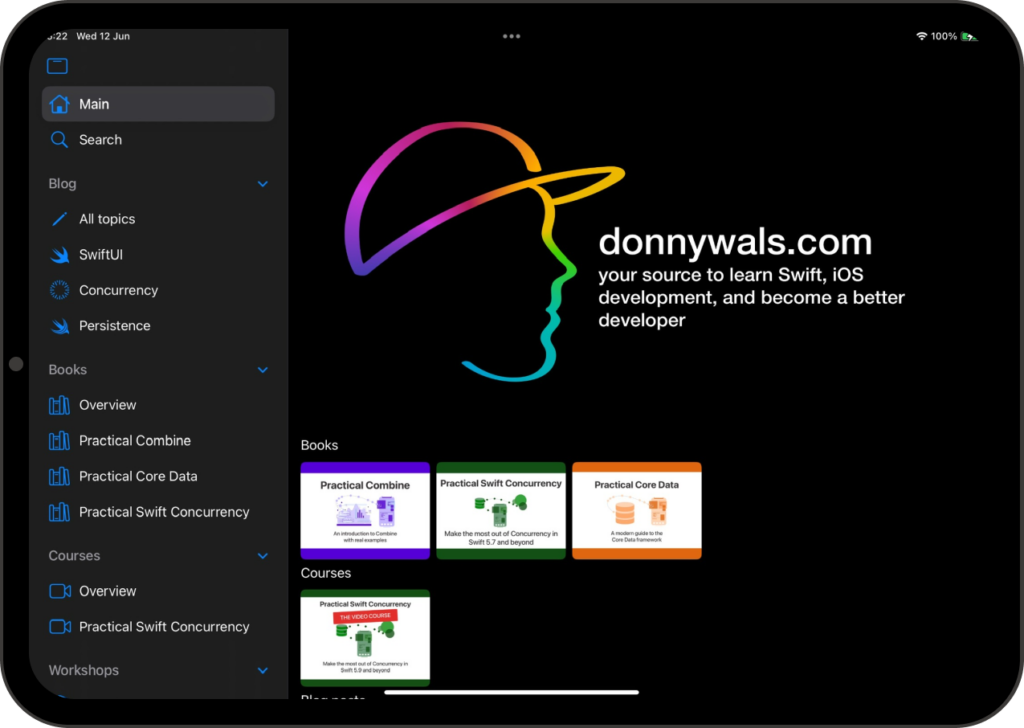
What I’d like to indicate you on this put up, is how one can leverage a sectioned sidebar that is smart and likewise has a tab bar that really works properly on telephones. On this screenshot you possibly can see all of the totally different variants of the tab/sidebar that I need to help.

Discover how my tab bar has solely a few objects in it within the compact mode that’s used for a split-screen iPad or iPhone. On my full width iPad show I’ve a tab bar that comprises a number of components like “Weblog” and “Books”. And when proven as a sidebar, these tab bar objects grow to be class headings as a substitute.
Supporting all that is pretty simple however it comes with some gotchas that I’d like to stipulate on this put up.
Organising our TabView and Sections
Whereas we do have to take note of a number of kind elements and write some particular code to deal with smaller screens we’ll begin by constructing out our large-screen TabView first.
Inside a TabView we will outline each Tab and TabSection objects. A Tab is proven as a tab within the tab view and the sidebar too. Within the screenshot above I’ve added Primary and Search as Tab in my TabView. You’ll be able to see that they’re not grouped underneath any header.
Then there’s Weblog, Books, Programs, and extra. These are sections that each one include their very own checklist of tabs.
Let’s go proper forward and have a look at the code that I exploit to construct my hierarchy of tabs and sections. I’ll solely embody a single TabSection because the code could be fairly lengthy and repetitive in any other case.
var physique: some View {
    TabView {
        Tab("Primary", systemImage: "home") {
            OverviewView()
        }

        TabSection("Weblog") {
            Tab("All subjects", systemImage: "pencil") {
                Textual content("That is the weblog web page")
            }

            Tab("SwiftUI", systemImage: "swift") {
                Textual content("SwiftUI matter")
            }

            Tab("Concurrency", systemImage: "timelapse") {
                Textual content("Concurrency matter")
            }

            Tab("Persistence", systemImage: "swiftdata") {
                Textual content("Persistence matter")
            }
        }

        // .. extra TabSections

        Tab(position: .search) {
            Textual content("Search the positioning")
        }
    }
}
If I’d run this code as-is, my TabView would work however person’s received’t be capable to toggle it right into a sidebar. We’ll repair that in a second. Let’s have a look at my hierarchy first.
My top-level Tab objects will all the time be proven on my tab bar. The Tab(position: .search) that I’ve here’s a particular case; that tab will all the time be proven on the trailing aspect of my tab bar with a search icon.
My TabSection is an attention-grabbing case. In tab bar view, the part’s title might be used because the title for my tab bar merchandise. The view that’s proven to the person once they choose this tab bar merchandise is the element view for the primary Tab within the part. So on this case, that’s “All subjects”. That is nice as a result of “All subjects” is an outline web page for the part.

When working on a small display nonetheless, each Tab is added to the tab bar no matter their sections. Which means that on iPhone, the tab bar is cluttered with all types of tab bar objects we don’t need.
Right here’s what we get once we run on iPhone. Discover that we don’t see the identical tab bar objects. As an alternative, each Tab we’ve outlined at any stage is being listed.

We’ll repair this after we allow sidebar toggling.
Enabling sidebar toggling
To permit customers to change our tab bar right into a sidebar, we have to apply the tabViewStyle view modifier to the TabView as follows:
var physique: some View {
    TabView {
      // tabs and sections...
    }
    .tabViewStyle(.sidebarAdaptable)
}
By setting the tabViewStyle to sidebarAdaptable, customers can now toggle between our tab bar and a sidebar simply.
In sidebar mode, all of our root Tab objects are listed first. After that, sections are listed with the part title as headers, and in every part we see the Tab views that we’ve added.
Switching between a sidebar and tab bar seems to be fairly good now and it really works properly.
However for smaller measurement lessons (like telephones and split-view iPad) we’ll need to do one thing else.
Let’s see how we will adapt our TabView to smaller screens.
Adapting the TabView to smaller screens
In SwiftUI, we will acquire entry to the present measurement class for our view by the setting. Since our TabView will grow to be a conventional tab bar on the backside of the display on compact measurement lessons and be within the new fashion on common we will really change the contents of our TabView primarily based on the scale class so that each one further objects we had earlier than might be gone if the scale class is compact. Right here’s what that appears like:
@Surroundings(.horizontalSizeClass)
var horizontalSize

var physique: some View {
    TabView {
        Tab("Primary", systemImage: "home") {
            OverviewView()
        }

        if horizontalSize == .common {
            TabSection("Weblog") {
                Tab("All subjects", systemImage: "pencil") {
                    Textual content("That is the weblog web page")
                }

                Tab("SwiftUI", systemImage: "swift") {
                    Textual content("SwiftUI matter")
                }

                Tab("Concurrency", systemImage: "timelapse") {
                    Textual content("Concurrency matter")
                }

                Tab("Persistence", systemImage: "swiftdata") {
                    Textual content("Persistence matter")
                }
            }
        } else {
            Tab("Weblog", systemImage: "pencil") {
                Textual content("That is the weblog web page")
            }
        }

        // repeat for different sections...
    }
}
The code is comparatively easy and it’s very efficient. We’ll simply have totally different tab objects relying on the scale class.
If you wish to be sure that tab choice is maintained, you possibly can really reuse the identical tag for tabs that symbolize the identical display in your app.
And that’s it! With this setup you’re able to help iPhone and iPad whereas utilizing the brand new tab bar and sidebar hybrid view.

