

Air mouse is a tool used to regulate the mouse of a tool comparable to a pc, cellular, good TVetc. On this mission, the air mouse is made utilizing an IndusBoard coin gadget.
IndusBoard Coin has numerous built-in sensors comparable to accelerometer, magnetometer, temperature sensor and so forth. For the air mouse, an accelerometer is used. This sensor detects the place of the board which is applied to make an air mouse by detecting the change in output readings.
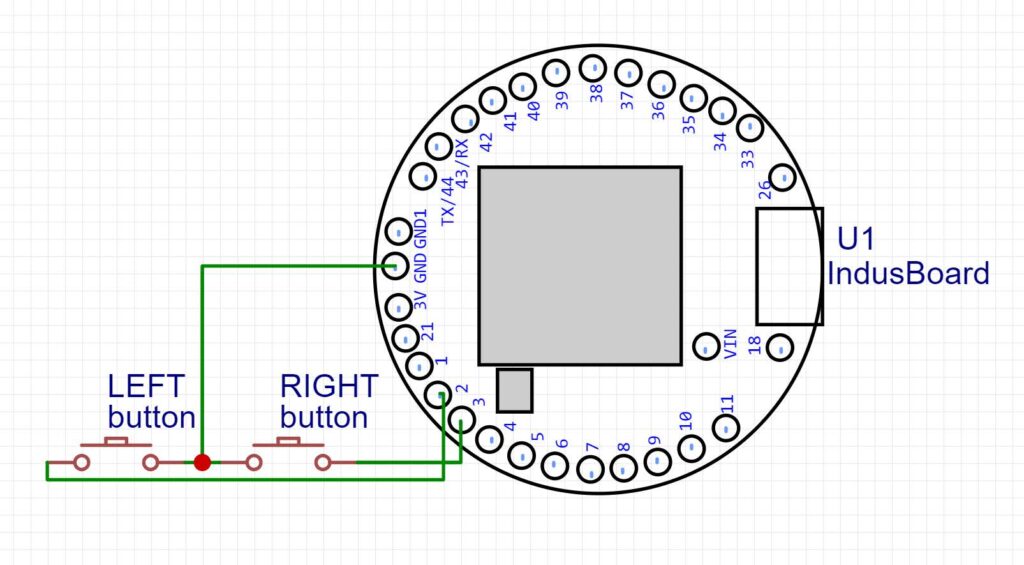
Moreover, left and proper clicks can be launched by connecting the pins of the board with exterior buttons.
– Commercial –

Elements required:
| S. no. | Title | Description | Quantity |
| 1. | IndusBoard Coin | 3cm sized dev board | 1 |
| 2. | Machine (laptop computer) | A Laptop computer or different mouse-operated gadget is required. | 1 |
| 3. | USB cable | Required to attach IndusBoard to the gadget. | 1 |
| 4. | Push button | For left and proper click on. | 2 |
| 5. | Jumper wires | To attach push buttons to the board. | 3 |
Arduino Code
 #embody
#embody
#embody
#embody "USB.h"
#embody "USBHIDMouse.h"
USBHIDMouse Mouse;
MPU6050 mpu();
#if outlined(ARDUINO_SAM_DUE)
#outline DEV_I2C Wire1 //Outline which I2C bus is used. Wire1 for the Arduino Due
#outline SerialPort Serial
#else
#outline DEV_I2C Wire //Or Wire
#outline SerialPort Serial
#endif
// Elements.
LSM303AGR_ACC_Sensor Acc(&DEV_I2C);
// sensors_event_t occasion;
// mpu.getEvent(&occasion);
// float x = occasion.acceleration.x;
// float y = occasion.acceleration.y;
const int leftButtonPin = 2; // Pin linked to the left button
const int rightButtonPin = 3; // Pin linked to the proper button
void setup() {
// Led.
// pinMode(13, OUTPUT);
// Initialize serial for output.
Serial.start(115200);
Mouse.start();
USB.start();
Wire.start();
// if (!mpu.start()) { // Initialize MPU6050
// Serial.println("Failed to search out MPU6050 chip");
// whereas (1) {
// delay(10);
// }
// }
// Initialize I2C bus.
DEV_I2C.start();
// mpu.calcGyroOffsets(true); // Calibrate and print offsets
pinMode(leftButtonPin, INPUT_PULLUP);
pinMode(rightButtonPin, INPUT_PULLUP);
// Initlialize parts.
Acc.start();
Acc.Allow();
}
void loop() {
// Led blinking.
// digitalWrite(13, HIGH);
// delay(250);
// digitalWrite(13, LOW);
// delay(250);
// Learn accelerometer LSM303AGR.
int32_t accelerometer[3];
Acc.GetAxes(accelerometer);
// mpu.replace(); // Replace MPU6050 information
// // Learn accelerometer values
float accelX = accelerometer[0]; // X-axis
float accelY = accelerometer[1]; // Y-axis
// Map accelerometer values to mouse actions
float mouseX = (float)(accelX * 0.01); // Regulate scaling issue as wanted
float mouseY = (float)(accelY * 0.01); // Regulate scaling issue as wanted
Mouse.transfer(mouseX,mouseY);
int leftButtonState = digitalRead(leftButtonPin);
int rightButtonState = digitalRead(rightButtonPin);
if (leftButtonState == LOW) { // Examine if left button is pressed
Mouse.click on(MOUSE_LEFT); // Ship left click on
delay(50); // Debounce delay
}
if (rightButtonState == LOW) { // Examine if proper button is pressed
Mouse.click on(MOUSE_RIGHT); // Ship proper click on
delay(50); // Debounce delay
}
// Output information.
// SerialPort.print("| Acc[mg]: ");
// SerialPort.print(accelerometer[0]);
// SerialPort.print(" ");
// SerialPort.print(accelerometer[1]);
// SerialPort.print(" ");
// SerialPort.print(accelerometer[2]);
// SerialPort.println(" |");
// for extra smoothness
if (abs(mouseX) > 2 || abs(mouseY) > 2) { // Regulate threshold as wanted
Mouse.transfer(mouseX, mouseY);
}
delay(20); // for easy motion
}
Schematic and Actual Implementation

Creator(s): Manjeet Vishwakarma, Abhay Verma and Satywanti Kundu are B.Tech ECE college students at GJUS&T HISAR

