
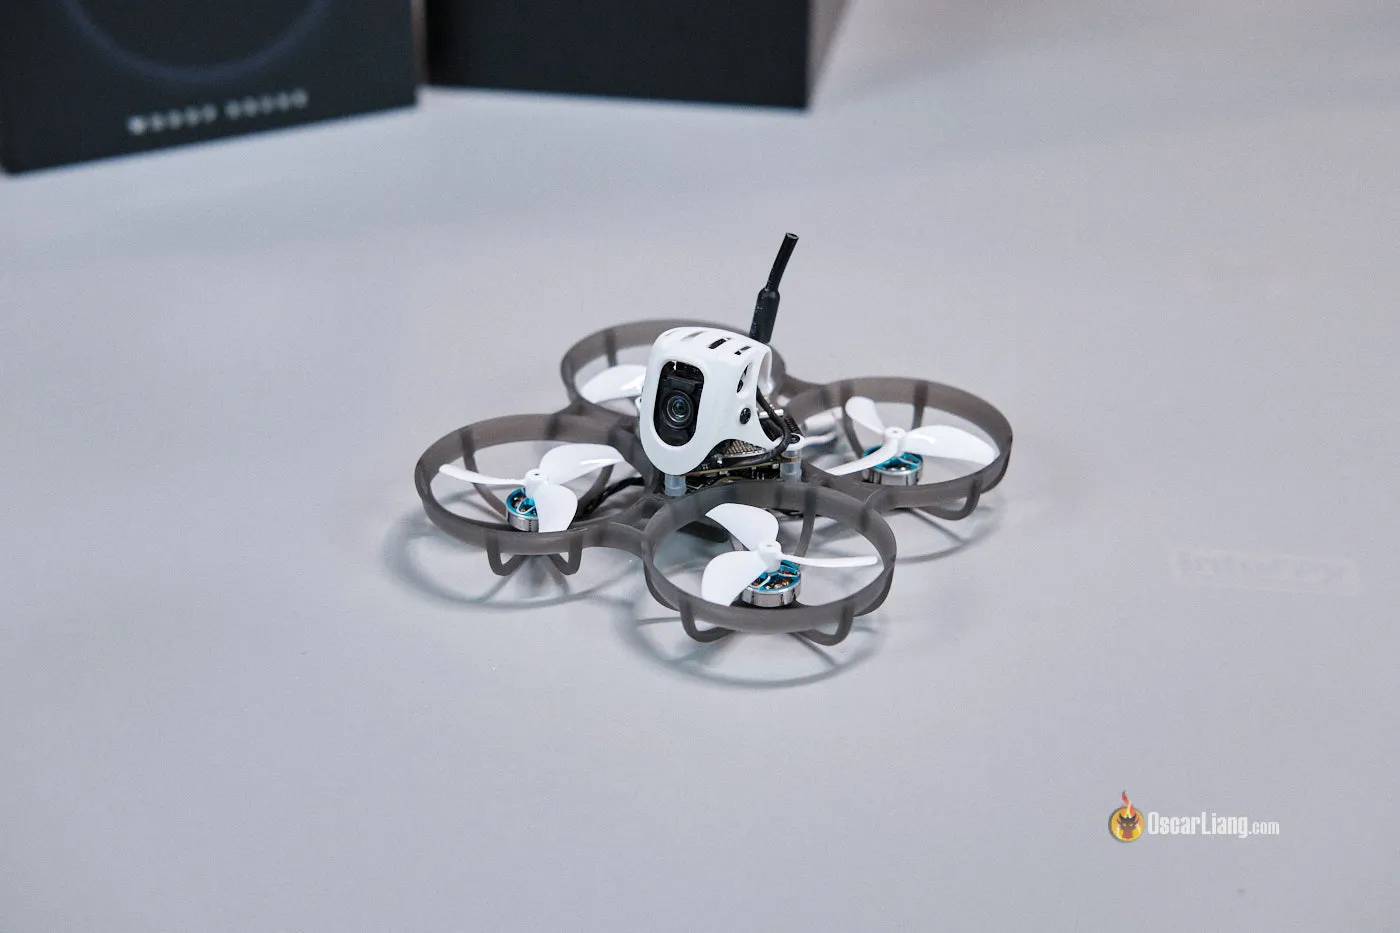
I not too long ago acquired my arms on the BetaFPV Meteor75 Professional O4, and I’m excited to share my expertise. This assessment covers how I put in the O4, set it up, and my flight expertise.

Additional Studying:
The place to Purchase
Get the Meteor75 Professional O4 whoop from:
It is available in two variations:
- DJI O4 Model: Priced at round $199.99.
- PNP Model (With out DJI O4): Priced at $79.99, however you’ll want to purchase your individual DJI O4 Air Unit.
To be sincere, in case you don’t thoughts further work assembling the drone, it is perhaps price getting the PNP model. The DJI O4 is barely $109, which suggests it can save you $11 by constructing it your self.
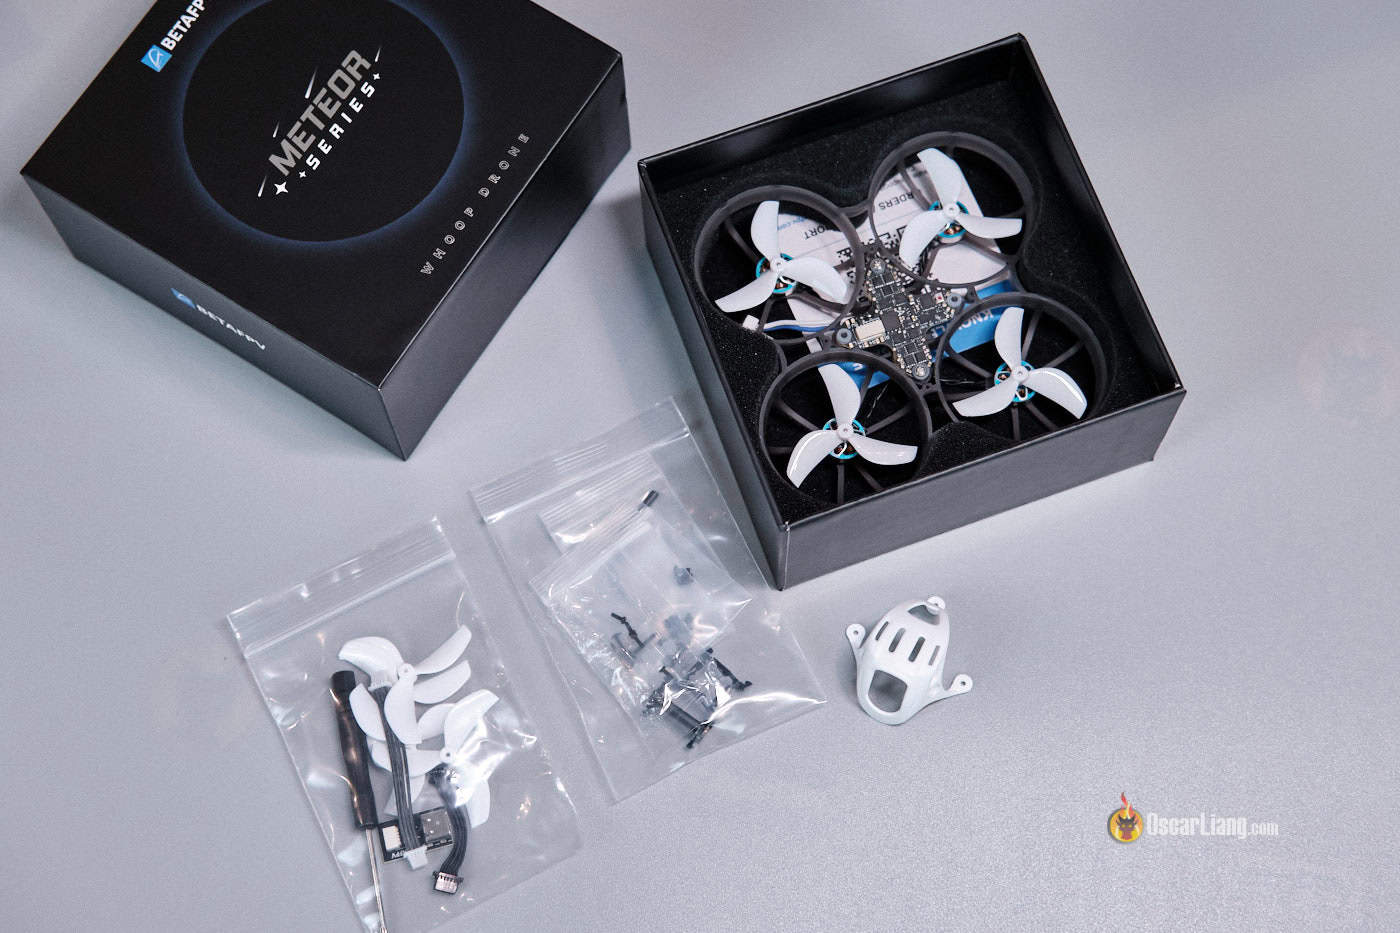
Unboxing
I’m reviewing the PNP model, which doesn’t embrace the O4 Air Unit. It comes with all the required equipment, together with a alternative antenna and an O4-to-FC cable, so that you’re prepared to put in the O4 within the Meteor75 Professional proper out of the field—no further elements or instruments required.
The quad weighs 37.2g (together with the DJI O4) or 51.4g together with a 1S 550mAh battery.
Cover
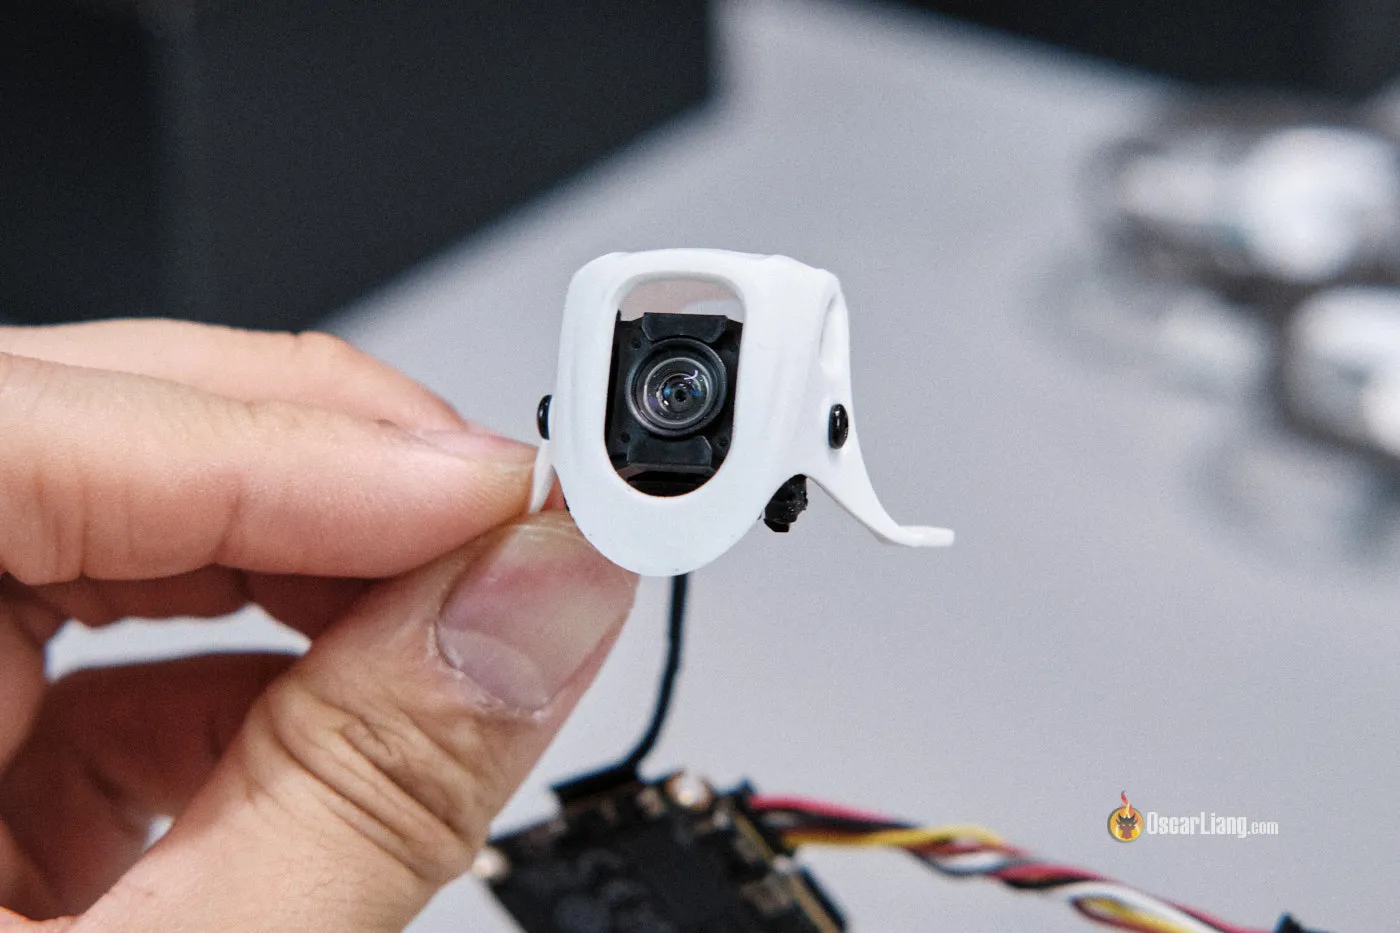
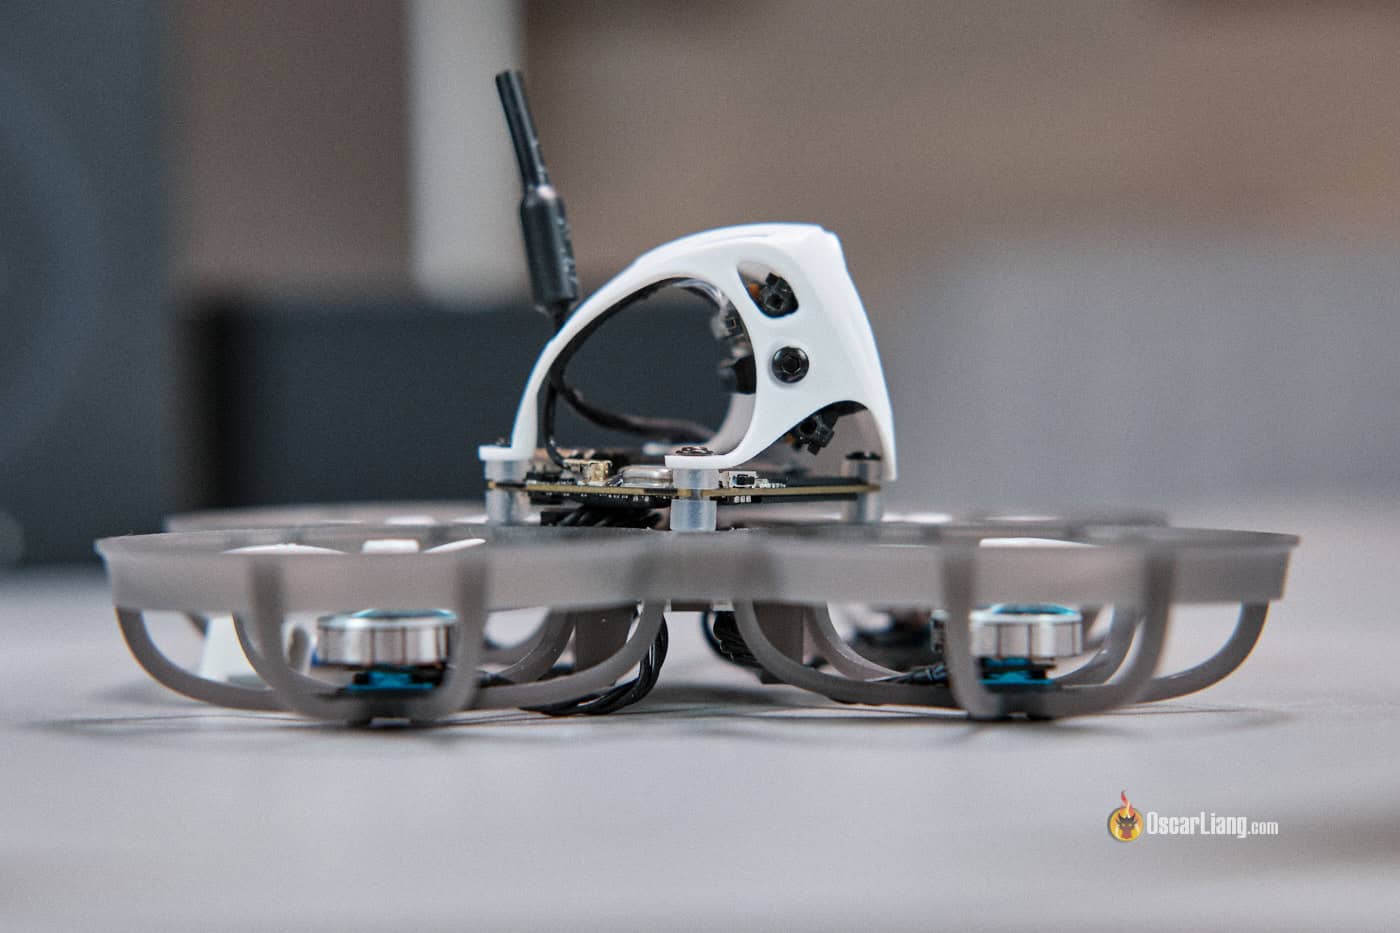
The brand new cover options a big cutout, permitting for a large angle adjustment for the O4 digital camera.
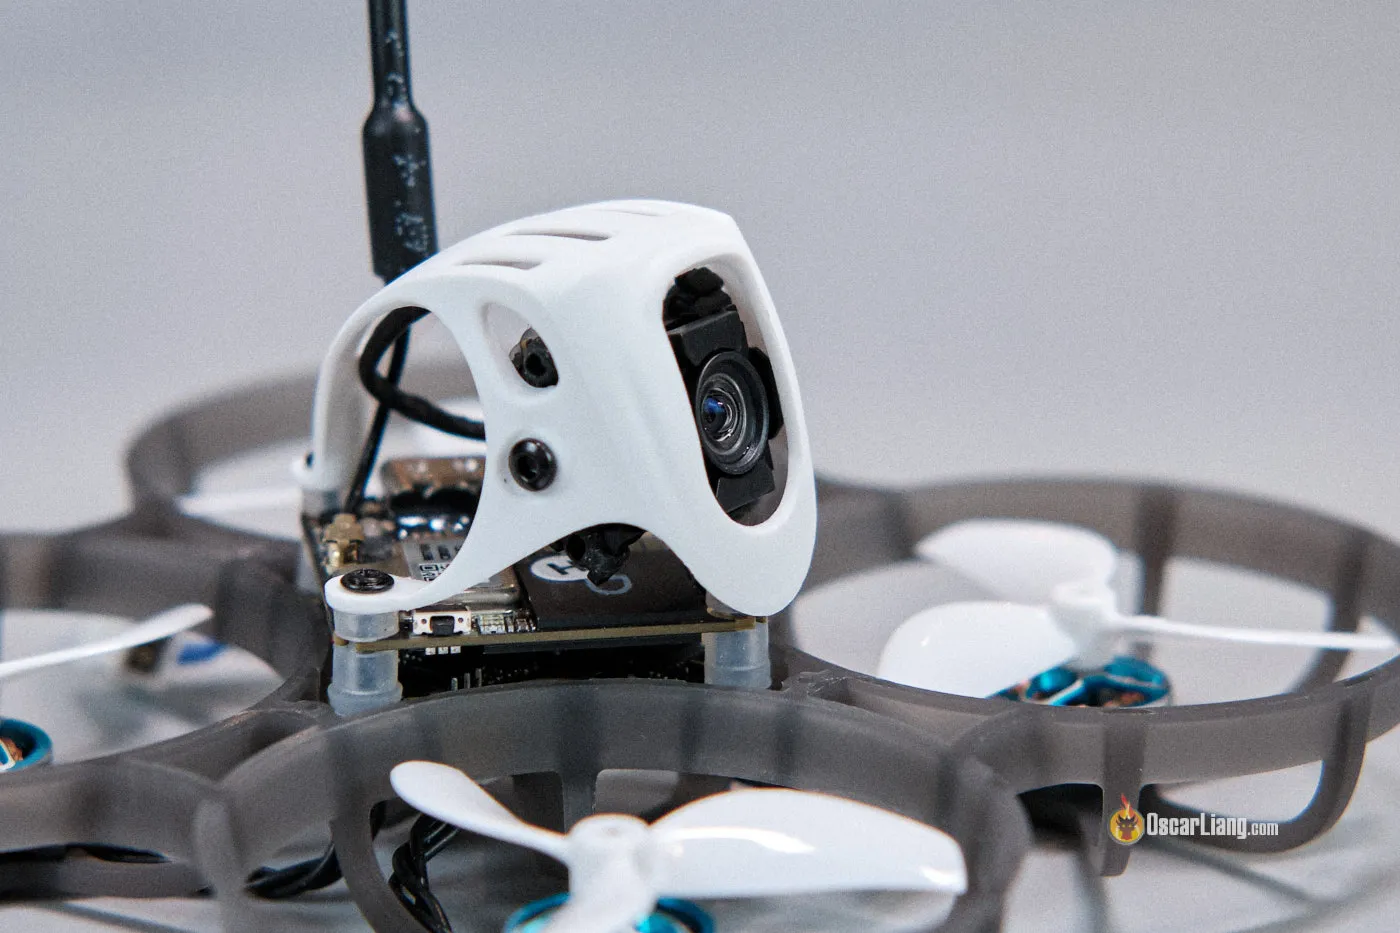
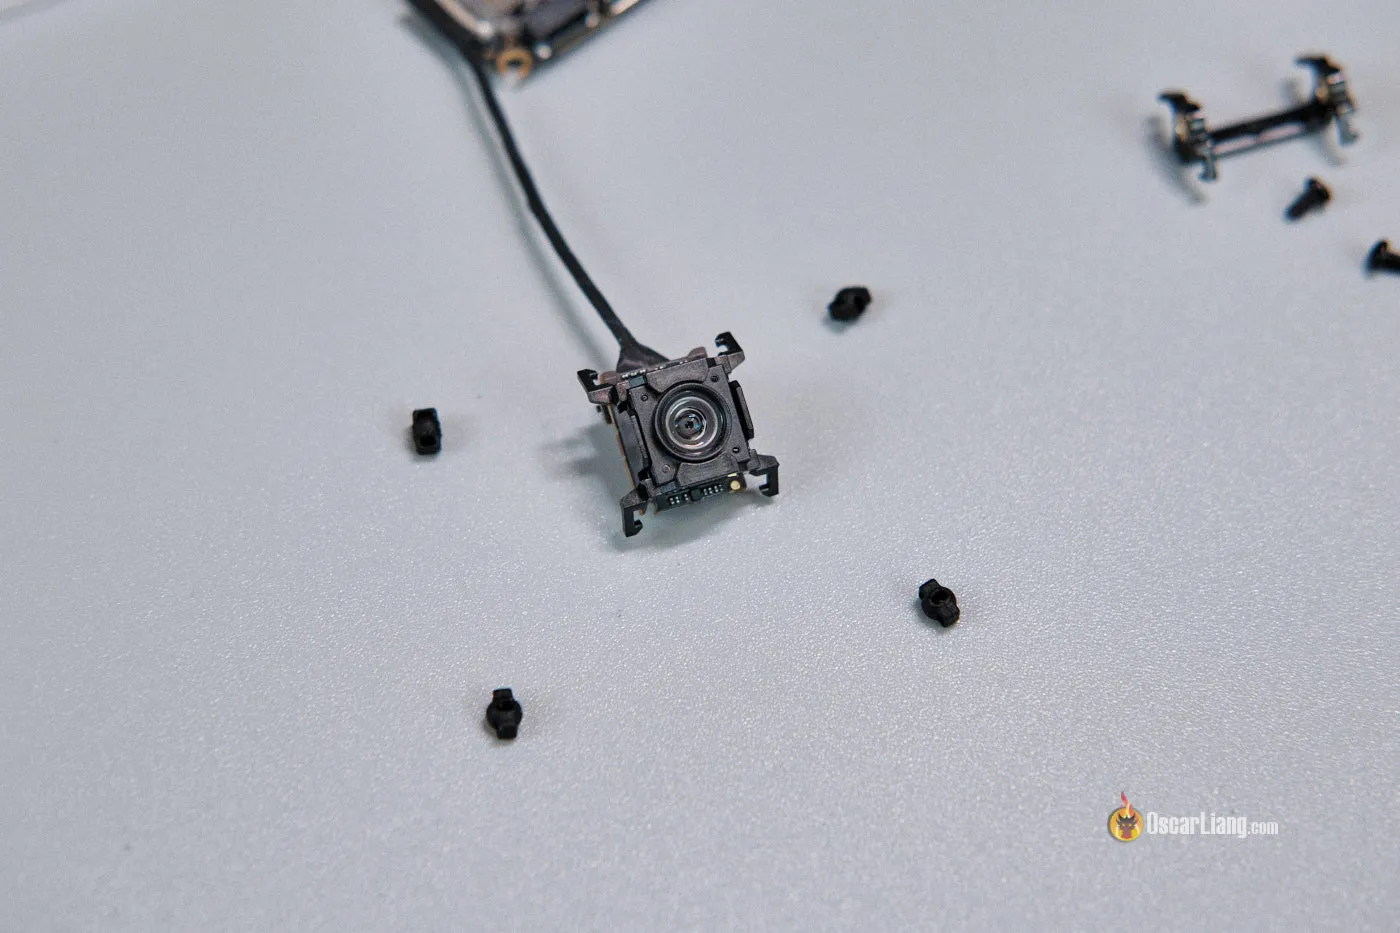
I’m fairly impressed by the digital camera’s comfortable mounting mechanism that BetaFPV has developed—it’s maybe one of many first “correct” comfortable mounting options for the DJI O4 so far, which is crucial to attain jello-free footage with the demanding O4 digital camera.
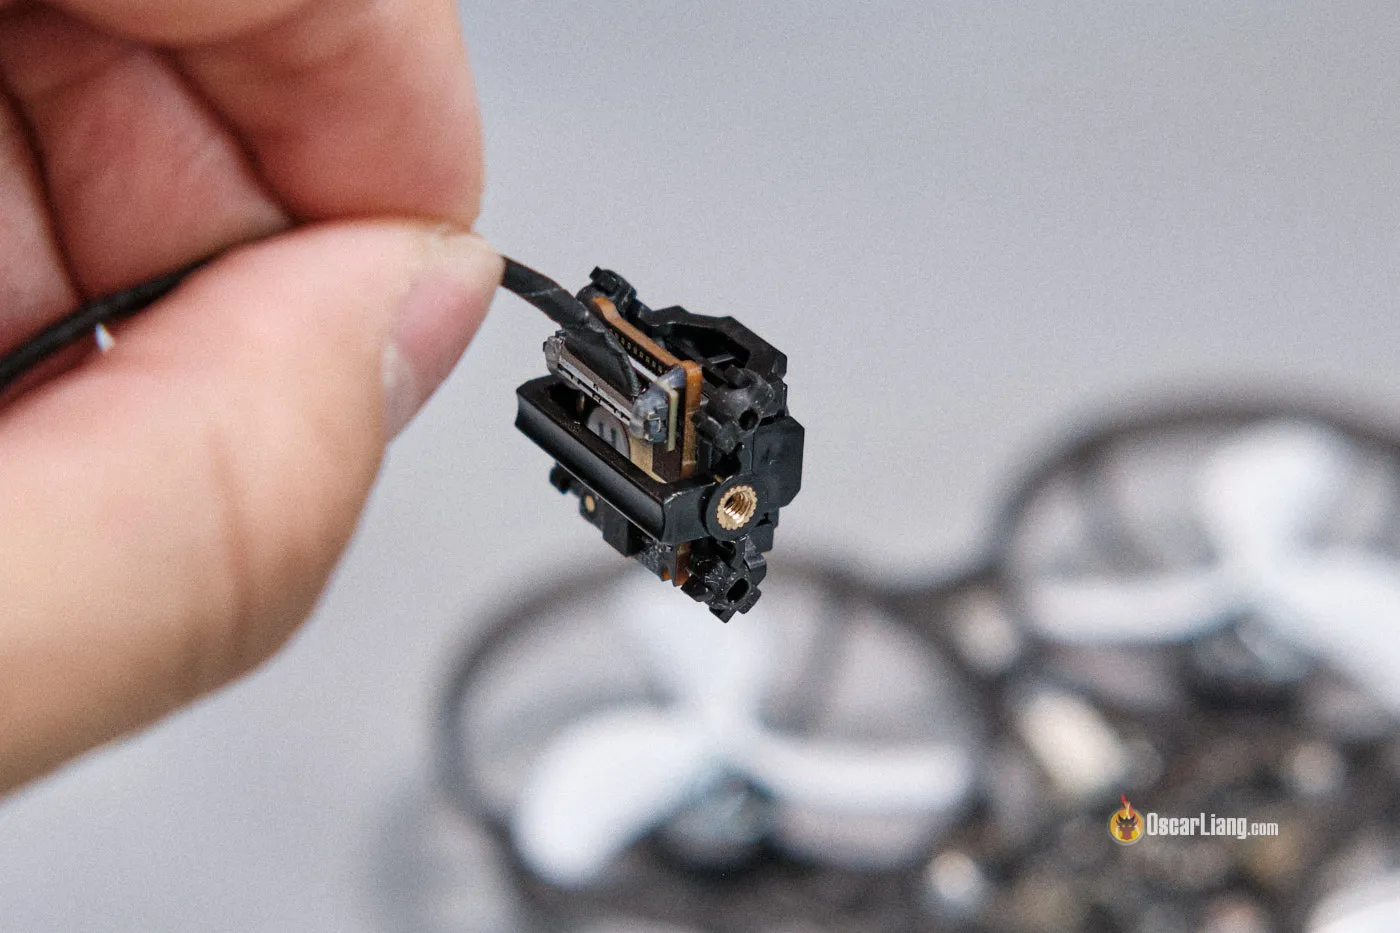
The mount contains a two-piece design—a again piece with two mounting screws on the perimeters (19mm width, micro FPV digital camera measurement) and a entrance clamp that secures the digital camera. The 2 items are related by 4 vibration-dampening “balls,” which cut back the vibrations reaching the digital camera.
Flight Controller
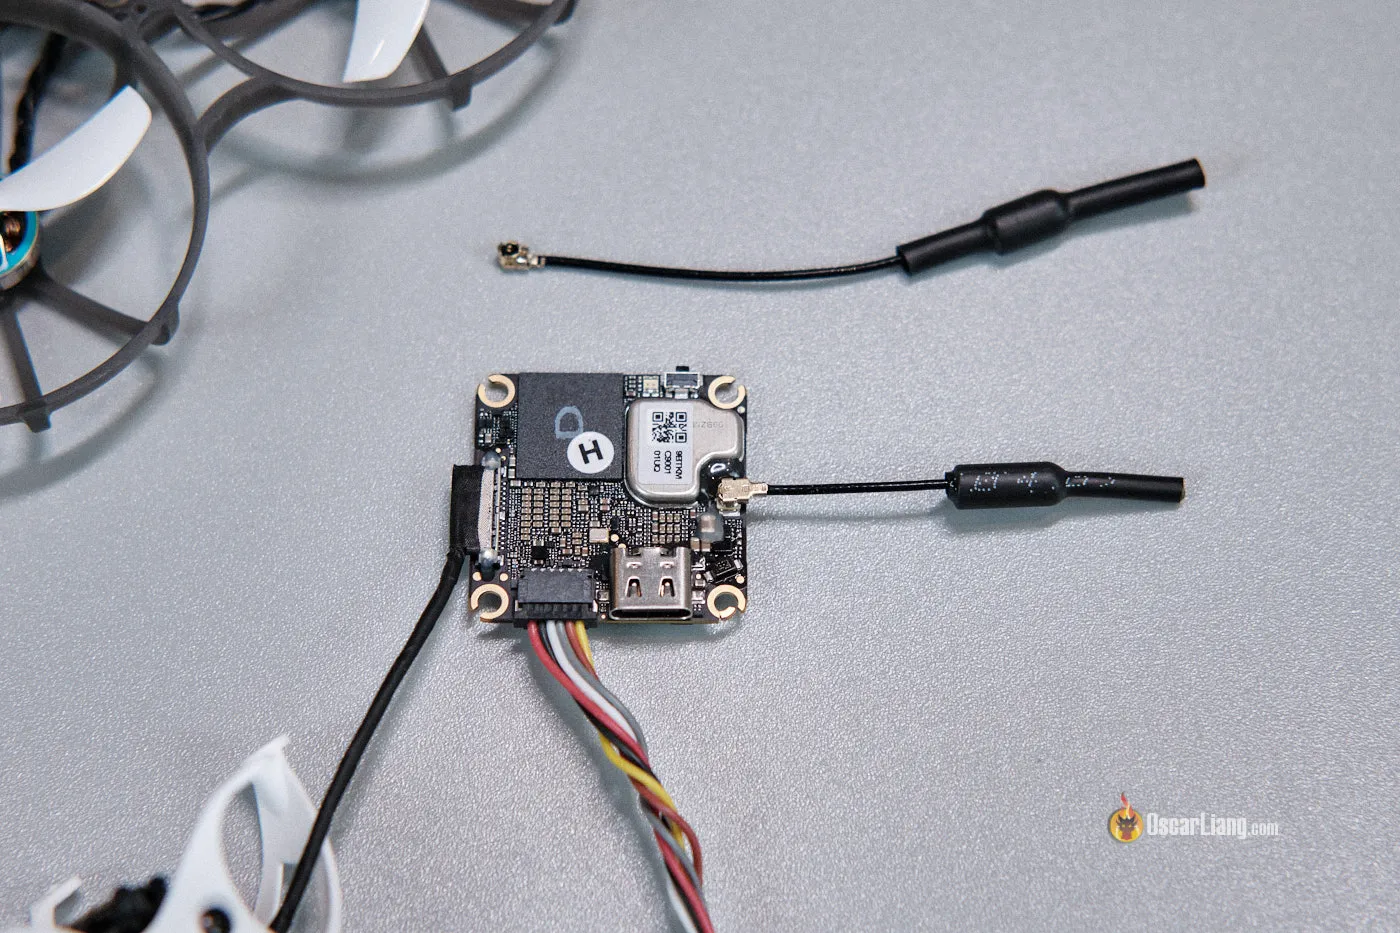
Aside from the brand new cover and digital camera comfortable mounting design, the Meteor75 Professional has additionally obtained an improve to the flight controller—the Matrix 3-in-1 FC.
It’s designed particularly for the DJI O4 Air Unit (Lite), that includes a connector that plugs instantly into the O4 Air Unit with out soldering. It’s a 1S board, and as we all know, the O4 doesn’t carry out nicely with voltages under 3.7V. Subsequently, BetaFPV has added a 5V BEC to this FC, offering sufficient energy for the O4 even at most RF energy.
There’s 16MB of reminiscence for the blackbox and a complete of 4 UARTs obtainable, though solely 2 are used.
Similar to any BetaFPV tiny whoop, to maintain the load down, there’s no USB port on the FC; to entry Betaflight, you’ll want to make use of BetaFPV’s devoted dongle.

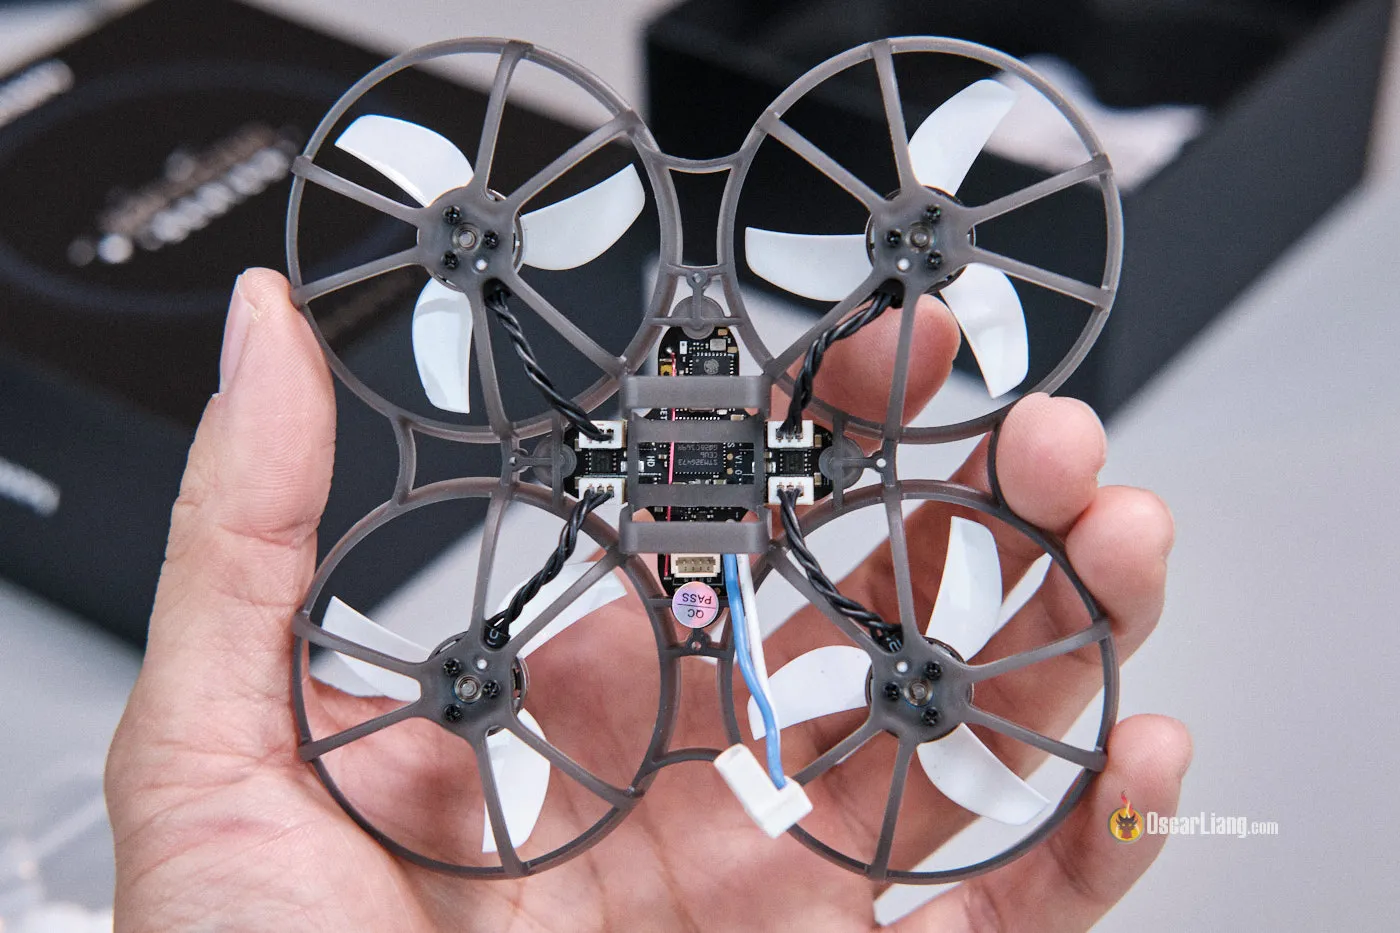
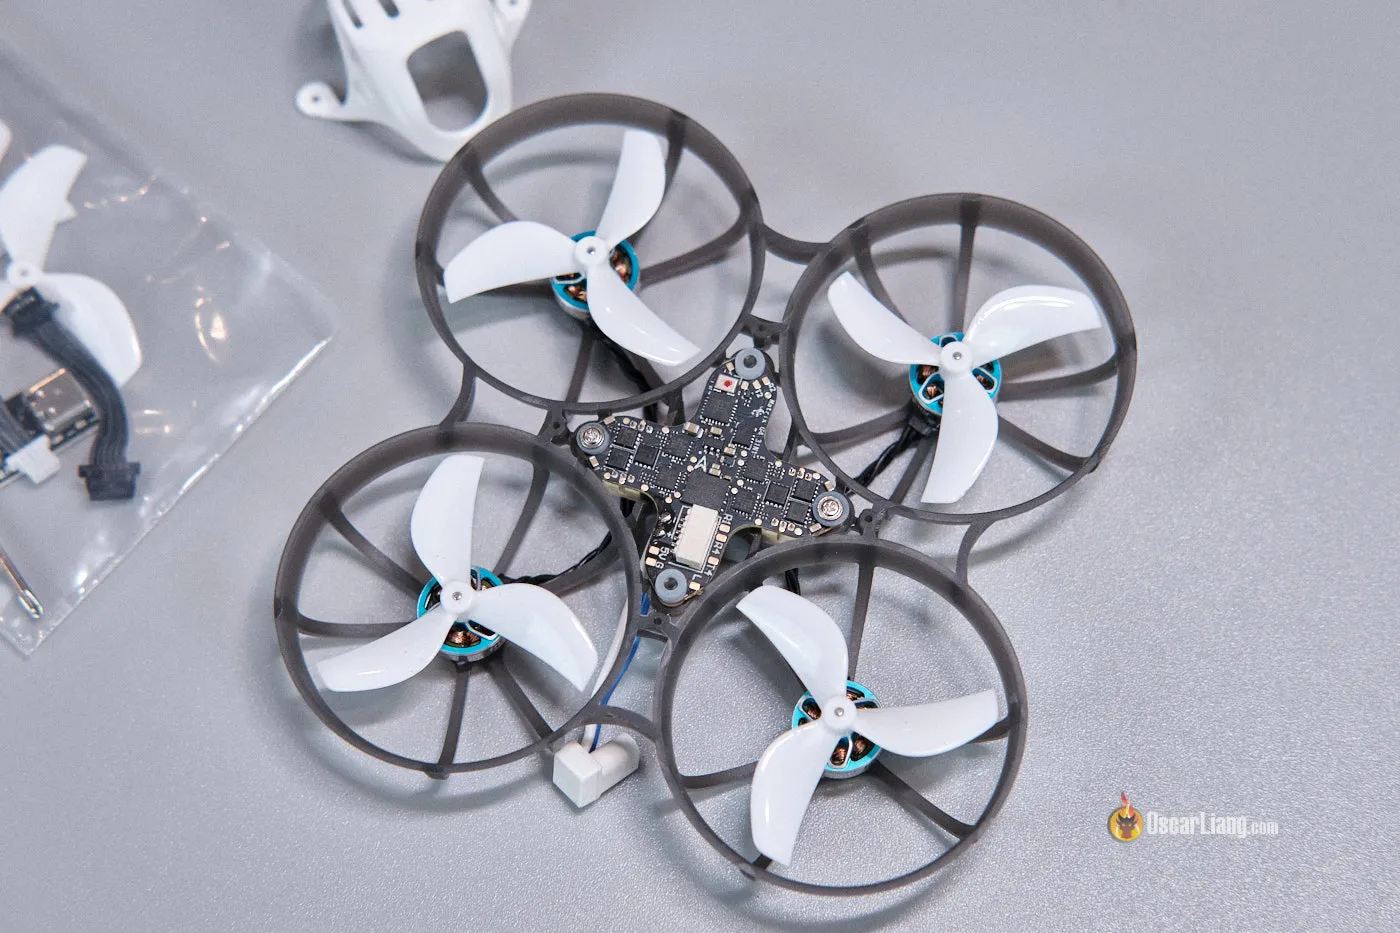
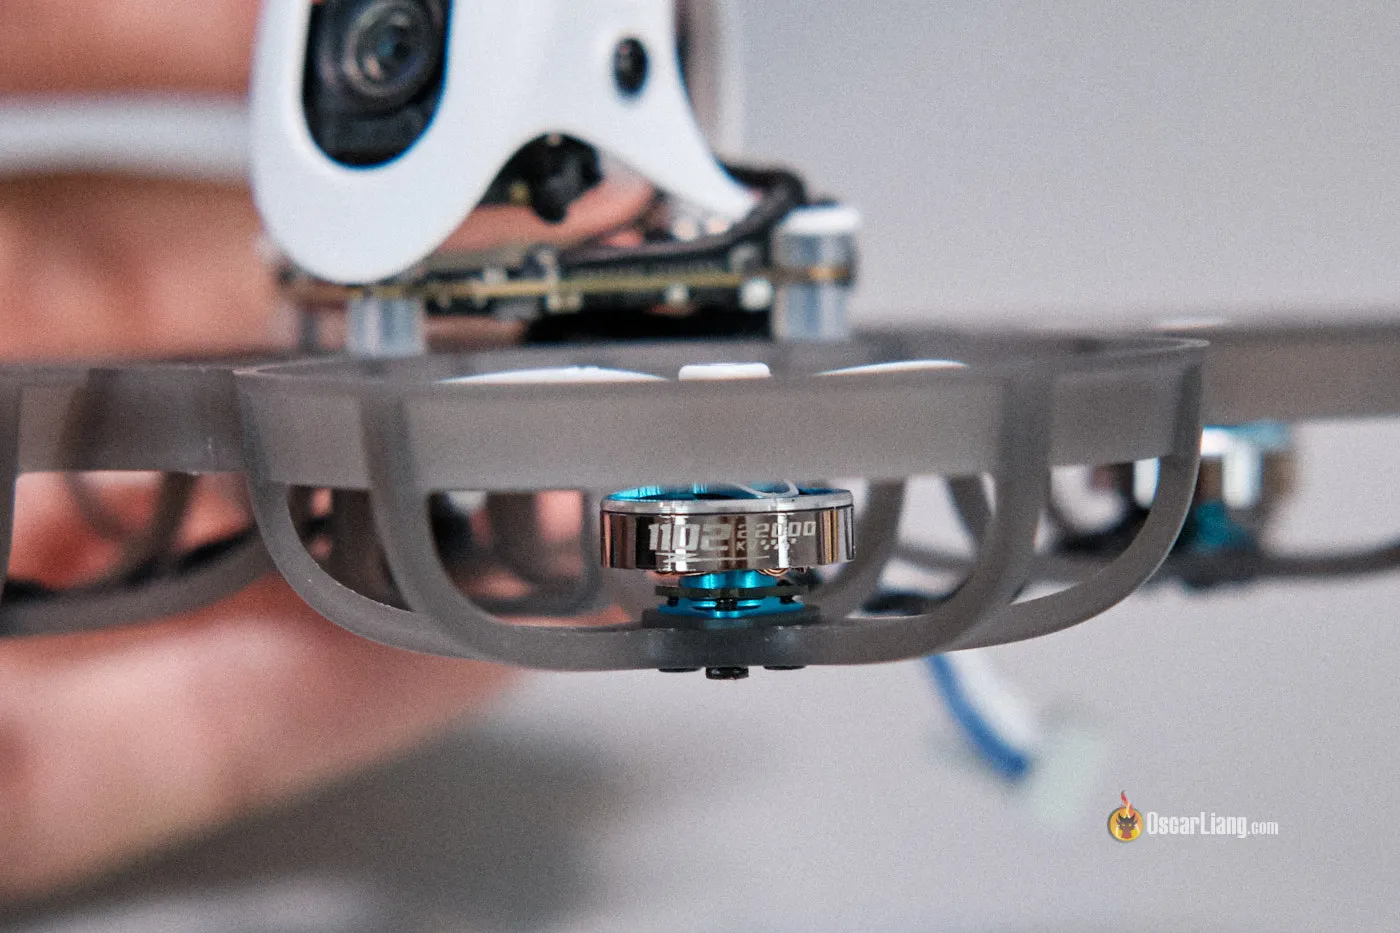
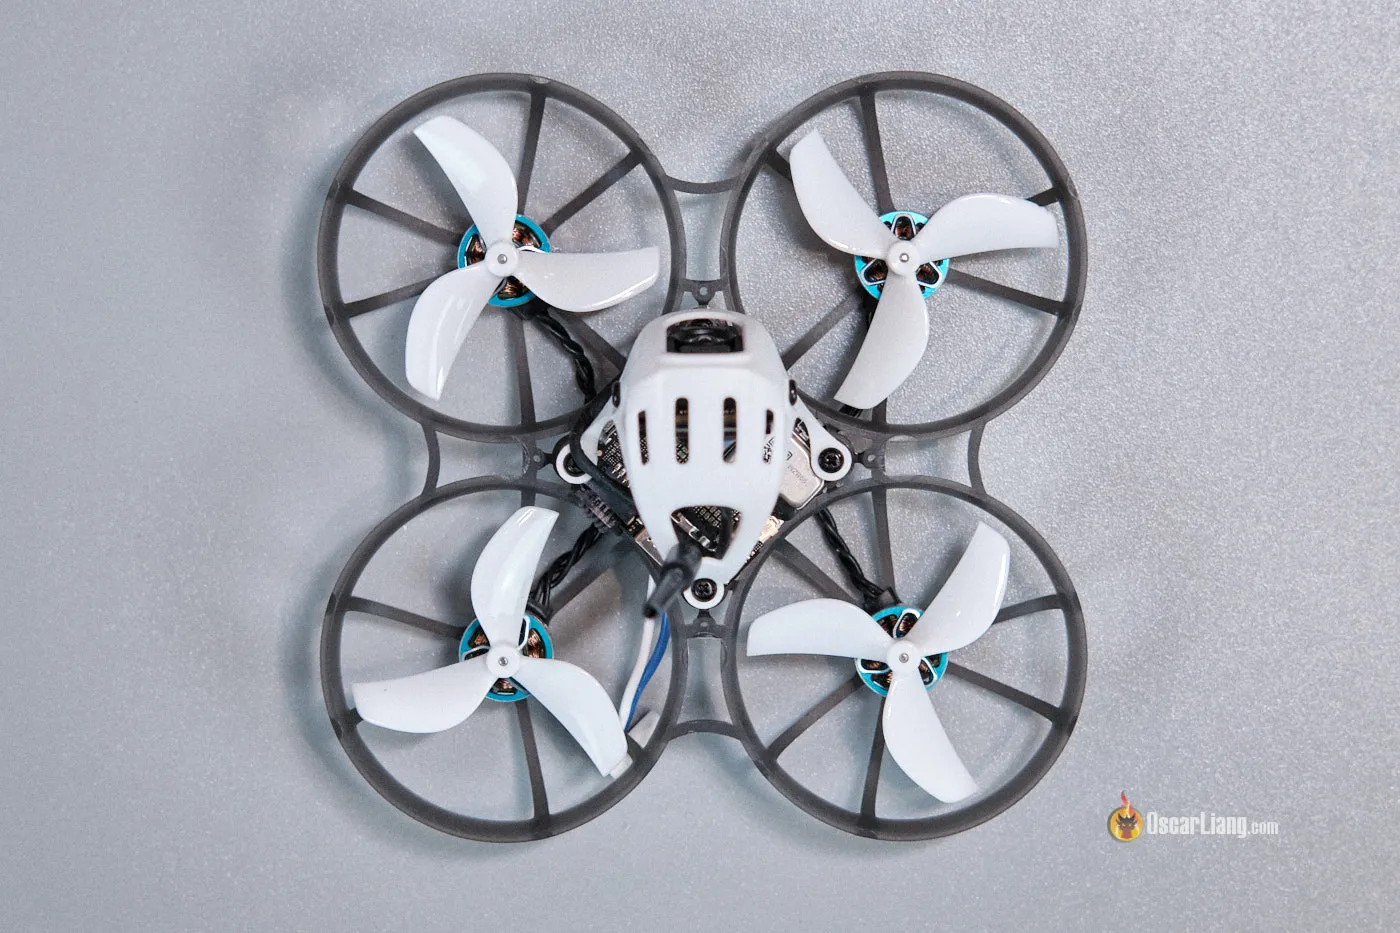
Motors and Propellers
The Meteor75 Professional O4 just isn’t strictly a 75mm whoop—the diagonal motor distance is definitely over 80mm, so it ought to actually be referred to as the Meteor80. The rise in measurement accommodates bigger propellers—these are 45mm tri-blade props, not the 40mm props utilized in typical 75mm tiny whoops. As a result of further weight of the DJI O4, bigger propellers make sense, as they supply extra energy and effectivity. To spin these bigger props, BetaFPV makes use of bigger 1102 22000KV motors.
Sturdiness
There have been blended experiences from the neighborhood relating to sturdiness, primarily as a result of DJI O4 Air Unit, not the Meteor75 itself. Some customers have skilled malfunctions or harm to the board after a number of arduous crashes. Whereas I haven’t encountered any main points but—since I’ve been flying gently as a result of that is the one DJI O4 I’ve—I’d warning towards treating the O4 whoop the identical manner you’ll an affordable analog whoop.
Putting in DJI O4 Air Unit
Putting in your individual O4 may sound difficult, particularly given the fiddly elements concerned within the comfortable mounting. Nevertheless, it turned out to be fairly easy—so long as you’ve regular arms. It solely took me about half-hour to finish the construct.
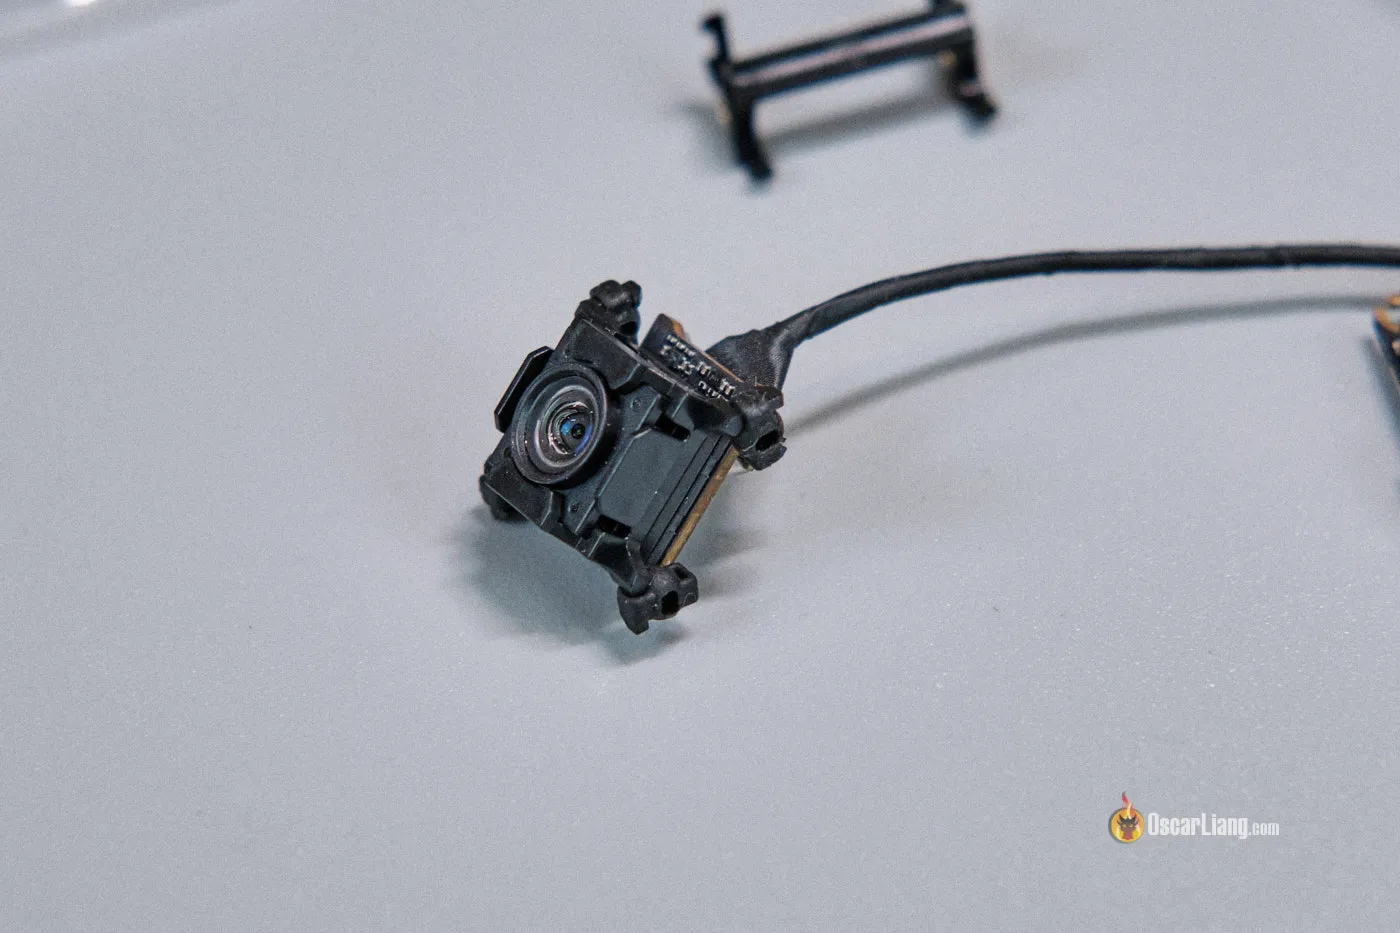
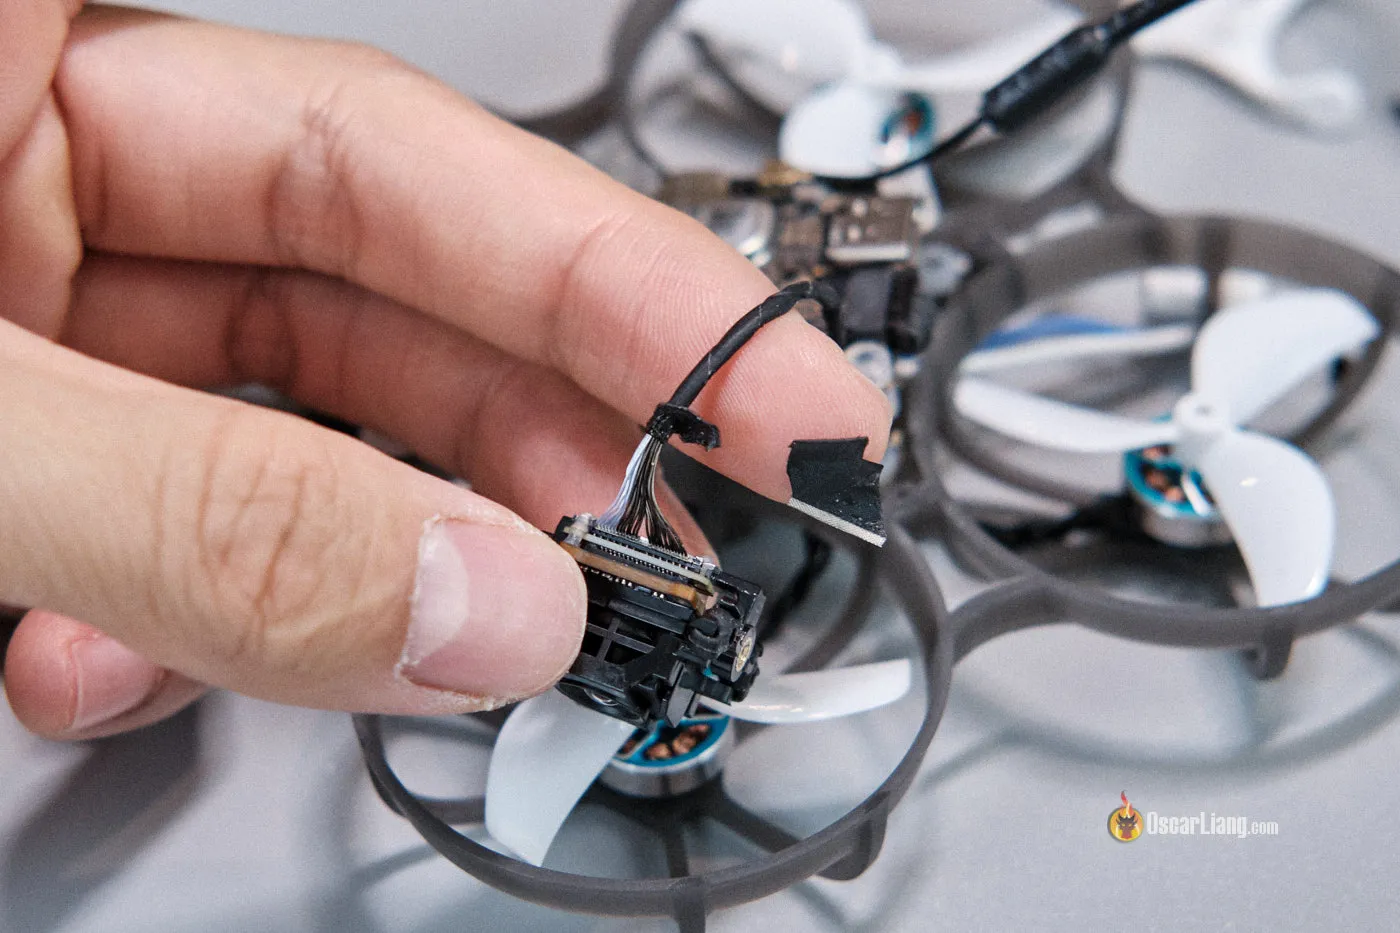
Professional Tip: The O4 digital camera cable is kind of stiff as a result of protecting tape used, and it will probably switch vibration from the body/cover to the digital camera. To resolve this, I eliminated the tape close to the digital camera connector, which exposes the versatile a part of the wires. Be extraordinarily cautious in case you determine to do that, and don’t harm the wires within the course of.

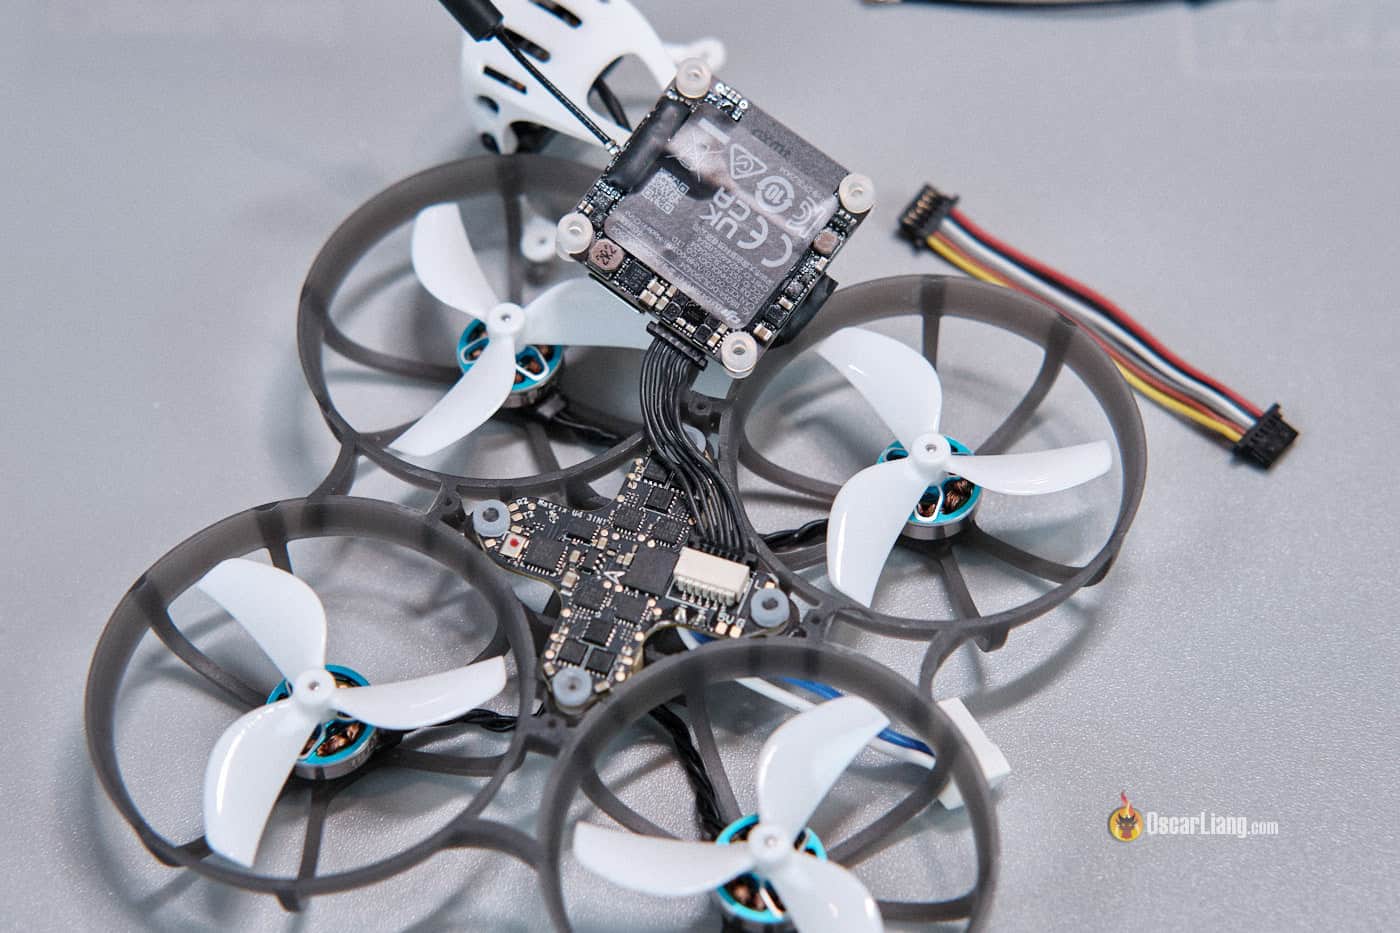


Nevertheless, I do have issues in regards to the threaded tubes on the body that holds the FC in place. They solely prolong to the highest of the FC silicone grommets (aka gummies) and don’t really present any help for the O4 Air Unit when it’s mounted on high of the FC. The O4 gummies are pressed towards the FC gummies utilizing longer screws. Whereas this methodology type of works, it has its flaws. If the screws usually are not tight sufficient, the O4 might need wiggle room—particularly throughout flips and rolls. Alternatively, if the screws are too tight, they’ll press too arduous on the FC gummies, which isn’t very best for comfortable mounting. The body is injection-molded, and it’s costly to create a brand new mould only for a small design change, so I perceive why BetaFPV opted for this workaround.
Battery and Flight Time
BetaFPV recommends their LAVA 1S 550mAh LiHV batteries. You may as well use the lighter, smaller 450mAh batteries, however flight time is significantly shorter. I get round 5 minutes of flight time when flying indoors with the 550mAh battery, and round 3.5 minutes with the 450mAh.
Get some 1S 550mah batteries right here:

Flight Efficiency
I’ve seen a number of movies of the Meteor75 Professional with O4 from when it was first launched, they usually all appear to have fairly unhealthy jello. I’m not certain if BetaFPV has made enhancements to the design as a result of I haven’t seen any jello or vibration throughout my indoor testing (I obtained mine simply final week). Additionally, the way in which I put in the O4 might need contributed to the improved picture high quality.
The inventory tune labored fairly nicely. I made a number of adjustments to the settings to go well with my flying type, however total, the quad was fairly responsive and secure out of the field.
I haven’t flown this quad outdoor that a lot as a result of it’s been raining and appears like it’s going to proceed for a number of extra days (and it’s near 0°C). Nevertheless, this whoop is designed primarily for indoor flying. In my expertise, a tiny whoop at this light-weight simply will get pushed round by the breeze except you’ve completely windless circumstances. For out of doors flying, bigger and extra highly effective fashions are higher suited. If you would like a whoop to fly predominantly outdoors, I believe the BetaFPV Femto is perhaps a more sensible choice, which I’m nonetheless testing and can publish a assessment within the subsequent few days evaluating it to the Meteor75 Professional.
Methods to Setup
The FC goal is BETAFPVG473, and it got here loaded with Betaflight 4.5.1. The unique CLI diff could be discovered right here.
- Bind ELRS Receiver: For some motive, the ELRS receiver received’t go into WiFi mode after ready a few minutes, so I needed to bind the receiver utilizing one other methodology. I merely clicked the “bind receiver” possibility within the receiver tab in Betaflight. Then, on my radio, I went into the ExpressLRS Lua script and chosen the Bind possibility. And binding was carried out.
- Pair O4 to Goggles 3:
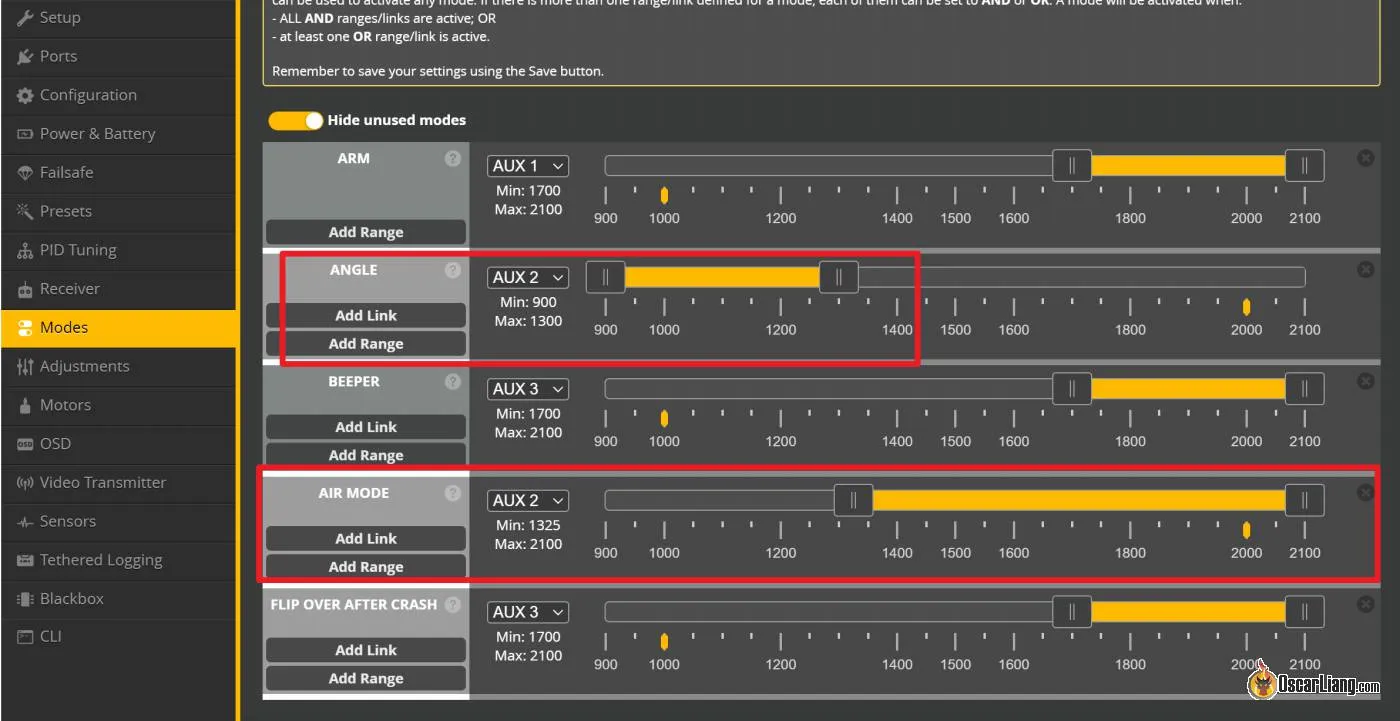
- Modes tab in Betaflight Configurator: Configure the switches for arming, angle mode, and turtle mode.
- Energy tab in Betaflight Configurator: Set the minimal cell voltage to three.2V and the warning to three.4V (land earlier than 3.2V).
- PID Tuning tab in Betaflight Configurator:
- Dynamic Idle: Set it to 75 (it was set to 30 for some motive, which is simply too low; 30 is for five″ quads).
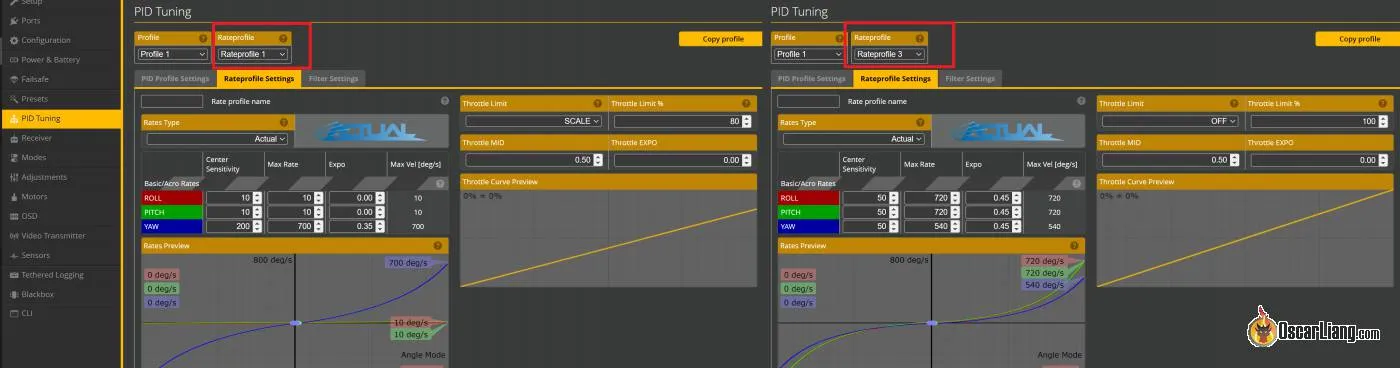
- Charges: disable Throttle expo by setting it to 0
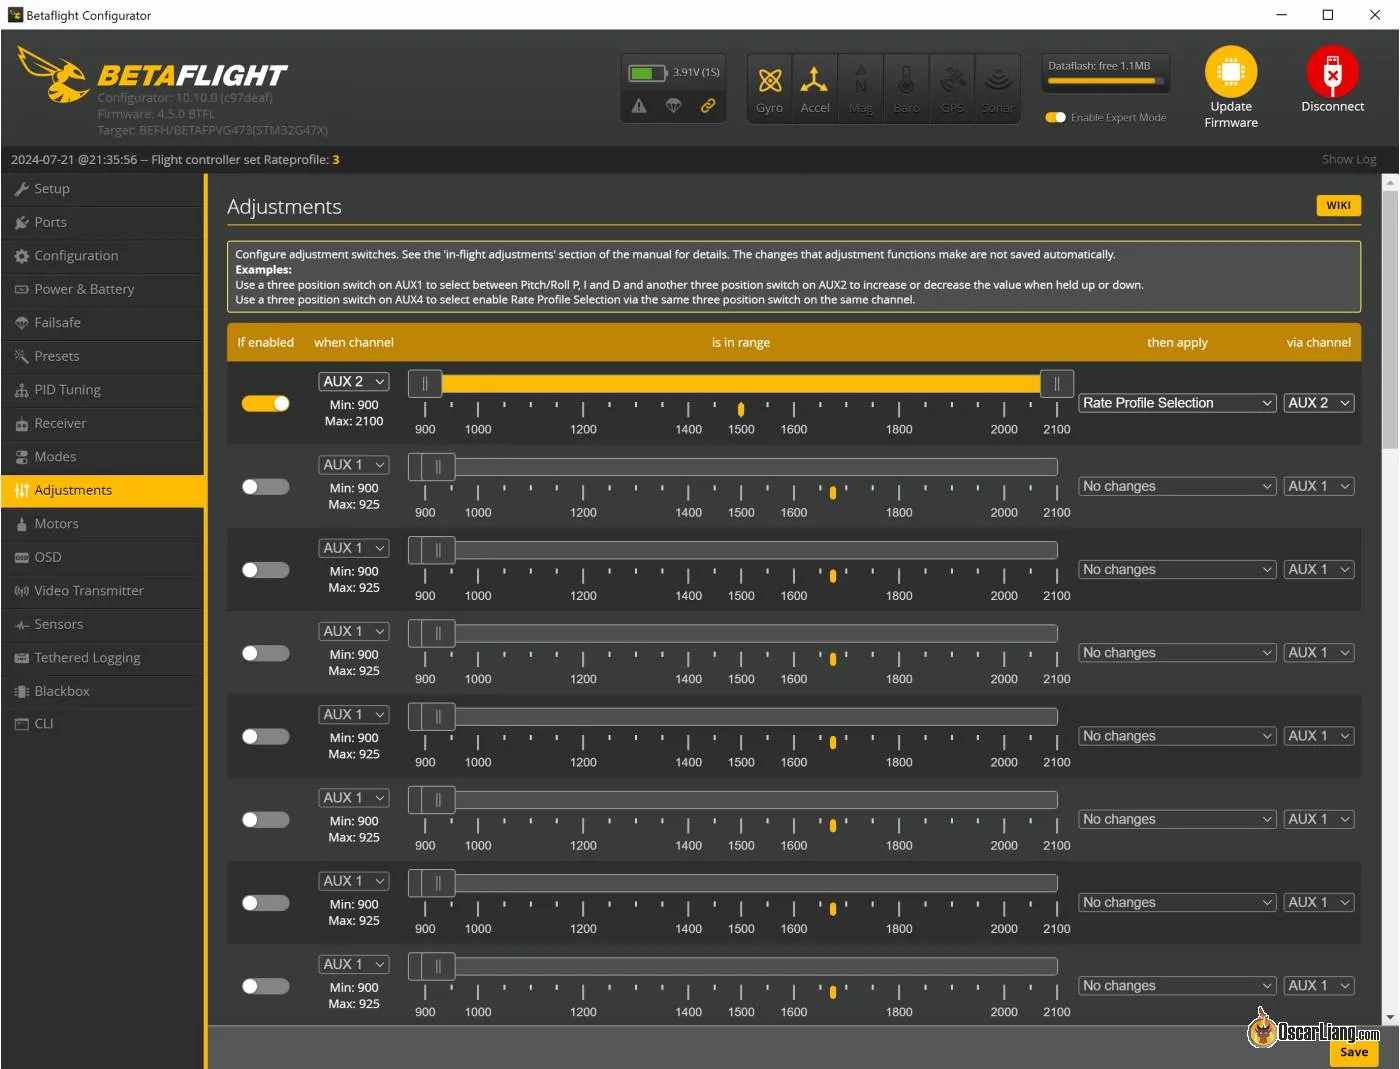
Listed here are my charges and easy methods to arrange charge choice based mostly in your flight mode.
Specs
- Wheelbase: 80.8mm
- Motors: 1102 22000KV
- Body: Meteor75 Professional
- Propellers: Gemfan 45mm 3-Blade Propellers
- Digital camera/VTX: DJI O4 Air Unit (Lite)
- Cover: Cover for O4 Air Unit
- FC: Matrix 1S 3IN1 HD FC
- Receiver: ELRS 2.4G
- Really helpful Battery: LAVA 1S 550mAh Battery
- Weight: 37.2g
Remaining Ideas
In relation to flying round the home, my total impression of the BetaFPV Meteor75 Professional O4 is optimistic, although it does include some quirks:
Professionals:
- Compact and revolutionary design—from the cover and comfortable mounting to the flight controller.
- Good indoor efficiency with potential for strong out of doors flights in calm circumstances.
- Though my assessment unit works high quality with stabilization, I’ve heard blended outcomes from different folks, particularly outdoor. BetaFPV might need fastened this subject in later batches, just like the one I reviewed. We’d like extra confirmations from different pilots.
Cons:
- DJI O4 sturdiness issues have been reported by some customers, notably with frequent crashes.
- Nice picture high quality, however flight efficiency is definitely not similar to lighter, analog tiny whoops.
The place to Purchase the Meteor75 Professional O4 Whoop
For fanatics trying to discover the world of FPV in HD, the Meteor75 Professional O4 is an attention-grabbing possibility with its mix of recent options and compact design. If you happen to’re keen to spend a little bit time fine-tuning your setup, it might grow to be a dependable device in your FPV arsenal.

